NgRx/Store Example
December 14, 2021
This page will walk through NgRx Store example.
1. NgRx Store manages global state across an entire Angular application.
2. NgRx Store uses RxJS to manage the global state.
3. The concept of NgRx Store for Angular is inspired by Redux.
4. Store helps to write performant, consistent applications on top of Angular.
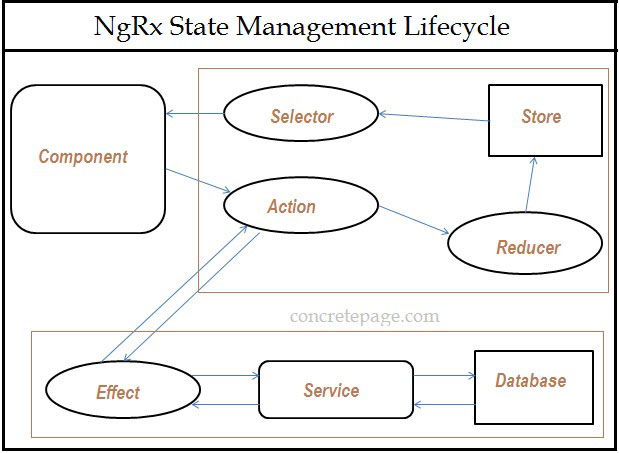
5. To manage the state lifecycle, NgRx uses Store, Action, Reducer, Selector and Effect.
6. Find the diagram for NgRx global state management lifecycle.

Reducer : A function that handles the state changes by accepting current state and latest action to compute a new state.
Selector : A function used to select, derive and compose pieces of state.
Store : Store is an observable of state and an observer of actions. State is accessed with the Store.
Effect : Effects are side effect model for Store. Effects are long-running services that listen to an observable of actions dispatched from the Store.
Now find the complete example step-by-step.
Contents
- 1. Technologies Used
- 2. Install Angular and NgRx/Store
- 3. Demo Application Project Structure
- 4. Create State
- 5. Create Action
- 6. Using createFeatureSelector() and createSelector()
- 7. Create Reducer
- 8. Using ActionReducerMap with StoreModule
- 9. Using Store.select() and Store.dispatch()
- 10. Run Application
- 11. References
- 12. Download Source Code
1. Technologies Used
Find the technologies being used in our example.1. Angular 13.0.0
2. NgRx 13.0.0
3. Node.js 12.20.0
4. NPM 8.2.0
2. Install Angular and NgRx/Store
Find the steps to install Angular and NgRx/Store.1. Make sure that Node and NPM are installed already.
2. Now run below command using command prompt.
npm install -g @angular/cli
3. To generate a new project, for example 'myapp', run the below command.
ng new myapp
@ngrx/store. Go to the directory myapp using command prompt and run the below command.
npm install @ngrx/store --save
3. Demo Application Project Structure
Find the project structure of our demo application.my-app | |--src | | | |--app | | | | | |--actions | | | | | | | |--article.actions.ts | | | | | |--components | | | | | | | |--article.component.html | | | |--article.component.ts | | | | | |--models | | | | | | | |--article.ts | | | | | |--reducers | | | | | | | |--app.states.ts | | | |--article.reducer.ts | | | |--reducers.ts | | | | | |--app.component.ts | | |--app.module.ts | | | |--index.html | |--styles.css
4. Create State
State is a single immutable data structure. We create State structure as following.app.states.ts
export interface AppState {
	articleState: ArticleState;
}
export interface ArticleState {
	articles: Article[];
}
5. Create Action
NgRxAction describes state changes. To create an Action, NgRx provides createAction function that returns a function that when called returns an object in the shape of the Action interface.
article.actions.ts
import { createAction, props } from '@ngrx/store';
import { Article } from '../models/article';

export const JavaArticlesAction = createAction('[ Article ] Java');
export const AngularArticlesAction = createAction('[ Article ] Angular');
export const FavoriteArticlesAction =
        createAction('[ Article ] Favorite_Articles', props<{ payload: Article[] }>());
6. Using createFeatureSelector() and createSelector()
ThecreateFeatureSelector() is used to create a feature selector for any specific state.
export const getArticleState = createFeatureSelector<ArticleState>('articleState');
createSelector() is used to create selector using feature selector.
export const getArticles = createSelector(
    getArticleState,
    (state: ArticleState) => state.articles
);
7. Create Reducer
Reducer describes how the application state changes for any action. To create a reducer, NgRx providescreateReducer function.
article.reducer.ts
import { createFeatureSelector, createSelector, createReducer, on, Action } from '@ngrx/store';
import * as fromActions from '../actions/article.actions';
import { JAVA_ARTICLES, ANGULAR_ARTICLES } from '../models/article';
import { ArticleState } from './app.states';

export const initialState: ArticleState = { articles: []};

const _articleReducer = createReducer(
  initialState,
  on(fromActions.JavaArticlesAction, (state) => { return {articles: JAVA_ARTICLES};}),
  on(fromActions.AngularArticlesAction, (state) => { return {articles: ANGULAR_ARTICLES};}),
  on(fromActions.FavoriteArticlesAction, (state, {payload}) => {return {articles: payload};})
);

export function articleReducer(state: any, action: Action) {
  return _articleReducer(state, action);
}

export const getArticleState = createFeatureSelector<ArticleState>('articleState');

export const getArticles = createSelector(
    getArticleState,
    (state: ArticleState) => state.articles
);
Article interface and array of articles used in our demo.
article.ts
export interface Article {
    id: number;
    title: string;
    category: string;
}

export const JAVA_ARTICLES: Article[] = [
    {id: 1, title: 'Java Article 1', category: 'Java'},
    {id: 2, title: 'Java Article 2', category: 'Java'},
]
export const ANGULAR_ARTICLES: Article[] = [
    {id: 1, title: 'Angular Article 1', category: 'Angular'},
    {id: 2, title: 'Angular Article 2', category: 'Angular'},
]
export const FAVORITE_ARTICLES: Article[] = [
    {id: 1, title: 'Java Article 1', category: 'Java'},
    {id: 2, title: 'Angular Article 2', category: 'Angular'}
]
8. Using ActionReducerMap with StoreModule
TheActionReducerMap registers the reducers. We need to create a constant of ActionReducerMap where we configure our reducers. Then that constant is configured in application module using StoreModule. Find the use of ActionReducerMap in our demo.
reducers.ts
import { ActionReducerMap } from '@ngrx/store';
import { AppState } from './app.states';
import { articleReducer } from './article.reducer';

export const reducers: ActionReducerMap<AppState> = {
  articleState: articleReducer
};
StoreModule is a module in @ngrx/store API that is used to configure reducers in application module.
app.module.ts
import { NgModule } from '@angular/core';
import { BrowserModule } from '@angular/platform-browser';
import { StoreModule } from '@ngrx/store';
import { AppComponent } from './app.component';
import { ArticleComponent } from './components/article.component';
import { reducers } from './reducers/reducers';

@NgModule({
      imports: [
            BrowserModule,
            StoreModule.forRoot(reducers)
      ],
      declarations: [
            AppComponent,
            ArticleComponent
      ],
      providers: [

      ],
      bootstrap: [
            AppComponent
      ]
})
export class AppModule { }
app.component.ts
import { Component } from '@angular/core';

@Component({
   selector: 'app-root',
   template: `
		<app-article></app-article>
     `
})
export class AppComponent {
}
9. Using Store.select() and Store.dispatch()
TheStore.select() selects a selector to fetch data from Store and the Store.dispatch() dispatches the Action to reducer to change the State. Find the code to use them.
article.component.ts
import { Store } from '@ngrx/store';
import { Component } from '@angular/core';
import { Observable } from 'rxjs';
import * as articleReducer from '../reducers/article.reducer';
import * as fromActions from '../actions/article.actions';
import { ArticleState } from '../reducers/app.states';
import { Article, FAVORITE_ARTICLES } from '../models/article';

@Component({
	selector: 'app-article',
	templateUrl: 'article.component.html'
})
export class ArticleComponent {
	articles$: Observable<Article[]>;

	constructor(private store: Store<ArticleState>) {
		this.articles$ = store.select(articleReducer.getArticles);
	}
	showJavaArticles() {
		this.store.dispatch(fromActions.JavaArticlesAction());
	}
	showAngularArticles() {
		this.store.dispatch(fromActions.AngularArticlesAction());
	}
	showFavoriteArticles() {
		this.store.dispatch(fromActions.FavoriteArticlesAction({ payload: FAVORITE_ARTICLES }));
	}
}
article.component.html
<button (click)="showJavaArticles()">Java Articles</button>
<button (click)="showAngularArticles()">Angular Articles</button>
<button (click)="showFavoriteArticles()">Favorite Articles</button>
<ul>
   <li *ngFor="let article of articles$ | async">
        {{article.id}} - {{article.title}} - {{article.category}}
   </li>
</ul>
10. Run Application
To run the application, find the steps.1. Download source code using download link given below on this page.
2. Use downloaded src in your Angular CLI application. To install Angular CLI, find the link.
3. Install NgRx/Store using NPM command.
4. Run ng serve using command prompt.
5. Access the URL http://localhost:4200
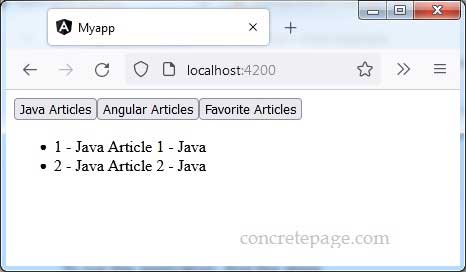
Find the print screen of output.

11. References
@NgRx/storeGetting started with Angular


