Angular Custom Event Binding + EventEmitter Example
February 10, 2024
On this page we will provide Angular custom event binding and EventEmitter example. Angular framework provides event binding using in-built event as well as custom event. Event binding is achieved using parenthesis () and on- keyword. When using parenthesis (), we need to write our event name inside it. When using on- keyword, on- is added as prefix with event name. Custom events are the EventEmitter instances. To create a custom event we need to create an instance of EventEmitter annotated by @Output(). Then this instance calls emit() method to emit payload which can be received by event object $event. In our example we are taking a parent child component communication example. In this example to send data from parent to child component, property binding will be used and to get data in parent component from child component, custom event binding will be used. Now we will discuss complete example step-by-step.
Contents
- 1. Steps for Custom Event Binding & Component Property Binding with Diagram
- 2. EventEmitter
- 3. Create Custom Event
- 4. Create a Sample Class
- 5. Create Child Component with EventEmitter
- 6. Create Parent Component with Custom Event Binding
- 7. Create Module
- 8. Run Application
- 9. References
- 10. Download Source Code
1. Steps for Custom Event Binding & Component Property Binding with Diagram
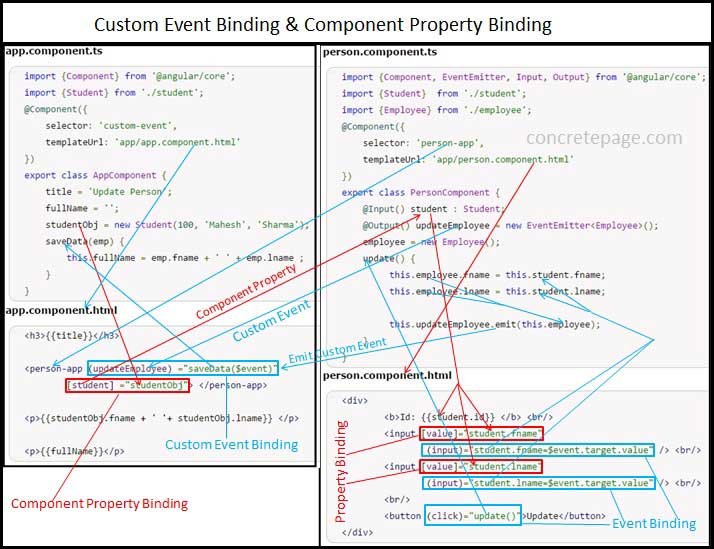
Find the diagram for custom event binding and component property binding. Arrow in light blue color is showing flow of custom event binding and arrow in red color is showing flow of component property binding.
person.component.ts to app.component.ts and for component property binding red arrow direction is from app.component.ts to person.component.ts. Find the steps involved in custom event binding and component property binding.
1. In the above diagram we are performing parent child communication using custom event binding and component property binding.
app.component.ts is behaving as parent and person.component.ts is behaving as child. The child selector person-app will be used to create a custom element in parent component. Component property binding and custom event binding will take place in person-app element.
2. In
AppComponent we are creating an object of Student class as studentObj. In PersonComponent we are creating an input variable as student of Student class type. @Input decorator is used to mark a variable as input variable.
3. In
app.component.html we are performing component property binding between the objects studentObj of AppComponent and student of PersonComponent in person-app element.
4. In
person.component.html the object student is providing its value to text box using element property binding.
5. When user changes values in text box then on
input event the values of student object is getting changed. Here input event binding is taking place. $event.target.value returns current input value by user.
6. In component property binding if the object sent to child is being updated then the reference object in parent will also get updated because they are pointing to the same object. So when
student object of PersonComponent is getting updated then at the same time studentObj of AppComponent will also get updated. It means student and studentObj both objects are always in sync. In property binding it happens only in case of object of a class and not in case of primitive data type such string, number.
7. On click of update button,
update() method of PersonComponent will be called. Here click event binding is taking place.
8. The object
updateEmployee of angular EventEmitter class works as custom event binding name. @Output decorator is used to mark a variable as output variable. EventEmitter has emit() method that emits the payload.
9. The execution of code
updateEmployee.emit() will invoke custom event binding and will send employee object to custom event binding. Custom event is taking place in app.component.html . When updateEmployee event fires then it calls saveData() method of AppComponent. $event contains the payload sent by emit() method that is employee object.
10. In the output we are printing
studentObj and fullName of AppComponent using interpolation in app.component.html. Here studentObj and student object will keep same values even after student object changes by user update in text box.
2. EventEmitter
EventEmitter is a class in angular framework. It has emit() method that emits custom events. We can use EventEmitter in custom event binding. To achieve it first we need to import it in our component file as given below.
import {Component, EventEmitter, Input, Output} from '@angular/core';
@Output decorator as follows.
@Output() updateEmployee = new EventEmitter<Employee>();
Employee is our TypeScript class. @Output() defines an output variable. updateEmployee will be a custom event name. Using emit() method of EventEmitter class we emits Employee object to parent component in custom event binding as follows.
this.updateEmployee.emit(this.employee);
emit() method can be accessed using event object $event.
3. Create Custom Event
Suppose we want to create a custom event named asupdateEmployee. So first of all we need to instantiate an instance of EventEmitter in the variable updateEmployee as below.
@Output() updateEmployee = new EventEmitter<Employee>();
@Output that declares it as output variable. Custom event binding is used in parent child component communication. Here we will send data from child component to parent component. To send data we need to use emit() method as below.
this.updateEmployee.emit(this.employee);
updateEmployee as custom event. Event binding can be done using parenthesis () or on- keyword. Find event binding using ().
<person-app (updateEmployee) ="saveData($event)"
	[student] ="studentObj"> </person-app>
updateEmployee event binding.
<person-app on-updateEmployee ="saveData($event)"
	[student] ="studentObj"> </person-app>
[student] ="studentObj" is working as a property binding to send data from parent component to child component.
4. Create a Sample Class
For our demo we are creating two sample classes using TypeScript as follows.student.ts
export class Student {
   constructor(public id: number, public fname: string, public lname: string) {
   }
}
export class Employee {
   public fname: string;
   public lname: string;
   constructor() {
   }
}
Student class in our parent component and will send it to child component using component property binding. Then we will set data to Employee class instance in child component and will send it to parent component using custom event binding.
5. Create Child Component with EventEmitter
Find child component file used in our example.person.component.ts
import {Component, EventEmitter, Input, Output} from '@angular/core';
import {Student}  from './student';
import {Employee} from './employee';
@Component({
    selector: 'person-app',
    templateUrl: './person.component.html'
})
export class PersonComponent {
    @Input() student : Student;
    @Output() updateEmployee = new EventEmitter<Employee>();
    employee = new Employee();
    update() {
	 this.employee.fname = this.student.fname;
	 this.employee.lname = this.student.lname;

	 this.updateEmployee.emit(this.employee);
    }
}
@Input(): Defines input variable in component communication. It is used to communicate from parent to child component using property binding.
@Output(): Defines output variable in component communication. It is used to communicate from child to parent component using custom event binding.
In our component file we have created a method
update() that will call emit() method. update() method is being used in our HTML template as given below.
person.component.html
<div>
	<b>Id: {{student.id}} </b> <br/>
	<input [value]="student.fname"
		(input)="student.fname=$event.target.value" /> <br/>
	<input [value]="student.lname"
		(input)="student.lname=$event.target.value" /> <br/>
	<br/>
	<button (click)="update()">Update</button>
</div>
input event binding to fetch current value entered by user and assigning it back to student instance. To access the current values entered by user we use $event.target.value. On the click of button, update() method will be called that is using click event binding.
6. Create Parent Component with Custom Event Binding
Now we will create parent component that will use custom event binding. Find the component.app.component.ts
import {Component} from '@angular/core';
import {Student} from './student';
@Component({
    selector: 'app-root',
    templateUrl: './app.component.html'
})
export class AppComponent {
    title = 'Update Person';
    fullName = '';
    studentObj = new Student(100, 'Mahesh', 'Sharma');
    saveData(emp) {
	this.fullName = emp.fname + ' ' + emp.lname ;
    }
}
Student class. Method saveData() will be called in custom event binding. Find the HTML template used in our parent component.
app.component.html
<h3>{{title}}</h3>

<person-app (updateEmployee) ="saveData($event)"
	[student] ="studentObj"> </person-app>

<p>{{studentObj.fname + ' '+ studentObj.lname}} </p>

<p>{{fullName}}</p>
updateEmployee declared in child component using EventEmitter will work as an event that is custom event. The event will be executed when the below line of code will execute.
this.updateEmployee.emit(this.employee);
student in our HTML template binds the value to input variable in child component.
7. Create Module
app.module.ts
import {NgModule}        from '@angular/core';
import {BrowserModule}   from '@angular/platform-browser';
import {AppComponent}    from './app.component';
import {PersonComponent} from './person.component';
@NgModule({
  imports:      [BrowserModule],
  declarations: [AppComponent, PersonComponent],
  bootstrap:    [AppComponent]
})
export class AppModule { }
8. Run Application
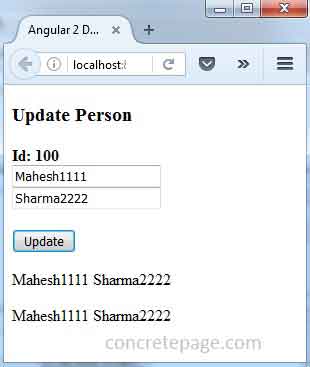
Find the print-screen of the output.
When we change first name and last name in text box then by
input event the student object gets changed and because of component property binding it is the same object reference of studentObj that will also get changed.
On click of update button
update method of child component is called and hence emit() method will execute that will generate updateEmployee event in parent component and that will call saveData() method because of custom event binding.
9. References
Angular Template syntaxAngular EventEmitter


