Angular Standalone Components Example
May 26, 2023
On this page we will learn to create standalone components in Angular application.
1. Standalone components are those components that enable us to build applications without using NgModules. Standalone components specify their dependencies directly and can run without
NgModule.
2. To mark a component, directive and pipe as standalone, just use
standalone: true within their respective decorators.
3. The standalone APIs are introduced in Angular 14 in developer preview mode. In Angular 15, these are marked as stable API.
4. The advantages of writing standalone components are simplified and reduced coding and need not to use
NgModule.
5. The standalone component resolves dependencies using
imports attribute. A standalone component can import modules, standalone components, standalone directives and standalone pipes.
6. Standalone component is bootstrapped using
bootstrapApplication from src/main.ts file.
7. Find a simple standalone component.
src/main.ts
import { bootstrapApplication } from '@angular/platform-browser';
import { Component } from "@angular/core";

@Component({
    selector: 'app-root',
    standalone: true,
    template: `
        {{msg}}
    `
})
export class MainAppComponent {
    msg = "Hello World!";
}

bootstrapApplication(MainAppComponent);
------
<body>
  <app-root></app-root>
</body>
------
1. Project Structure
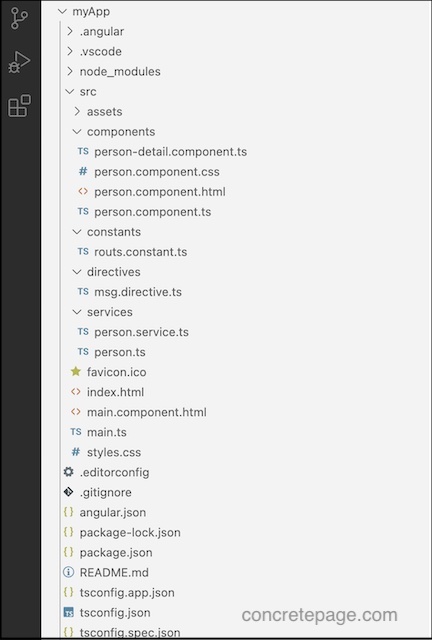
Now we will create a demo standalone Angular application with parent-child components, directives and router. Find the project structure of our demo application.
2. Creating Standalone Component
Standalone components are created usingstandalone: true within @Component decorator. They import modules, standalone components, standalone directives and standalone pipes to resolve the dependencies. Now find the components of our example.
src/main.ts
import { bootstrapApplication } from '@angular/platform-browser';
import { Component, OnInit } from "@angular/core";
import { Person } from "./services/person";
import { PersonService } from "./services/person.service";
import { PersonComponent } from "./components/person.component";
import { MsgDirective } from './directives/msg.directive';
import { RouterModule, provideRouter } from '@angular/router';
import { ROUTES } from './constants/routs.constant';

@Component({
    selector: 'app-root',
    standalone: true,
    imports: [
        RouterModule,
        PersonComponent,
        MsgDirective
    ],
    templateUrl: './main.component.html'
})
export class MainAppComponent implements OnInit {
    title = "Person List";
    persons?: Person[];
    constructor(private service: PersonService) { }
    ngOnInit() {
        this.service.getAllPersons().subscribe(data => {
            this.persons = data;
        });
    }
}

bootstrapApplication(MainAppComponent, {
    providers: [
        PersonService,
        provideRouter(ROUTES),
    ]
});
provideRouter requires RouterModule, so we need to import it using imports within @Component decorator.
2. The
imports can import modules, standalone components, standalone directives and standalone pipes. So PersonComponent and MsgDirective must be marked as standalone: true.
3. To bootstrap the application, we need to configure our standalone component using
bootstrapApplication in src/main.ts file.
4. We can configure services and routes using
bootstrapApplication. The provideRouter is used to configure routes.
5. Include selector
app-root of component in index.html as usual.
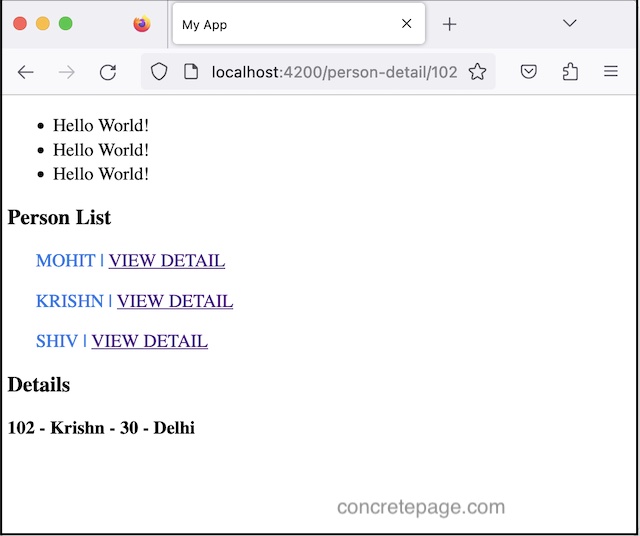
Now find the HTML code.
src/main.component.html
<ul>
  <li *msgLoop="3">
    Hello World!
  </li>
</ul>
<h3>{{title}}</h3>
<app-person [allPersons]="persons"></app-person>

<router-outlet></router-outlet>
import { Component, Input } from "@angular/core";
import { CommonModule } from "@angular/common";
import { Person } from "../services/person";
import { RouterModule } from "@angular/router";

@Component({
  selector: 'app-person',
  standalone: true,
  imports: [
    CommonModule,
    RouterModule
  ],
  templateUrl: 'person.component.html',
  styleUrls: ['person.component.css']
})
export class PersonComponent {
  @Input('allPersons') persons?: Person[];
}
CommonModule enables to use ngIf, ngFor etc.
src/components/person.component.html
<div *ngFor="let p of persons">
  <p>{{p.name}} | <a [routerLink]="['/person-detail', p.id]">View Detail</a> </p>
</div>
p {
  color: rgb(5, 124, 235);
  text-indent: 25px;
  text-transform: uppercase;
}
import { Component, OnInit } from '@angular/core';
import { ActivatedRoute, Params } from '@angular/router';
import { CommonModule } from '@angular/common';
import { switchMap } from 'rxjs/operators';
import { Person } from '../services/person';
import { PersonService } from '../services/person.service';

@Component({
    standalone: true,
    imports: [CommonModule],
    template: `
    <div *ngIf="person">
      <h3>Details</h3>
      {{person.id}} - {{person.name}} - {{person.age}} - {{person.city}}
    </div>
    `,
    styles: ['div { font-weight: bold}']
})
export class PersonDetailComponent implements OnInit {
    person?: Person;
    constructor(private route: ActivatedRoute,
        private personService: PersonService) { }
    ngOnInit() {
        this.route.params.pipe(
            switchMap((params: Params) => this.personService.getPersonById(+params['id']))
        ).subscribe(person => this.person = person);
    }
}
3. Creating Standalone Directive
Standalone directives are created usingstandalone: true within @MsgDirective decorator.
src/directives/msg.directive.ts
import { Directive, TemplateRef, ViewContainerRef, Input } from '@angular/core';

@Directive({
    selector: '[msgLoop]',
    standalone: true
})
export class MsgDirective {
    constructor(private templateRef: TemplateRef<any>,
        private viewContainer: ViewContainerRef) { }
    @Input('msgLoop') set loop(num: number) {
        for (var i = 0; i < num; i++) {
            this.viewContainer.createEmbeddedView(this.templateRef);
        }
    }
}
4. Configure Routs
In Angular standalone application, provide-prefixed functions can be used to configure different systems. To configure routes, useprovideRouter within bootstrapApplication.
src/constants/routs.constant.ts
import { Route } from "@angular/router";
import { PersonDetailComponent } from "src/components/person-detail.component";

export const ROUTES: Route[] = [
	{ path: 'person-detail/:id', component: PersonDetailComponent },
];
PersonDetailComponent must be a standalone component.
src/main.ts
------
bootstrapApplication(MainAppComponent, {
    providers: [
        ------
        provideRouter(ROUTES),
    ]
});
5. Configure Services
Find the service used in our example.src/services/person.service.ts
import { Injectable } from '@angular/core';
import { Observable, of } from 'rxjs';
import { map } from 'rxjs/operators';
import { Person } from "./person";

@Injectable()
export class PersonService {
  getAllPersons(): Observable<Person[]> {
    return of(
      [
        { id: 101, name: 'Mohit', age: 25, city: 'Varanasi' },
        { id: 102, name: 'Krishn', age: 30, city: 'Delhi' },
        { id: 103, name: 'Shiv', age: 35, city: 'Patna' }
      ]
    );
  }
  getPersonById(pid: number) {
    return this.getAllPersons().pipe(
      map(allPersons => allPersons.find(p => p.id === pid))
    );
  }
}
bootstrapApplication.
src/main.ts
------
bootstrapApplication(MainAppComponent, {
    providers: [
        PersonService,
        ------
    ]
});
providedIn: 'root' within @Injectable decorator.
@Injectable({
    providedIn: 'root'
})
export class PersonService {
}


