Angular Material Datepicker Start View : month, year, multi-year
July 08, 2020
This page will walk through Angular Material Datepicker start view example. The Datepicker calendar can be started with month, year or multi-year views. The month start view is the default start view of calendar. To set the start view, we need to use startView property of <mat-datepicker> and <mat-date-range-picker> elements. For month start view, the startView is assigned with month, assign year for year start view and assign multi-year for multi-year start view.
To get year selected value on year selection, use
yearSelected event and to get month selected value, use monthSelected event. These events will emit normalized dates.
On this page will discuss using month, year, multi-year start view of calendar with complete example.
Contents
Technologies Used
Find the technologies being used in our example.1. Angular 10.0.0
2. Angular Material 10.0.0
3. Node.js 12.5.0
4. NPM 6.9.0
5. moment.js 2.27.0
Start View with Month
To set start view of calendar, we need to usestartView property of <mat-datepicker> and <mat-date-range-picker> elements. The month view is the default start view of Datepicker calendar. In the month view when we open calendar, we select a day of month.
The month start view is available by default, though we can set as following.
<mat-datepicker #dob startView="month"></mat-datepicker>
<mat-date-range-picker>.
<mat-date-range-picker #admDateRangePicker startView="month"></mat-date-range-picker>
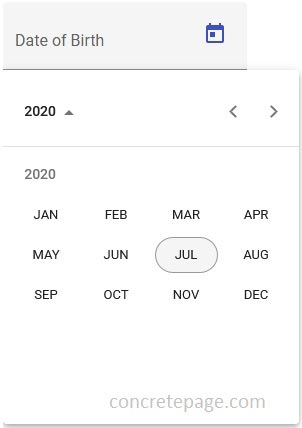
Start View with Year
To set year start view of calendar, we need to assignstartView property with year value.
<mat-datepicker #dob startView="year"></mat-datepicker>

<mat-date-range-picker>.
<mat-date-range-picker #admDateRangePicker startView="year"></mat-date-range-picker>
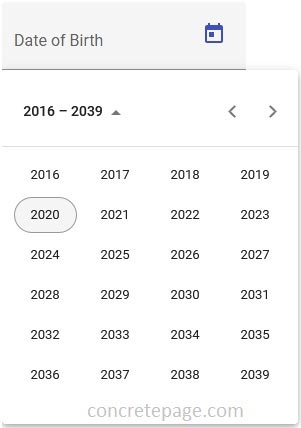
Start View with Multi-Year
To set multi-year start view of calendar, we need to assignstartView property with multi-year value.
<mat-datepicker #dob startView="multi-year"></mat-datepicker>

<mat-date-range-picker>.
<mat-date-range-picker #admDateRangePicker startView="multi-year"></mat-date-range-picker>
monthSelected and yearSelected Event
In year and multi-year start view, day is selected at last in calendar. While selecting year and month, we can receive normalized date using monthSelected and yearSelected event. The monthSelected and yearSelected events are used with <mat-datepicker> and <mat-date-range-picker> elements.
The
monthSelected and yearSelected emit normalized date. Normalized date means if we select year, suppose 2020, then yearSelected will emit the date as 01-Jan-2020. If we select month such as May and suppose year 2020 is already selected then monthSelected will emit normalized date as 01-May-2020. It means in normalized date, if year selected then the date will include 1st of January for month/day and if month is selected then date will include 1st of selected month for day value.
Now find the code snippet. Here we are creating Datepicker with
multi-year view and using monthSelected and yearSelected events with <mat-datepicker>.
<mat-form-field appearance="fill">
  <mat-label>Date of Birth</mat-label>
  <input matInput [matDatepicker]="dob" formControlName="dateOfBirth">
  <mat-datepicker-toggle matSuffix [for]="dob"></mat-datepicker-toggle>
  <mat-datepicker #dob
     startView="multi-year"
     (yearSelected)="handleYearSelected($event)"
     (monthSelected)="handleMonthSelected($event)" >
  </mat-datepicker>
</mat-form-field>
handleYearSelected(normalizedYear: Moment) {
  console.log("normalizedYear: ", normalizedYear.toDate());
}
handleMonthSelected(normalizedMonth: Moment) {
  console.log("normalizedMonth: ", normalizedMonth.toDate());
}
For selection of year 2019, output in console.
normalizedYear: Date Tue Jan 01 2019 00:00:00 GMT+0530 (India Standard Time)
For selection of month OCT, output in console.
normalizedMonth: Date Tue Oct 01 2019 00:00:00 GMT+0530 (India Standard Time)
Complete Example
student.component.html
<h3>Datepicker Start View</h3>
<form [formGroup]="studentForm" (ngSubmit)="onFormSubmit()">
  <mat-form-field>
    <mat-label>Student Name</mat-label>
    <input matInput formControlName="name">
  </mat-form-field>
  <br/>
  <mat-form-field appearance="fill">
    <mat-label>Date of Birth</mat-label>
    <input matInput [matDatepicker]="dob" formControlName="dateOfBirth">
    <mat-datepicker-toggle matSuffix [for]="dob"></mat-datepicker-toggle>
    <mat-datepicker #dob
       startView="multi-year"
       (yearSelected)="handleYearSelected($event)"
       (monthSelected)="handleMonthSelected($event)" >
    </mat-datepicker>
  </mat-form-field>
  <br/>
  <mat-form-field appearance="fill">
    <mat-label>Admission Date Range</mat-label>
    <mat-date-range-input [rangePicker]="admDateRangePicker"  formGroupName="admDateRange">
      <input matStartDate formControlName="startDate" placeholder="Start date">
      <input matEndDate formControlName="endDate" placeholder="End date">
    </mat-date-range-input>
    <mat-datepicker-toggle matSuffix [for]="admDateRangePicker"></mat-datepicker-toggle>
    <mat-date-range-picker #admDateRangePicker startView="year"></mat-date-range-picker>
  </mat-form-field>
  <br/><br/>
  <button mat-raised-button>Submit</button>
</form>
import { Component, OnInit } from '@angular/core';
import { FormBuilder, FormControl } from '@angular/forms';
import { StudentService } from './student.service';

import { Moment } from 'moment';

@Component({
  selector: 'app-student',
  templateUrl: './student.component.html'
})
export class StudentComponent implements OnInit {
  constructor(private formBuilder: FormBuilder, private studentService: StudentService) { }
  ngOnInit() {
  }
  studentForm = this.formBuilder.group({
    name: '',
    dateOfBirth: '',
    admDateRange: this.formBuilder.group({
      startDate: '',
      endDate: ''
    })
  });
  onFormSubmit() {
    this.studentService.saveStudent(this.studentForm.value);
    this.studentForm.reset();
  }
  handleYearSelected(normalizedYear: Moment) {
    console.log("normalizedYear: ", normalizedYear.toDate());
  }
  handleMonthSelected(normalizedMonth: Moment) {
    console.log("normalizedMonth: ", normalizedMonth.toDate());
  }
}
import { Injectable } from '@angular/core';

@Injectable({
  providedIn: 'root'
})
export class StudentService {
  saveStudent(student) {
    console.log(JSON.stringify(student));
  }
}
import { Component } from '@angular/core';

@Component({
  selector: 'app-root',
  template: `
      <app-student></app-student>
  `
})
export class AppComponent {
}
import { BrowserModule } from '@angular/platform-browser';
import { NgModule } from '@angular/core';
import { FormsModule, ReactiveFormsModule }    from '@angular/forms';
import { BrowserAnimationsModule } from '@angular/platform-browser/animations';
import { MatInputModule } from '@angular/material/input';
import { MatDatepickerModule } from '@angular/material/datepicker';
import { MatMomentDateModule } from '@angular/material-moment-adapter';

import { AppComponent } from './app.component';
import { StudentComponent } from './student.component';

@NgModule({
  declarations: [
    AppComponent,
    StudentComponent
  ],
  imports: [
    BrowserModule,
    FormsModule,
    ReactiveFormsModule,
    BrowserAnimationsModule,
    MatInputModule,
    MatDatepickerModule,
    MatMomentDateModule
  ],
  providers: [
  ],
  bootstrap: [ AppComponent ]
})
export class AppModule { }
Run Application
To run the application, find the steps.1. Install Angular CLI using link.
2. Install Angular Material using link.
3. Download source code using download link given below on this page.
4. Use downloaded src in your Angular CLI application.
5. Run ng serve using command prompt.
6. Access the URL http://localhost:4200
References
DatepickerMoment.js Documentation


