Angular FormControl Example
July 21, 2020
This page will walk through Angular FormControl example. The FormControl is used to create Angular reactive form. Angular uses three fundamental API to create Angular reactive form that are FormControl, FormGroup and FormArray.
FormControl: It is a class that is used to get and set values and validation of a form control such as <input> and <select> tag.
FormGroup: It has the role to track value and validity state of group of
FormControl.
FormArray: It tracks the value and validity state of array of
FormControl, FormGroup or FormArray instances.
On this page first we will create an example for standalone
FormControl. Then we will create HTML form using FormControl, FormGroup and FormArray. Now find the example step by step.
Contents
- Technologies Used
- ReactiveFormsModule
- FormControl
- 1. Default Value
- 2. Get and Set Value
- 3. Disable FormControl
- 4. FormControl Validation
- 5. Checkbox using FormControl
- FormControl with FormGroup using FormControlName
- FormControl with FormArray using FormControlName
- Application Component and Module
- Run Application
- References
- Download Source Code
Technologies Used
Find the technologies being used in our example.1. Angular 10.0.0
2. Node.js 12.5.0
3. NPM 6.9.0
ReactiveFormsModule
To enable reactive form in our angular application we need to configure ng moduleReactiveFormsModule in application module. In angular we can create HTML forms in two ways i.e. reactive forms and template-driven forms.
Reactive Form: Creating form using
FormControl, FormGroup and FormArray is said to be reactive form. They use ng module as ReactiveFormsModule.
Template-Driven Form: Creating form using
NgForm and NgModel, is said to be template-driven form. They use ng module as FormsModule.
ReactiveFormsModule and FormsModule both belong to @angular/forms library. To use reactive form in our angular application, we need to configure ReactiveFormsModule in our application module as follows.
import { NgModule } from '@angular/core';
import { ReactiveFormsModule } from '@angular/forms';
import { BrowserModule } from '@angular/platform-browser';

@NgModule({
  imports: [
        BrowserModule,
	ReactiveFormsModule
  ],
-------------
-------------
})
export class AppModule { }
FormControl
FormControl is used to track values and validation of a form control. It can be used standalone as well as with the parent form. When we work with FormControl class, FormControlDirective and FormControlName directives are also used.
FormControlDirective: It syncs a standalone
FormControl instance to form a control element.
FormControlName: It is used with
FormGroup with a <form> tag. FormControlName syncs a FormControl in an existing FormGroup to a form control by name.
Now let us start how to use
FormControl in our angular application. For every form control such as text, checkbox, radio button we need to create an instance of FormControl in our class.
city = new FormControl();
<input [formControl]="city">
[formControl] is FormControlDirective. Find the example
formcontrol.component.ts
import { Component } from '@angular/core';
import { FormControl, Validators } from '@angular/forms';

@Component({
   selector: 'app-form-control',
   templateUrl: 'formcontrol.component.html',
   styleUrls: ['formcontrol.component.css']
})
export class FormControlDemoComponent {
  name = new FormControl('', [Validators.required, Validators.maxLength(15)]);
  age = new FormControl(20, Validators.required);
  city = new FormControl();
  country = new FormControl({value: 'India', disabled: true});
  married = new FormControl(true);

  setNameValue() {
      this.name.setValue('Donald Trump');
      console.log('Name: ' + this.name.value);
      console.log('Validation Status: ' + this.name.status);
  }
  setResetName() {
      this.name.reset();
  }
  changeValue() {
      console.log(this.married.value);
      this.married = new FormControl(!this.married.value);
  }
}
<h3>Using FormControl </h3>
<div>
 <div>
   Name: <input [formControl]="name">
         <label *ngIf="name.invalid" [ngClass] = "'error'"> Name required with max 15 character. </label>
 </div>
 <div>
   <button (click)="setNameValue()">Set value</button>
   <button (click)="setResetName()">Reset</button>
 </div>
 <div>
   Age: <input [formControl]="age">
 </div>
 <div>
   City: <input [formControl]="city">
 </div>
 <div>
   Country: <input [formControl]="country">
 </div>
 <div>
    <input type="checkbox" [checked]="married.value" (change)="changeValue()" />
	Are you married?
 </div>
</div>
<div>
 <p>Name: <b>{{ name.value }}</b>, Validation Status: <b>{{ name.status }}</b></p>
 <p>Age: <b>{{ age.value }}</b>, Validation Status: <b>{{ age.status }}</b></p>
 <p>City: <b>{{ city.value }}</b> </p>
 <p>Country: <b>{{ country.value }}</b> </p>
 <p>Married?: <b>{{ married.value }}</b> </p>
</div>
.error{
    color: red;
    font-size: 20px;
}

1. Default Value
If we want to set a default value to our form control, we can pass a default value while instantiating aFormControl in our class.
city = new FormControl('Noida');
married = new FormControl(true);
<input [formControl]="city">
<input type="checkbox" [checked]="married.value" (change)="changeValue()" />
2. Get and Set Value
To fetch the value of a form control, we have to usevalue property on the instance of FormControl in our class. In the same way we can fetch the value in HTML template.
city = new FormControl('Noida');
console.log(this.city.value);
FormControl instance will be updated with new value.
Now to set a value to a form control at run time, we need to call setValue() method on the instance of FormControl in our class.
setCityValue() {
  this.city.setValue('Varanasi');
}
3. Disable FormControl
To disable a form control, we need to passdisabled property as true while instantiating FormControl in our class. Find the code snippet.
country = new FormControl({value: 'India', disabled: true});
<input [formControl]="country">
4. FormControl Validation
To validate a form control created byFormControl, we need to use Validators that belongs to @angular/forms library. Find the code snippet.
name = new FormControl('', [Validators.required, Validators.maxLength(15)]);
age = new FormControl(20, Validators.required);
Name: <input [formControl]="name">
<label *ngIf="name.invalid" [ngClass] = "'error'" > Name required with max 15 character. </label>
Age: <input [formControl]="age">
<label *ngIf="age.invalid" [ngClass] = "'error'" > Age required. </label>
FormControl and not with the HTML form tag.
5. Checkbox using FormControl
To create a checkbox usingFormControl we can do as given below.
married = new FormControl(true);
<div>
    <input type="checkbox" [checked]="married.value" (change)="changeValue()" />
	Are you married?
</div>
changeValue() {
      console.log(this.married.value);
      this.married = new FormControl(!this.married.value);
}
FormControl with FormGroup using FormControlName
We will create form control with parent HTML<form> tag. All the form control which are the instances of FormControl class, will be grouped using FormGroup class. Find the code snippet.
userForm = new FormGroup({
	name: new FormControl('Mahesh', Validators.maxLength(10)),
	age: new FormControl(20, Validators.required),
	city: new FormControl(),
	country: new FormControl()
 });
<form [formGroup]="userForm" (ngSubmit)="onFormSubmit()">
    Name: <input formControlName="name"  placeholder="Enter Name">
    Age: <input formControlName="age"  placeholder="Enter Age">
    City: <input formControlName="city"  placeholder="Enter City">
    Country: <input formControlName="country" placeholder="Enter Country">
         <button type="submit">Submit</button>
 </form>
FormControl created in class, has been used in HTML using angular FormControlName that syncs the FormControl value with HTML form control. [formGroup] is the FormGroupDirective that binds existing FormGroup to a DOM element.
When the form will be submitted, we can access form values as following.
onFormSubmit(): void {
    console.log('Name:' + this.userForm.get('name').value);
    console.log('Age:' + this.userForm.get('age').value);
    console.log('City:' + this.userForm.get('city').value);
    console.log('Country:' + this.userForm.get('country').value);
}
FormControl, we need to create a method in our class as given below.
get userName(): any {
    return this.userForm.get('name');
}
<div>
    Name: <input formControlName="name"  placeholder="Enter Name">
    <label *ngIf="userName.invalid" [ngClass] = "'error'"> Name is too long. </label>
</div>
FormControl value using FormGroupDirective. We have defined it as [formGroup]="userForm" in our form. Now we can use userForm to get values for validation as given below.
<label *ngIf=" userForm.get('name').invalid" [ngClass] = "'error'"> Name is too long. </label>
formgroup.component.ts
import { Component } from '@angular/core';
import { FormControl, FormGroup, Validators } from '@angular/forms';

@Component({
   selector: 'app-form-group',
   templateUrl: 'formgroup.component.html',
   styleUrls: ['formgroup.component.css']
})
export class FormGroupDemoComponent {
  usrNameChanges: string;
  usrNameStatus: string;
  userForm = new FormGroup({
	name: new FormControl('Mahesh', Validators.maxLength(10)),
	age: new FormControl(20, Validators.required),
	city: new FormControl(),
	country: new FormControl()
  });
  get userName(): any {
        return this.userForm.get('name');
  }
  onFormSubmit(): void {
	console.log('Name:' + this.userForm.get('name').value);
	console.log('Age:' + this.userForm.get('age').value);
	console.log('City:' + this.userForm.get('city').value);
	console.log('Country:' + this.userForm.get('country').value);
  }
  setDefaultValue() {
        this.userForm.setValue({name: 'Mahesh', age: 20, city: '', country: ''});
  }
}
<h3> Using FormControl with FormGroup </h3>
<div>
 <form [formGroup]="userForm" (ngSubmit)="onFormSubmit()">
  <div>
    Name: <input formControlName="name"  placeholder="Enter Name">
	<label *ngIf="userName.invalid" [ngClass] = "'error'"> Name is too long. </label>
  </div>
  <div>
    Age: <input formControlName="age"  placeholder="Enter Age">
	<label *ngIf="userForm.get('age').invalid" [ngClass] = "'error'"> Age is required. </label>
  </div>
  <div>
    City: <input formControlName="city"  placeholder="Enter City">
  </div>
  <div>
    Country: <input formControlName="country" placeholder="Enter Country">
  </div>
  <div>
    <button type="submit">Submit</button>
    <button type="button" (click) = "setDefaultValue()">Set Default</button>
  </div>
 </form>
<div>
.error{
    color: red;
    font-size: 20px;
}

FormControl with FormArray using FormControlName
Now we will useFormControl with FormArray and FormGroup using FormControlName. In our angular application, FormArray is used when we want to dynamically generate form controls such as <input> and <select>. Find the code snippet.
userForm = new FormGroup({
    users: new FormArray([
      new FormControl('Mahesh'),
      new FormControl('Krishna'),
      new FormControl()
    ])
});
FormControl instances. We will iterate it in our UI as follows.
<div *ngFor="let user of users.controls; index as idx">
     <input [formControlName]="idx" placeholder="Enter User Name">
</div>
for(let i = 0; i < this.users.length; i++) {
  console.log(this.users.at(i).value);
}
FormArray i.e users , we will call controls that will return array of FormControl instances.
Now to add a form control at run time we need to use
push() method of FormArray.
addUserField() {
     this.users.push(new FormControl());
}
removeAt() method of FormArray.
deleteUserField(index: number) {
     this.users.removeAt(index);
}
formarray.component.ts
import { Component } from '@angular/core';
import {FormControl, FormGroup, FormArray } from '@angular/forms';

@Component({
   selector: 'app-form-array',
   templateUrl: 'formarray.component.html'
})
export class FormArrayDemoComponent{
  userForm = new FormGroup({
    users: new FormArray([
      new FormControl('Mahesh'),
      new FormControl('Krishna'),
      new FormControl()
    ])
  });
  get users(): FormArray {
     return this.userForm.get('users') as FormArray;
  }
  addUserField() {
     this.users.push(new FormControl());
  }
  deleteUserField(index: number) {
     this.users.removeAt(index);
  }
  onFormSubmit() {
    console.log(this.users.value); // Gives FormArray data
    console.log(this.userForm.value); // Gives Complete form data
    //Iterate FormArray
    for(let i = 0; i < this.users.length; i++) {
	  console.log(this.users.at(i).value);
    }
  }
}
<h3> Using FormControl with FormArray </h3>
<div>
    <form [formGroup]="userForm" (ngSubmit)="onFormSubmit()">
      <div formArrayName="users">
        <div *ngFor="let user of users.controls; index as idx">
          <input [formControlName]="idx" placeholder="Enter User Name">
          <button (click)="deleteUserField(idx)">Delete</button>
        </div>
      </div>
      <button type="submit">Submit</button>
      <button type="button" (click)="addUserField()">Add More User</button>
    </form>
</div>

Application Component and Module
app.component.ts
import { Component } from '@angular/core';
import {FormControl, Validators} from '@angular/forms';

@Component({
   selector: 'app-root',
   template: `
               <app-form-control></app-form-control>
	       <app-form-group></app-form-group>
	       <app-form-array></app-form-array>
             `
})
export class AppComponent {
}
import { NgModule } from '@angular/core';
import { ReactiveFormsModule } from '@angular/forms';
import { BrowserModule } from '@angular/platform-browser';

import { AppComponent }  from './app.component';
import { FormControlDemoComponent }  from './formcontrol.component';
import { FormGroupDemoComponent }  from './formgroup.component';
import { FormArrayDemoComponent }  from './formarray.component';

@NgModule({
  imports: [
        BrowserModule,
	ReactiveFormsModule
  ],
  declarations: [
        AppComponent,
	FormControlDemoComponent,
	FormGroupDemoComponent,
	FormArrayDemoComponent,
  ],
  bootstrap: [
        AppComponent
  ]
})
export class AppModule { }
Run Application
To run the application, find following steps.1. Download source code using download link given below on this page.
2. Use downloaded src in your Angular CLI application. To install angular CLI, find the link.
3. Run ng serve using command prompt.
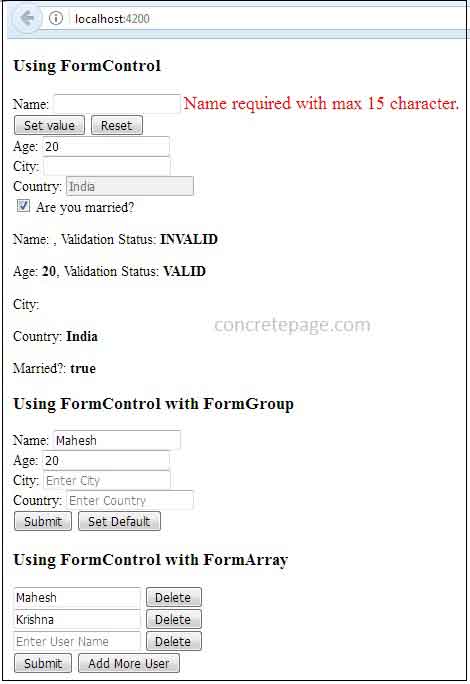
4. Now access the URL http://localhost:4200
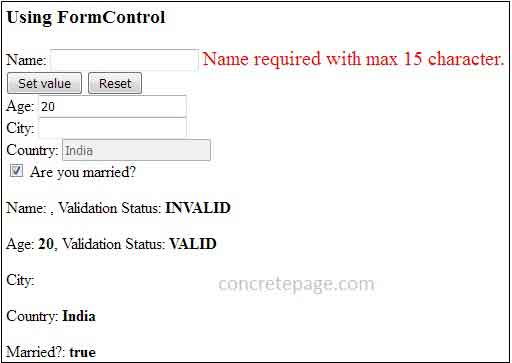
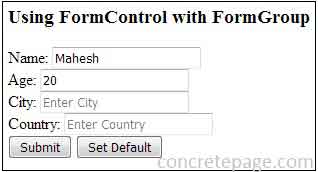
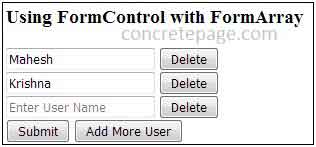
Find the print screen of the output.

References
FormControlFormGroup
FormArray


