Angular Event Binding Example
February 10, 2024
On this page we will provide Angular event binding example. Event binding is a data binding from an element to a component. Data obtained from user actions such as keystrokes, mouse movements, clicks, and touches can be bound to component property using event binding. In the event binding, target will be an event name. Target event is enclosed within parenthesis ( ) or can be used with canonical form using prefix on- to perform event binding. Target event is written to the left side of equal sign. Target events can be click, change, mouseover, mouseout, keydown, keyup etc. In angular framework we can alias our event name as well as we can create custom events. To access current changes by user, we use event object $event. It will be DOM event object if target event is a native DOM element event. It has properties as target and target.value. Event binding using parenthesis ( ) is achieved as follows.
<button (click)="isValid=true">True</button>
<button on-click="isValid=true">True</button>
<input (change) = "changeText($event.target.value)">
Contents
1. Input Event Binding
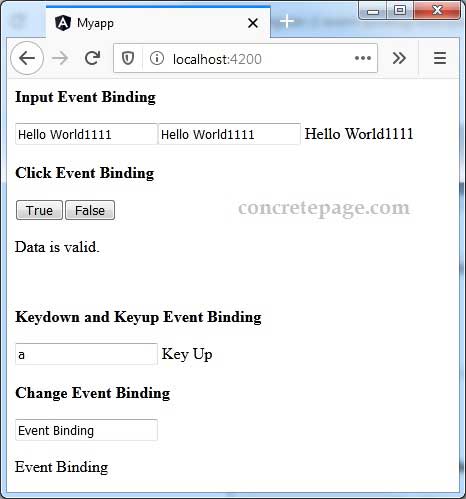
input event is a DOM event which is fired synchronously when the value of <input> or <textarea> element is changed. Here we will bind the component property with input event. We will use event object $event to get the current value entered by user. For the example find a component property.
msg1 = 'Hello World';
<input [value]="msg1" (input)="msg1=$event.target.value">
<input [value]="msg1" on-input="msg1=$event.target.value">
setMsg(data:string) {
    this.msg1 = data;
}
input event to call the method.
<input [value]="msg1" (input)="setMsg($event.target.value)">
{{msg1}}
msg1 will also be changed. Here $event gives the current value entered by user. We access it by using
$event.target.value
In our code we are assigning its value to msg1 as
msg1=$event.target.value
2. Click Event Binding
Here we will understand event binding usingclick event. For the demo we are creating two buttons. We have initialized a component property as
isValid = true;
<button> element as an example.
<button (click)="isValid=true">True</button>
<button (click)="isValid=false">False</button>
isValid will be assigned with value true and when we click False button then isValid will be assigned with value false. If we are using isValid property in our code anywhere else, accordingly there will be will be change in DOM. For the example we are using it with ngIf as follows.
<p *ngIf="isValid">
	Data is valid.
</p>
<p *ngIf="!isValid">
        Data is not valid.
</p>
ngIf will run and on the click of False button second ngIf will run.
3. KeyDown and KeyUp Event Binding
Here we will discuss event binding usingkeydown and keyup event using <input> element. For the demo we are using parenthesis ( ) as well as on- keyword.
<input on-keydown="msg2='Key down'" (keyup)="msg2='Key Up'">
msg2 is a component property and if we print it as
{{msg2}}
4. Change Event Binding
Here we will discusschange event binding using <input> element. On value change we will call a method which we have defined in our component as follows.
changeText(mytext:string) {
     this.msg3 = mytext;
}
<input> element which is using change event binding.
Using parenthesis ( ).
<input (change) = "changeText($event.target.value)">
<input on-change = "changeText($event.target.value)">
innerHTML in <p> element as follows.
<p [innerHTML] = "msg3"> </p>
<p> {{msg3}} </p>
changeText() method will be called and current user input value will be passed to the method that will be assigned to a component property msg3. And hence we will observe value change within <p> element for every value change in <input> element.
5. Complete Example
event.component.ts
import {Component} from '@angular/core';
@Component({
    selector: 'app-root',
    templateUrl: './event.component.html'
})
export class EventComponent {
        isValid = true;
	msg1 = 'Hello World';
	msg2 = '';
	msg3 = '';
	setMsg(data:string) {
	    this.msg1 = data;
	}
	changeText(mytext:string) {
	    this.msg3 = mytext;
        }
}
<b>Input Event Binding </b><br/><br/>
<input [value]="msg1" (input)="msg1=$event.target.value">

<input [value]="msg1" (input)="setMsg($event.target.value)">

{{msg1}}

<br/><br/><b>Click Event Binding </b><br/><br/>
<button (click)="isValid=true">True</button>
<button (click)="isValid=false">False</button>
<p *ngIf="isValid">
	Data is valid.
</p>
<p *ngIf="!isValid">
	Data is not valid.
</p>

<br/><br/><b>Keydown and Keyup Event Binding </b><br/><br/>
<input on-keydown="msg2='Key down'" (keyup)="msg2='Key Up'" >
{{msg2}}

<br/><br/><b>Change Event Binding </b><br/><br/>
<input on-change="changeText($event.target.value)">
<p [innerHTML] = "msg3"> </p>
import {NgModule}        from '@angular/core';
import {BrowserModule}   from '@angular/platform-browser';
import {EventComponent}  from './event.component';
@NgModule({
  imports:      [BrowserModule],
  declarations: [EventComponent],
  bootstrap:    [EventComponent]
})
export class AppModule { }


