hostDirectives in Angular
June 10, 2023
On this page we will learn to use hostDirectives property in our Angular application.
1. Angular provides Directive Composition API to encapsulate reusable behaviours of directives. It is introduced in Angular 15.
2. The
@Directive decorator has hostDirectives property. The @Component decorator inherits hostDirectives property from @Directive. So hostDirectives is available to both the decorators, @Directive as well as @Component.
3. A directive or component configures standalone directives using
hostDirectives property and these directives are called host directives. This enables the transitive aggregation of multiple behaviours. We can create a directive that will include the behaviour of those directives configured in hostDirectives and hence we achieve reusability of code.
4. All the directives configured in
hostDirectives must be standalone. To create a standalone directive, use standalone: true within @Directive. The selectors of directives configured in hostDirectives are ignored.
Contents
1. hostDirectives
ThehostDirectives configures standalone directives that should be applied to the host whenever the directive is matched. By default none of the inputs and outputs of the host directives will be available on the host unless we specify them using inputs and outputs properties.
Find the
hostDirectives declarations from the Angular doc.
hostDirectives?: (Type<unknown> | {
    directive: Type<unknown>;
    inputs?: string[];
    outputs?: string[];
})[]
2. hostDirectives with @Directive
A Directive can apply attributes, CSS classes, and event listeners to an element. We can inherit the behaviour of multiple Directive to single Directive using hostDirectives property of @Directive.
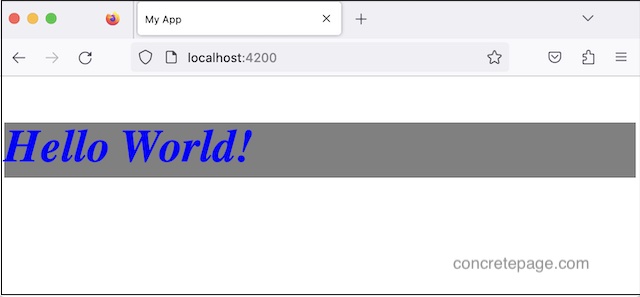
In our example we have three directives, one for mouse event and second for applying CSS and third directive will inherit the behaviour of the first and second directive.
message.directive.ts
import { Directive, ElementRef } from '@angular/core';
import { MouseEventDirective } from './mouseevent.directive';
import { ThemeDirective } from './theme.directive';

@Directive({
  selector: '[message]',
  standalone: true,
  hostDirectives: [
    MouseEventDirective,
    ThemeDirective
  ]
})
export class MessageDirective {
  constructor(elRef: ElementRef) {
    elRef.nativeElement.style.backgroundColor = 'gray';
  }
}
MouseEventDirective and ThemeDirective and apply it to third directive MessageDirective.
The MouseEventDirective and ThemeDirective must be standalone. When the MessageDirective is used in the HTML template, the instances of all these directives are created.
mouseevent.directive.ts
import { Directive, ElementRef, HostListener } from '@angular/core';

@Directive({
     selector: '[mouseEvent]',
     standalone: true
})
export class MouseEventDirective {
   constructor(private elRef: ElementRef) {
   }
   @HostListener('mouseover') onMouseOver() {
     this.changeColor('blue');
   }
   @HostListener('mouseleave') onMouseLeave() {
     this.changeColor('black');
   }
   changeColor(color: string) {
     this.elRef.nativeElement.style.color = color;
   }
}
import { Directive, ElementRef } from '@angular/core';

@Directive({
  selector: '[niceTheme]',
  standalone: true
})
export class ThemeDirective {
  constructor(elRef: ElementRef) {
    elRef.nativeElement.style.fontStyle = 'italic';
    elRef.nativeElement.style.fontSize = '50px';
  }
}
MouseEventDirective.
message.component.ts
import { Component } from "@angular/core";
import { MessageDirective } from "src/directives/message.directive";

@Component({
    selector: "app-msg",
    standalone: true,
    imports: [
        MessageDirective
    ],
    template: `
          <h3 message>Hello World!</h3>
    `
})
export class MessageComponent {
}

3. hostDirectives with @Component
We apply the standalone directives to a component by adding hostDirectives property to its @Component decorator. When the component is rendered, Angular also creates an instance of each host directive. By default, host directive inputs and outputs are not exposed to this component.
message.component.ts
import { Component } from "@angular/core";
import { MouseEventDirective } from "src/directives/mouseevent.directive";
import { ThemeDirective } from "src/directives/theme.directive";

@Component({
    selector: "app-msg",
    standalone: true,
    hostDirectives: [
        ThemeDirective,
        MouseEventDirective
    ],
    template: `
          <h3>Hello World!</h3>
    `
})
export class MessageComponent {
}
4. Using inputs and outputs
By default inputs and outputs of the host directives are not available on the host. We need to specify them using inputs and outputs properties.
Find the directive that have inputs and outputs.
mouseevent.directive.ts
import { Directive, ElementRef, EventEmitter, HostListener, Input, Output } from '@angular/core';

@Directive({
  selector: '[mouseEvent]',
  standalone: true
})
export class MouseEventDirective {
  @Input('initialColor')
  initialColor?: string;

  @Output('colorChanged')
  colorChanged = new EventEmitter();

  constructor(private elRef: ElementRef) {
    this.elRef.nativeElement.style.color = this.initialColor;
  }
  @HostListener('click') onMouseClick() {
    this.changeColor('blue');
  }
  changeColor(color: string) {
    this.elRef.nativeElement.style.color = color;
    this.colorChanged.emit();
  }
}
initialColor and output as colorChanged.
Find the component that exposes the input and output properties of host directive.
message.component.ts
import { Component } from "@angular/core";
import { MouseEventDirective } from "src/directives/mouseevent.directive";
import { ThemeDirective } from "src/directives/theme.directive";

@Component({
    selector: "app-msg",
    standalone: true,
    hostDirectives: [
        ThemeDirective,
        {
         directive: MouseEventDirective,
         inputs: ['initialColor'],
         outputs: ['colorChanged']
        }
    ],
    template: `
          <h3>Hello World!</h3>
    `
})
export class MessageComponent {
}
main.ts
import { bootstrapApplication } from '@angular/platform-browser';
import { Component } from "@angular/core";
import { MessageComponent } from './components/message.component';

@Component({
    selector: 'app-root',
    standalone: true,
    imports: [
        MessageComponent
    ],
    template: `
       <app-msg [initialColor]="myColor" (colorChanged)="logColorChanged()"></app-msg>
    `
})
export class AppComponent {
    myColor = "orange";
    logColorChanged() {
        console.log('Color changed.');
    }
}
bootstrapApplication(AppComponent);
Aliasing inputs and outputs
We can alias inputs and outputs from
hostDirective to customize the API of our component.
message.component.ts
@Component({
    selector: "app-msg",
    standalone: true,
    hostDirectives: [
        ThemeDirective,
        {
         directive: MouseEventDirective,
         inputs: ['initialColor: color'],
         outputs: ['colorChanged: changed']
        }
    ],
    template: `
          <h3>Hello World!</h3>
    `
})
export class MessageComponent {
}
<app-msg [color]="myColor" (changed)="logColorChanged()"></app-msg>
5. Execution Order
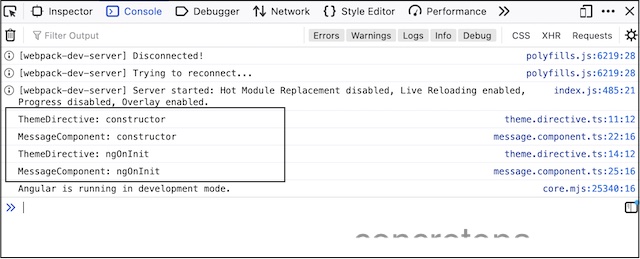
Host directives always execute their constructor, lifecycle hooks, and bindings before the component or directive on which they are applied.Find the sample code.
theme.directive.ts
@Directive({
  selector: '[niceTheme]',
  standalone: true
})
export class ThemeDirective implements OnInit {
  constructor(elRef: ElementRef) {
    console.log('ThemeDirective: constructor');
  }
  ngOnInit(): void {
    console.log('ThemeDirective: ngOnInit');
  }
}
@Component({
    selector: "app-msg",
    standalone: true,
    hostDirectives: [
        ThemeDirective,
    ],
    ......
})
export class MessageComponent implements OnInit {
    constructor() {
        console.log('MessageComponent: constructor');
    }
    ngOnInit(): void {
        console.log('MessageComponent: ngOnInit');
    }
}
1. Constructor of
ThemeDirective
2. Constructor of
MessageComponent
3. ngOnInit of
ThemeDirective
4. ngOnInit of
MessageComponent
5. Host binding of
ThemeDirective
6. Host binding of
MessageComponent
Find the print screen of the output.

6. Dependency Injection
1. A component or directive can inject the directives that are configured in theirhostDirectives.
2. The providers can be configured by component/directive that are applying
hostDirectives as well as the directives configured in hostDirectives. In this case, the providers configured in component/directive that are applying hostDirectives, take precedence.
Find the sample dependency example.
message.component.ts
@Component({
    selector: "app-msg",
    standalone: true,
    hostDirectives: [
        ThemeDirective,
        MouseEventDirective
    ],
    ------

})
export class MessageComponent implements OnInit {
    constructor(med: MouseEventDirective) {
        med.changeColor('green');
    }
    ------
}
MouseEventDirective has been injected in MessageComponent. The MouseEventDirective is eligible to be injected because it is configured in the hostDirectives.


