Android RecyclerView List Example
July 15, 2023
On this page, we will learn Android RecyclerView to create dynamic list.
1. The
RecyclerView is the ViewGroup that contains the views corresponding to our data. The RecyclerView is used to display large sets of data. The RecyclerView is also a library that contains RecyclerView class and Layout Manager classes.
2. The
RecyclerView is added to our layout in the same way as we add other UI element. We define the layout and supply the data, then RecyclerView dynamically creates elements when they are needed.
3. The
RecyclerView recycles its views. When an item scrolls off the screen, it does not destroy its view, instead it reuses the view for new items that have scrolled onscreen.
4. The advantage of
RecyclerView in displaying large data is that it improves performance and app’s responsiveness. It also reduces power consumption.
5. Each item of the list is defined by view holder i.e.
RecyclerView.ViewHolder class. First the view holder is created then RecyclerView binds it to its data.
6. We need to create an adapter using
RecyclerView.Adapter class. The RecyclerView requests views, and binds the views to their data, by calling methods in the adapter.
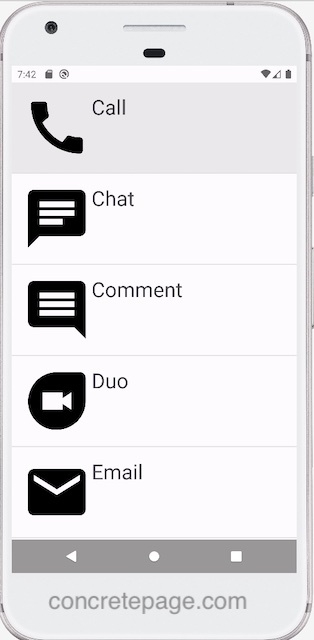
Here on this page we will create a demo application that will display a list using
RecyclerView. Now let us discuss using RecyclerView in detail step-by-step.
1. Create Layout
The items inRecyclerView are arranged by RecyclerView.LayoutManager class. We can use one of the layout managers provided by the RecyclerView library, or we can define our own. The RecyclerView library provides three layout managers.
1. LinearLayoutManager : Arranges the items in one-dimensional list.
2. GridLayoutManager : Arranges the items in two-dimensional grid.
3. StaggeredGridLayoutManager : Arranges the items in a staggered grid formation.
In our example, we are using
LinearLayoutManager class.
LinearLayoutManager layoutManager = new LinearLayoutManager(this);
RecyclerView recyclerView = findViewById(R.id.communication);
recyclerView.setLayoutManager(layoutManager);
res/layout/activity_main.xml
<?xml version="1.0" encoding="utf-8"?>
<androidx.coordinatorlayout.widget.CoordinatorLayout xmlns:android="http://schemas.android.com/apk/res/android"
    android:layout_width="match_parent"
    android:layout_height="match_parent">

    <androidx.recyclerview.widget.RecyclerView
        android:id="@+id/communication"
        android:layout_width="match_parent"
        android:layout_height="match_parent"/>
</androidx.coordinatorlayout.widget.CoordinatorLayout>
MainActivity.java
package com.cp.app;
import android.os.Bundle;
import androidx.appcompat.app.AppCompatActivity;
import androidx.recyclerview.widget.DividerItemDecoration;
import androidx.recyclerview.widget.LinearLayoutManager;
import androidx.recyclerview.widget.RecyclerView;
import java.util.ArrayList;
import java.util.List;

public class MainActivity extends AppCompatActivity {

    MyRecyclerViewAdapter adapter;

    @Override
    protected void onCreate(Bundle savedInstanceState) {
        super.onCreate(savedInstanceState);
        setContentView(R.layout.activity_main);
        List<MyItem> communications = new ArrayList<>();
        communications.add(new  MyItem("Call", R.drawable.ic_call));
        communications.add(new  MyItem("Chat", R.drawable.ic_chat));
        communications.add(new  MyItem("Comment", R.drawable.ic_comment));
        communications.add(new  MyItem("Duo", R.drawable.ic_duo));
        communications.add(new  MyItem("Email", R.drawable.ic_email));
        communications.add(new  MyItem("Notification", R.drawable.ic_notification));
        communications.add(new  MyItem("Voicemail", R.drawable.ic_voicemail));

        LinearLayoutManager layoutManager = new LinearLayoutManager(this);
        RecyclerView recyclerView = findViewById(R.id.communication);
        recyclerView.setLayoutManager(layoutManager);

        DividerItemDecoration dividerItemDecoration = new DividerItemDecoration(recyclerView.getContext(),
                layoutManager.getOrientation());
        recyclerView.addItemDecoration(dividerItemDecoration);

        adapter = new MyRecyclerViewAdapter(this, communications);
        recyclerView.setAdapter(adapter);
    }
}
MyItem.java
package com.cp.app;
public class MyItem {
    private String name;
    private int imageId;

    public MyItem(String name, int imageId) {
        this.name = name;
        this.imageId = imageId;
    }
    public String getName() {
        return name;
    }
    public int getImageId() {
        return imageId;
    }
}
2. Create View Holder
TheRecyclerView defines the item of the list using RecyclerView.ViewHolder class. A ViewHolder describes an item view and metadata. Each item of the list is defined by ViewHolder. The RecyclerView creates the view holder and then binds it to its data.
MyViewHolder.java
package com.cp.app;
import android.view.View;
import android.widget.ImageView;
import android.widget.TextView;
import androidx.recyclerview.widget.RecyclerView;
import com.google.android.material.snackbar.Snackbar;

public class MyViewHolder extends RecyclerView.ViewHolder  {
    TextView myTextView;
    ImageView myImageView;
    public MyViewHolder(View itemView) {
        super(itemView);
        myTextView = itemView.findViewById(R.id.cmTextView);
        myImageView = itemView.findViewById(R.id.cmImageView);
        itemView.setOnClickListener(view ->
                Snackbar.make(itemView.getRootView(), "Clicked on " + myTextView.getText(), Snackbar.LENGTH_LONG)
               .setAction("Action", null).show());
    }
}
3. Create Adapter
Adapter is created extendingRecyclerView.Adapter class. Adapter and view holder together determine how the data is displayed. Adapter creates view holder objects as needed and sets data. View holder is the wrapper around the view of an individual item in the list.
We need to create adapter extending
RecyclerView.Adapter class and override three methods.
onCreateViewHolder() : RecyclerView calls this method on create of a new view holder. This method creates and initializes the
ViewHolder and its associated views.
onBindViewHolder() : RecyclerView calls this method to associate a
ViewHolder with data. Here we implement the code to fetch the data and fill view holder layout. For example, we fetch the data from the list and associate the view holder’s TextView.
getItemCount() : RecyclerView calls this method to get the size of the dataset. RecyclerView uses this to determine when there are no more items that can be displayed.
Find the adapter class.
MyRecyclerViewAdapter.java
package com.cp.app;
import android.content.Context;
import android.view.LayoutInflater;
import android.view.View;
import android.view.ViewGroup;
import androidx.recyclerview.widget.RecyclerView;
import java.util.List;

public class MyRecyclerViewAdapter extends RecyclerView.Adapter<MyViewHolder> {

    private List<MyItem> myList;
    private LayoutInflater layoutInflater;
    public MyRecyclerViewAdapter(Context context, List<MyItem> data) {
        this.layoutInflater = LayoutInflater.from(context);
        this.myList = data;
    }
    @Override
    public MyViewHolder onCreateViewHolder(ViewGroup parent, int viewType) {
        View view = layoutInflater.inflate(R.layout.row_item, parent, false);
        return new MyViewHolder(view);
    }
    @Override
    public void onBindViewHolder(MyViewHolder holder, int position) {
        MyItem item = myList.get(position);
        holder.myImageView.setImageResource(item.getImageId());
        holder.myTextView.setText(item.getName());
    }
    @Override
    public int getItemCount() {
        return myList.size();
    }
}
res/layout/row_item.xml
<?xml version="1.0" encoding="utf-8"?>
<LinearLayout xmlns:android="http://schemas.android.com/apk/res/android"
    android:layout_width="match_parent"
    android:layout_height="wrap_content"
    android:orientation="horizontal"
    android:padding="15dp">

    <ImageView
        android:id="@+id/cmImageView"
        android:layout_width="wrap_content"
        android:layout_height="wrap_content" />
    <TextView
        android:id="@+id/cmTextView"
        android:layout_width="wrap_content"
        android:layout_height="wrap_content"
        android:textSize="30sp"/>
</LinearLayout>


