Android Bottom App Bar + Floating Action Button
August 21, 2023
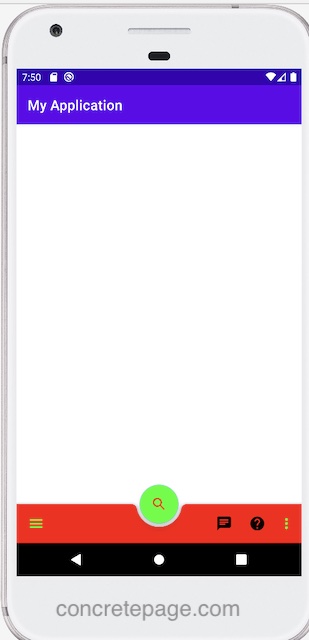
On this page we will create Android bottom app bar with a floating action button.
1. To create bottom app bar, we need to understand following APIs.
CoordinatorLayout : Top-level application decor and container for a specific interaction with one or more child views.
BottomAppBar : An extension of
Toolbar that supports a shaped background.
FloatingActionButton (FAB) : Used for a special type of promoted action. It looks like a circled icon floating above the UI.
2. The
BottomAppBar cradles an attached FloatingActionButton.
3. The
FloatingActionButton is anchored to BottomAppBar in two ways.
Using XML:
 <com.google.android.material.floatingactionbutton.FloatingActionButton
     ------
     app:layout_anchor="@id/bottom_app_bar" />
CoordinatorLayout.LayoutParams.setAnchorId(int)
BottomAppBar using two modes.
FAB_ALIGNMENT_MODE_CENTER : Primary mode with the FAB is centred.
FAB_ALIGNMENT_MODE_END : Secondary mode with the FAB on the side.
5. To set app bar background color, use
app:backgroundTint. We should not use android:background attribute or BottomAppBar.setBackground because BottomAppBar manages its background internally.
6. A menu is attached to
BottomAppBar to create action items.
<com.google.android.material.bottomappbar.BottomAppBar
   ------
   app:menu="@menu/bottom_app_bar_menu" />
BottomAppBar to open navigation drawer.
<com.google.android.material.bottomappbar.BottomAppBar
   ------
   app:navigationIcon="@drawable/ic_menu_24" />
materialThemeOverlay attribute to a ThemeOverlay which sets the colorControlNormal attribute to the correct color.
Now find the steps to create bottom app bar with floating action button.
Step-1: Create Menu for Bottom App Bar
res/menu/bottom_app_bar_menu.xml
<?xml version="1.0" encoding="utf-8"?>
<menu xmlns:android="http://schemas.android.com/apk/res/android"
    xmlns:app="http://schemas.android.com/apk/res-auto">
    <item
        android:id="@+id/navigation_chat"
        android:icon="@drawable/ic_chat_24"
        app:showAsAction="always"
        android:title="@string/title_chat"/>
    <item
        android:id="@+id/navigation_help"
        android:icon="@drawable/ic_help_24"
        app:showAsAction="always"
        android:title="@string/title_help" />
    <item
        android:id="@+id/navigation_settings"
        android:icon="@drawable/ic_settings_24"
        android:title="@string/title_settings"/>
    <item
        android:id="@+id/navigation_account"
        android:icon="@drawable/ic_account_24"
        android:title="@string/title_account"/>
</menu>
Step-2: Create Layout
res/layout/activity_main.xml
<?xml version="1.0" encoding="utf-8"?>
<androidx.coordinatorlayout.widget.CoordinatorLayout xmlns:android="http://schemas.android.com/apk/res/android"
    xmlns:app="http://schemas.android.com/apk/res-auto"
    android:layout_width="match_parent"
    android:layout_height="match_parent"
    android:paddingTop="?attr/actionBarSize">

    <com.google.android.material.bottomappbar.BottomAppBar
        android:id="@+id/bottom_app_bar"
        style="@style/Theme.MyApplication"
        android:layout_width="match_parent"
        android:layout_height="wrap_content"
        android:layout_gravity="bottom"
        app:backgroundTint="@color/red"
        app:navigationIcon="@drawable/ic_menu_24"
        app:fabCradleMargin="5dp"
        app:navigationIconTint="@color/green"
        app:iconTint="@color/green"
        app:menu="@menu/bottom_app_bar_menu" />

    <com.google.android.material.floatingactionbutton.FloatingActionButton
        android:id="@+id/fab"
        android:layout_width="wrap_content"
        android:layout_height="wrap_content"
        android:backgroundTint="@color/green"
        app:srcCompat="@drawable/ic_search_24"
        app:fabSize="auto"
        app:layout_anchor="@id/bottom_app_bar" />

    <TextView
        android:id="@+id/myText"
        android:layout_width="match_parent"
        android:layout_height="match_parent"
        android:layout_marginStart="9dp"
        android:layout_marginTop="9dp"
        android:layout_marginEnd="9dp"
        android:textAlignment="center"
        android:textSize="25sp" />
</androidx.coordinatorlayout.widget.CoordinatorLayout>

Step-3: Handle Click Events
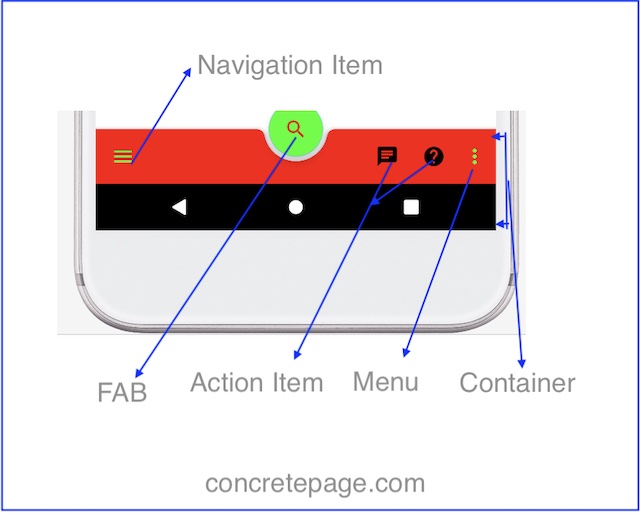
Bottom app bar contains container, navigation icon, floating action button (FAB), action items and overflow menu.
TextView in our layout. We will display a message on click of items.
MainActivity.java
public class MainActivity extends AppCompatActivity {

    private ActivityMainBinding binding;

    @Override
    protected void onCreate(Bundle savedInstanceState) {
        super.onCreate(savedInstanceState);
        binding = ActivityMainBinding.inflate(getLayoutInflater());
        setContentView(binding.getRoot());
        BottomAppBar bottomAppBar = findViewById(R.id.bottom_app_bar);
        TextView tv =  findViewById(R.id.myText);

        // Handle click on Navigation Item
        bottomAppBar.setNavigationOnClickListener(view -> {
            tv.setText("Navigation Item");
            }
        );
        // Handle click on action Item and menu item
        bottomAppBar.setOnMenuItemClickListener(menuItem -> {
            if (menuItem.getItemId() == R.id.navigation_help) {
                tv.setText("Action Item : Help");
            }
            else if (menuItem.getItemId() == R.id.navigation_chat) {
                tv.setText("Action Item : Chat");
            } else {
                tv.setText("Menu Item: " + menuItem.getTitle());
            }
            return true;
        });

        // Handle click on FAB
        FloatingActionButton fab = findViewById(R.id.fab);
        fab.setOnClickListener(view -> {
            tv.setText("FAB");
        });
    }
}
Step-4: Configure Attributes
1. For BottomAppBar container :app:backgroundTint : Sets color.
app:elevation : Sets elevation
android:minHeight : Sets minimum height
2. For navigation icon :
app:navigationIcon : Sets icon.
app:navigationIconTint : Sets color.
3. FAB attributes :
app:fabAlignmentMode : Sets alignment mode.
app:fabCradleMargin : Sets cradle margin.
app:fabCradleRoundedCornerRadius : Sets corner radius.
app:fabCradleVerticalOffset : Sets cradle vertical offset.
app:fabAnimationMode : Sets animation mode.


