Android Bottom Navigation Bar Example
August 01, 2023
On this page we will learn to create bottom navigation bar in our Android application.
1. To create a bottom navigation bar, we use material
BottomNavigationView that represents a standard bottom navigation bar for application.
2. We will use
NavHostFragment that will provide an area within our layout for self-contained navigation to occur.
3. We will create a menu XML that will contain all items of navigation bar. Each item will have an icon and text.
4. We will create a navigation graph XML to associate fragment with respective layout.
5. In our demo application, for the click of menu items we have a layout that contains a
TextView.
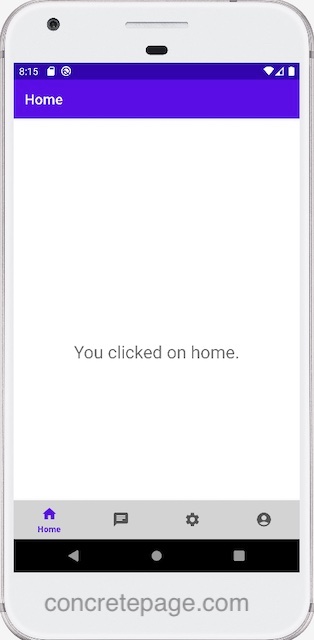
Here we will create a demo application for bottom navigation bar with 4 menu items. Find the print screen of the output.

Contents
1. Creating Main Activity
Find the xml for main activity.res/layout/activity_main.xml
<?xml version="1.0" encoding="utf-8"?>
<androidx.constraintlayout.widget.ConstraintLayout xmlns:android="http://schemas.android.com/apk/res/android"
    xmlns:app="http://schemas.android.com/apk/res-auto"
    android:layout_width="match_parent"
    android:layout_height="match_parent"
    android:paddingTop="?attr/actionBarSize">

    <com.google.android.material.bottomnavigation.BottomNavigationView
        android:id="@+id/bottom_nav_view"
        android:layout_width="0dp"
        android:layout_height="wrap_content"
        android:layout_marginStart="0dp"
        android:layout_marginEnd="0dp"
        android:background="@color/gray"
        app:layout_constraintBottom_toBottomOf="parent"
        app:layout_constraintLeft_toLeftOf="parent"
        app:layout_constraintRight_toRightOf="parent"
        app:menu="@menu/bottom_nav_menu" />

    <fragment
        android:id="@+id/nav_host_fragment"
        android:name="androidx.navigation.fragment.NavHostFragment"
        android:layout_width="match_parent"
        android:layout_height="match_parent"
        app:defaultNavHost="true"
        app:layout_constraintBottom_toTopOf="@id/bottom_nav_view"
        app:layout_constraintLeft_toLeftOf="parent"
        app:layout_constraintRight_toRightOf="parent"
        app:layout_constraintTop_toTopOf="parent"
        app:navGraph="@navigation/app_navigation" />

</androidx.constraintlayout.widget.ConstraintLayout>
BottomNavigationView and a fragment element of NavHostFragment type within ConstraintLayout element.
2. A
ConstraintLayout helps us to position and size widgets in a flexible way. The BottomNavigationView is a material design bottom navigation that represents a standard bottom navigation bar for application.
3. We attach a menu to
BottomNavigationView.
app:menu="@menu/bottom_nav_menu"
BottomNavigationView is attached to the fragment.
app:layout_constraintBottom_toTopOf="@id/bottom_nav_view"
NavHostFragment class.
android:name="androidx.navigation.fragment.NavHostFragment"
app:navGraph="@navigation/app_navigation"
MainActivity.java
package com.cp.app;
import android.os.Bundle;
import androidx.appcompat.app.AppCompatActivity;
import androidx.navigation.NavController;
import androidx.navigation.Navigation;
import androidx.navigation.ui.AppBarConfiguration;
import androidx.navigation.ui.NavigationUI;
import com.cp.app.databinding.ActivityMainBinding;

public class MainActivity extends AppCompatActivity {

    private ActivityMainBinding binding;

    @Override
    protected void onCreate(Bundle savedInstanceState) {
        super.onCreate(savedInstanceState);

        binding = ActivityMainBinding.inflate(getLayoutInflater());
        setContentView(binding.getRoot());
        AppBarConfiguration appBarConfiguration = new AppBarConfiguration.Builder(
                R.id.navigation_home, R.id.navigation_chat, R.id.navigation_settings, R.id.navigation_account)
                .build();
        NavController navController = Navigation.findNavController(this, R.id.nav_host_fragment);
        NavigationUI.setupActionBarWithNavController(this, navController, appBarConfiguration);
        NavigationUI.setupWithNavController(binding.bottomNavView, navController);
    }
}
activity_main.xml file.
AppBarConfiguration : Configuration options for
NavigationUI methods.
NavController : Manages app navigation within a
NavHost.
NavigationUI : Hooks up elements typically in the 'chrome' of our application.
2. Menu for Navigation
Find the menu XML file used in bottom navigation bar.res/menu/bottom_nav_menu.xml
<?xml version="1.0" encoding="utf-8"?>
<menu xmlns:android="http://schemas.android.com/apk/res/android">
    <item
        android:id="@+id/navigation_home"
        android:icon="@drawable/ic_home_24"
        android:title="@string/title_home" />
    <item
        android:id="@+id/navigation_chat"
        android:icon="@drawable/ic_chat_24"
        android:title="@string/title_chat" />
    <item
        android:id="@+id/navigation_settings"
        android:icon="@drawable/ic_settings_24"
        android:title="@string/title_settings" />
    <item
        android:id="@+id/navigation_account"
        android:icon="@drawable/ic_account_24"
        android:title="@string/title_account" />
</menu>
3. Navigation Graph XML
Find the navigation graph XML.res/navigation/app_navigation.xml
<?xml version="1.0" encoding="utf-8"?>
<navigation xmlns:android="http://schemas.android.com/apk/res/android"
    xmlns:app="http://schemas.android.com/apk/res-auto"
    xmlns:tools="http://schemas.android.com/tools"
    app:startDestination="@+id/navigation_home">
    <fragment
        android:id="@+id/navigation_home"
        android:name="com.cp.app.ui.home.HomeFragment"
        android:label="@string/title_home"
        tools:layout="@layout/fragment_home" />
    <fragment
        android:id="@+id/navigation_chat"
        android:name="com.cp.app.ui.chat.ChatFragment"
        android:label="@string/title_chat"
        tools:layout="@layout/fragment_chat" />
    <fragment
        android:id="@+id/navigation_settings"
        android:name="com.cp.app.ui.settings.SettingsFragment"
        android:label="@string/title_settings"
        tools:layout="@layout/fragment_settings" />
    <fragment
        android:id="@+id/navigation_account"
        android:name="com.cp.app.ui.account.AccountFragment"
        android:label="@string/title_account"
        tools:layout="@layout/fragment_account" />
</navigation>
4. Navigation UI
In our demo application, we have 4 navigation UI.1. Home :
HomeViewModel.java
package com.cp.app.ui.home;
import androidx.lifecycle.LiveData;
import androidx.lifecycle.MutableLiveData;
import androidx.lifecycle.ViewModel;

public class HomeViewModel extends ViewModel {
    private final MutableLiveData<String> mText;
    public HomeViewModel() {
        mText = new MutableLiveData<>();
        mText.setValue("You clicked on home.");
    }
    public LiveData<String> getText() {
        return mText;
    }
}
LiveData : A data holder class that can be observed within a given lifecycle.
MutableLiveData : LiveData which publicly exposes
setValue(T) and postValue(T) method.
Now create a class extending
Fragment. Here the view is created for Home navigation. We override onCreateView() and onDestroyView() method from Fragment class.
HomeFragment.java
package com.cp.app.ui.home;
import android.os.Bundle;
import android.view.LayoutInflater;
import android.view.View;
import android.view.ViewGroup;
import android.widget.TextView;
import androidx.annotation.NonNull;
import androidx.fragment.app.Fragment;
import androidx.lifecycle.ViewModelProvider;
import com.cp.app.databinding.FragmentHomeBinding;

public class HomeFragment extends Fragment {

    private FragmentHomeBinding binding;

    public View onCreateView(@NonNull LayoutInflater inflater,
                             ViewGroup container, Bundle savedInstanceState) {
        HomeViewModel homeViewModel =
                new ViewModelProvider(this).get(HomeViewModel.class);

        binding = FragmentHomeBinding.inflate(inflater, container, false);
        View root = binding.getRoot();

        final TextView textView = binding.textHome;
        homeViewModel.getText().observe(getViewLifecycleOwner(), textView::setText);
        return root;
    }
    @Override
    public void onDestroyView() {
        super.onDestroyView();
        binding = null;
    }
}
FragmentHomeBinding is automatically generated class for fragment_home.xml file.
2. Chat :
ChatViewModel.java
package com.cp.app.ui.chat;
import androidx.lifecycle.LiveData;
import androidx.lifecycle.MutableLiveData;
import androidx.lifecycle.ViewModel;

public class ChatViewModel extends ViewModel {
    private final MutableLiveData<String> mText;
    public ChatViewModel() {
        mText = new MutableLiveData<>();
        mText.setValue("You clicked on chat.");
    }
    public LiveData<String> getText() {
        return mText;
    }
}
package com.cp.app.ui.chat;
import android.os.Bundle;
import android.view.LayoutInflater;
import android.view.View;
import android.view.ViewGroup;
import android.widget.TextView;
import androidx.annotation.NonNull;
import androidx.fragment.app.Fragment;
import androidx.lifecycle.ViewModelProvider;
import com.cp.app.databinding.FragmentChatBinding;

public class ChatFragment extends Fragment {

    private FragmentChatBinding binding;

    public View onCreateView(@NonNull LayoutInflater inflater,
                             ViewGroup container, Bundle savedInstanceState) {
        ChatViewModel chatViewModel =
                new ViewModelProvider(this).get(ChatViewModel.class);

        binding = FragmentChatBinding.inflate(inflater, container, false);
        View root = binding.getRoot();

        final TextView textView = binding.textChat;
        chatViewModel.getText().observe(getViewLifecycleOwner(), textView::setText);
        return root;
    }
    @Override
    public void onDestroyView() {
        super.onDestroyView();
        binding = null;
    }
}
3. Settings :
SettingsViewModel.java
package com.cp.app.ui.settings;
import androidx.lifecycle.LiveData;
import androidx.lifecycle.MutableLiveData;
import androidx.lifecycle.ViewModel;

public class SettingsViewModel extends ViewModel {
    private final MutableLiveData<String> mText;
    public SettingsViewModel() {
        mText = new MutableLiveData<>();
        mText.setValue("You clicked on settings.");
    }
    public LiveData<String> getText() {
        return mText;
    }
}
package com.cp.app.ui.settings;
import android.os.Bundle;
import android.view.LayoutInflater;
import android.view.View;
import android.view.ViewGroup;
import android.widget.TextView;
import androidx.annotation.NonNull;
import androidx.fragment.app.Fragment;
import androidx.lifecycle.ViewModelProvider;
import com.cp.app.databinding.FragmentSettingsBinding;

public class SettingsFragment extends Fragment {

    private FragmentSettingsBinding binding;

    public View onCreateView(@NonNull LayoutInflater inflater,
                             ViewGroup container, Bundle savedInstanceState) {
        SettingsViewModel dashboardViewModel =
                new ViewModelProvider(this).get(SettingsViewModel.class);

        binding = FragmentSettingsBinding.inflate(inflater, container, false);
        View root = binding.getRoot();

        final TextView textView = binding.textSettings;
        dashboardViewModel.getText().observe(getViewLifecycleOwner(), textView::setText);
        return root;
    }
    @Override
    public void onDestroyView() {
        super.onDestroyView();
        binding = null;
    }
}
4. Account :
AccountViewModel.java
package com.cp.app.ui.account;
import androidx.lifecycle.LiveData;
import androidx.lifecycle.MutableLiveData;
import androidx.lifecycle.ViewModel;

public class AccountViewModel extends ViewModel {
    private final MutableLiveData<String> mText;
    public AccountViewModel() {
        mText = new MutableLiveData<>();
        mText.setValue("You clicked on account.");
    }
    public LiveData<String> getText() {
        return mText;
    }
}
package com.cp.app.ui.account;
import android.os.Bundle;
import android.view.LayoutInflater;
import android.view.View;
import android.view.ViewGroup;
import android.widget.TextView;
import androidx.annotation.NonNull;
import androidx.fragment.app.Fragment;
import androidx.lifecycle.ViewModelProvider;
import com.cp.app.databinding.FragmentAccountBinding;

public class AccountFragment extends Fragment {

    private FragmentAccountBinding binding;

    public View onCreateView(@NonNull LayoutInflater inflater,
                             ViewGroup container, Bundle savedInstanceState) {
        AccountViewModel accountViewModel =
                new ViewModelProvider(this).get(AccountViewModel.class);

        binding = FragmentAccountBinding.inflate(inflater, container, false);
        View root = binding.getRoot();

        final TextView textView = binding.textAccount;
        accountViewModel.getText().observe(getViewLifecycleOwner(), textView::setText);
        return root;
    }
    @Override
    public void onDestroyView() {
        super.onDestroyView();
        binding = null;
    }
}


