Android Options Menu Example
July 03, 2023
On this page we will learn to create options menu in our Android application.
1. Menus are common user interface in our Android applications that present user actions and other options in our activities.
2. Menus are created using
Menu APIs. Menus can be used in three ways in our Android application.
a. Options menu : It contains the items that have the global impact on the application such as Bookmark, Search, Settings etc. Options menu is the primary collection of menu items.
b. Context menu : It is a floating menu that appears when the user performs a long-click on an element. A context menu contains the menu items that act on selected content or context frame.
c. Popup menu : It appears below the anchor view or above the view. It provides an overflow-style menu for actions that relate to specific content.
3. Menus are created using XML format and can be updated by code at runtime. Menus are added to
Activity within onCreateOptionsMenu() method.
4. On click of menu items, actions are performed within
onOptionsItemSelected() method in an Activity class.
1. XML for Menu
1. Menu items are defined in an XML format and then we inflate the menu resource in ourActivity or Fragment.
2. Defining menu in XML file is good practice instead of defining in activity code. The advantages of defining menu in XML are as followings.
a. We can easily visualize the menu structure in XML.
b. The content of menu is separate from application’s behavioural code.
c. We can create alternative menu configurations for different platform versions, screen sizes, and other configurations.
3. The menu XML files are created within
res/menu/ directory. The menu XML uses following elements.
<menu> : Root node to define menu. This can contain <item> and <group> elements.
<item> : Creates a menu item. This can contain
<menu> element in order to create a submenu.
<group> : An optional container for
<item> elements. It is used to categorize menu items so they share properties such as active state and visibility.
Find the sample XML file to create menu.
<menu xmlns:android="http://schemas.android.com/apk/res/android"
    xmlns:app="http://schemas.android.com/apk/res-auto">
    <item android:id="@+id/search_menu"
        android:icon="@drawable/search"
        android:title="@string/search"
        app:showAsAction="always"/>
    ——
</menu>
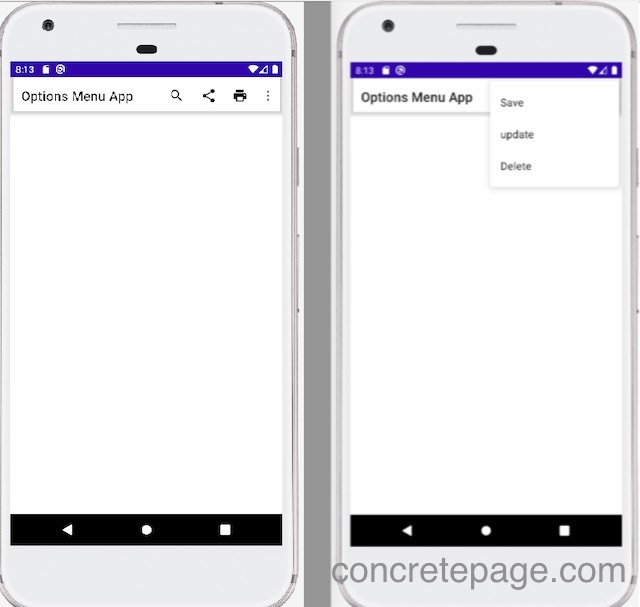
android:icon works only when the menu item is displayed on app bar. Menu item can be displayed on app bar using app:showAsAction attribute with values always or ifRoom .
The showAsAction values are never, always, ifRoom etc.
Find the menu XML file used used in our example.
res/menu/main.xml
<?xml version="1.0" encoding="utf-8"?>
<menu xmlns:android="http://schemas.android.com/apk/res/android"
    xmlns:app="http://schemas.android.com/apk/res-auto">
    <item
        android:id="@+id/search_menu"
        android:icon="@drawable/search"
        android:title="@string/search"
        app:showAsAction="always" />
    <item
        android:id="@+id/share_menu"
        android:icon="@drawable/share"
        android:title="@string/share"
        app:showAsAction="always" />
    <item
        android:id="@+id/print_menu"
        android:icon="@drawable/print"
        android:title="@string/print"
        app:showAsAction="always" />
    <item
        android:id="@+id/save_menu"
        android:title="@string/save"
        app:showAsAction="never" />
    <item
        android:id="@+id/update_menu"
        android:title="update"
        app:showAsAction="never" />
    <item
        android:id="@+id/delete_menu"
        android:title="@string/delete"
        app:showAsAction="never" />
</menu>
2. Creating Sub-Menus
To create sub-menus, use<menu> tag within <item> tag.
<item>
  <menu>
    <item></item>
    ------
  </menu>
</item>
res/menu/main.xml
<?xml version="1.0" encoding="utf-8"?>
<menu xmlns:android="http://schemas.android.com/apk/res/android"
    xmlns:app="http://schemas.android.com/apk/res-auto">
    <item
        android:id="@+id/search_menu"
        android:icon="@drawable/search"
        android:title="@string/search"
        app:showAsAction="always" />
    <item
        android:id="@+id/manage_menu"
        android:title="@string/manage"
        app:showAsAction="never">
        <menu>
            <item
                android:id="@+id/save_menu"
                android:title="@string/save"
                app:showAsAction="never" />
            <item
                android:id="@+id/update_menu"
                android:title="update"
                app:showAsAction="never" />
            <item
                android:id="@+id/delete_menu"
                android:title="@string/delete"
                app:showAsAction="never" />
        </menu>
    </item>
    <item
        android:id="@+id/share_menu"
        android:icon="@drawable/share"
        android:title="@string/share"
        app:showAsAction="never" />
    <item
        android:id="@+id/print_menu"
        android:icon="@drawable/print"
        android:title="@string/print"
        app:showAsAction="never" />
</menu>
3. Creating Activity
Find the activity class used in our example.MainActivity.java
package com.cp.myapplication;
import android.os.Bundle;
import android.view.Menu;
import android.view.MenuItem;
import androidx.appcompat.app.AppCompatActivity;
import androidx.navigation.ui.AppBarConfiguration;
import com.cp.myapplication.databinding.ActivityMainBinding;
import com.google.android.material.snackbar.Snackbar;

public class MainActivity extends AppCompatActivity {
    private AppBarConfiguration mAppBarConfiguration;
    private ActivityMainBinding binding;

    @Override
    protected void onCreate(Bundle savedInstanceState) {
        super.onCreate(savedInstanceState);
        binding = ActivityMainBinding.inflate(getLayoutInflater());
        setContentView(binding.getRoot());
        setSupportActionBar(binding.toolbar);
    }

    @Override
    public boolean onCreateOptionsMenu(Menu menu) {
        getMenuInflater().inflate(R.menu.main, menu);
        return true;
    }

    @Override
    public boolean onOptionsItemSelected(MenuItem item) {
        Snackbar.make(binding.getRoot(), item.getTitle(), Snackbar.LENGTH_LONG)
                .setAction("Action", null).show();
        return true;
    }
}
2. The
ActivityMainBinding is the generated class by following layout xml file.
res/layout/activity_main.xml
<?xml version="1.0" encoding="utf-8"?>
<androidx.coordinatorlayout.widget.CoordinatorLayout xmlns:android="http://schemas.android.com/apk/res/android"
    xmlns:app="http://schemas.android.com/apk/res-auto"
    xmlns:tools="http://schemas.android.com/tools"
    android:layout_width="match_parent"
    android:layout_height="match_parent"
    android:fitsSystemWindows="true"
    tools:context=".MainActivity">
    <com.google.android.material.appbar.AppBarLayout
        android:layout_width="match_parent"
        android:layout_height="wrap_content"
        android:background="@color/material_on_surface_stroke"
        android:fitsSystemWindows="true">
        <com.google.android.material.appbar.MaterialToolbar
            android:id="@+id/toolbar"
            android:layout_width="match_parent"
            android:layout_height="?attr/actionBarSize" />
    </com.google.android.material.appbar.AppBarLayout>
</androidx.coordinatorlayout.widget.CoordinatorLayout>
onCreateOptionsMenu() method specifies our options menu for an Activity class. Inflate the menu as following.
getMenuInflater().inflate(R.menu.main, menu);
onOptionsItemSelected() method.
5. Find the
AndroidManifest.xml to run the code.
AndroidManifest.xml
<?xml version="1.0" encoding="utf-8"?>
<manifest xmlns:android="http://schemas.android.com/apk/res/android"
    xmlns:tools="http://schemas.android.com/tools">

    <application
        android:allowBackup="true"
        android:dataExtractionRules="@xml/data_extraction_rules"
        android:fullBackupContent="@xml/backup_rules"
        android:icon="@mipmap/ic_launcher"
        android:label="@string/app_name"
        android:roundIcon="@mipmap/ic_launcher_round"
        android:supportsRtl="true"
        tools:targetApi="31">
        <activity
            android:name=".MainActivity"
            android:exported="true"
            android:label="@string/app_name"
            android:theme="@style/Theme.MyApplication.NoActionBar">
            <intent-filter>
                <action android:name="android.intent.action.MAIN" />
                <category android:name="android.intent.category.LAUNCHER" />
            </intent-filter>
        </activity>
    </application>
</manifest>

app:showAsAction="always".


