Android FragmentActivity with ListFragment and Fragment Example
October 17, 2014
On this page we will create FragmentActivity with ListFragment and Fragment in android. Fragment is reusable in android layout. More than one fragment can be combined to represent a single user interface. A fragment is associated with activity. In this tutorial we are creating a menu with some item like alphabet and when clicking on item, we are displaying a message related to that item.
Fragment Layout using <fragment> Tag
Find the main layout which is defining two fragments. One is to create menu and second to display output.main.xml
<?xml version="1.0" encoding="utf-8"?>
<LinearLayout xmlns:android="http://schemas.android.com/apk/res/android"
    xmlns:tools="http://schemas.android.com/tools"
    android:layout_width="match_parent"
    android:layout_height="match_parent"
    android:orientation="horizontal" >
    <fragment
        android:layout_height="match_parent"
        android:layout_width="50dp"
        class="com.concretepage.android.AlphabetListFragment"
        android:id="@+id/menu"/>
    <fragment
        android:layout_width="100dp"
        android:layout_height="match_parent"
        class="com.concretepage.android.OutputFragment"
        android:id="@+id/output"/>
</LinearLayout>
menu_fragment.xml
<?xml version="1.0" encoding="utf-8"?>
<LinearLayout xmlns:android="http://schemas.android.com/apk/res/android"
    android:orientation="vertical"
    android:layout_width="match_parent"
    android:layout_height="match_parent">
    <ListView
        android:layout_width="match_parent"
        android:layout_height="wrap_content"
        android:id="@android:id/list" />
</LinearLayout>
output_fragment.xml
<?xml version="1.0" encoding="utf-8"?>
<LinearLayout xmlns:android="http://schemas.android.com/apk/res/android"
    android:orientation="vertical"
    android:layout_width="match_parent"
    android:gravity="center"
    android:background="#b0b0ff"
    android:layout_height="match_parent">
    <TextView
        android:layout_width="wrap_content"
        android:layout_height="wrap_content"
        android:layout_gravity="center"
        android:textColor="#FF0000"
        android:textSize="20sp"
        android:id="@+id/word"/>
</LinearLayout>
strings.xml
<?xml version="1.0" encoding="utf-8"?>
<resources>
   <string name="app_name">Concrete Page</string>
   <string name="hello">Hello World!</string>
</resources>
@android:id/list
Android provides build in resource id for the list. So while creating menu layout we have used @android:id/list. And this id will be used by android to get menu fragment layout. If we want to use this id then write it as android.R.id.list.FragmentActivity, ListFragment and Fragment Classes
Find the fragment class that will display output on the click of menu item. android.app.Fragment class will be extended to create fragment class.OutputFragment.java
package com.concretepage.android;
import android.app.Fragment;
import android.os.Bundle;
import android.view.LayoutInflater;
import android.view.View;
import android.view.ViewGroup;
import android.widget.TextView;
import com.cp.android.R;
public class OutputFragment extends Fragment {
    TextView output;
    @Override
    public View onCreateView(LayoutInflater inflater,ViewGroup viewGroup, Bundle savedInstanceState) {
        View view = inflater.inflate(R.layout.output_fragment, viewGroup, false);
        output= (TextView)view.findViewById(R.id.word);
        return view;
    }
    public void display(String txt){
        output.setText(txt);
    }
}
AlphabetListFragment.java
package com.concretepage.android;
import android.app.ListFragment;
import android.os.Bundle;
import android.view.LayoutInflater;
import android.view.View;
import android.view.ViewGroup;
import android.widget.ArrayAdapter;
import android.widget.ListView;
import com.cp.android.R;
public class AlphabetListFragment extends ListFragment {
    String[] alphabet = new String[] { "A","B","C"};
    String[] word = new String[]{"Apple", "Boat", "Cat"};
    @Override
    public View onCreateView(LayoutInflater inflater,ViewGroup viewGroup, Bundle savedInstanceState) {
        View view =inflater.inflate(R.layout.menu_fragment, viewGroup, false);
        ArrayAdapter adapter = new ArrayAdapter(getActivity(),
                android.R.layout.simple_list_item_activated_1, alphabet);
        setListAdapter(adapter);
        return view;
    }
    @Override
    public void onListItemClick(ListView listView, View view, int position, long id) {
        OutputFragment txt = (OutputFragment)getFragmentManager().findFragmentById(R.id.output);
        txt.display(word[position]);
        getListView().setSelector(android.R.color.holo_red_dark);
    }
}
MainActivity.java
package com.concretepage.android;
import com.cp.android.R;
import android.os.Bundle;
import android.support.v4.app.FragmentActivity;
public class MainActivity extends FragmentActivity {
   @Override
    protected void onCreate(Bundle savedInstanceState) {
        super.onCreate(savedInstanceState);
        setContentView(R.layout.main);
    }
}
android.R.layout and android.R.color
There are defined ids in android. For different type of layout and color we can use android in-built ids. To give a look to menu there are different ids like simple_dropdown_item_1line and simple_list_item_activated_1 etc. We can use it as android.R.layout.simple_list_item_activated_1. In the same way there are different in-built color id that can be used directly in the code as android.R.color.holo_red_dark.Android Manifest File
To run fragment we are using below android manifest. Declare only fragment activity class and no require declaring fragment classes.AndroidManifest.xml
<?xml version="1.0" encoding="utf-8"?>
<manifest xmlns:android="http://schemas.android.com/apk/res/android"
    package="com.cp.android"
    android:versionCode="1"
    android:versionName="1.0" >
    <uses-sdk android:minSdkVersion="11" />
    <application
        android:allowBackup ="false"
        android:icon="@drawable/ic_launcher"
        android:label="@string/app_name" >
        <activity
            android:name="com.concretepage.android.MainActivity"
            android:label="@string/app_name" >
            <intent-filter>
                <action android:name="android.intent.action.MAIN" />
                <category android:name="android.intent.category.LAUNCHER" />
            </intent-filter>
        </activity>
    </application>
</manifest>
Output
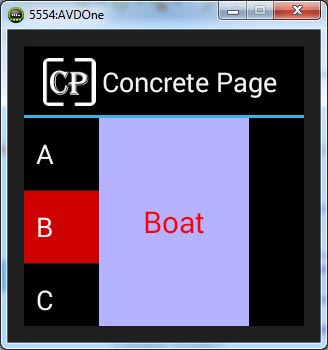
Finally installing APK file in mobile or simulator we will see below UI. On click of alphabet, the word will be displayed.


