Spring Boot MVC Security Example
November 28, 2019
This page will walk through Spring Boot MVC security custom login and logout + Thymeleaf + CSRF + MySQL database + JPA + Hibernate example. Spring Boot configures Spring features itself on the basis of JAR present in the classpath. To create a view in Spring Boot MVC, we should prefer template engine and not JSP because for the JSP there are known limitations with embedded servlet container. In our example we will use Spring Boot MVC with Thymeleaf template engine. We will create custom login, logout and other pages using Thymeleaf. We will perform user authentication using database. For Spring Security we will create a security configuration file where we will configure custom login, logout and exception handling configuration. When we use JavaConfig for Spring Security, it enables CSRF protection by default. If CSRF protection is enabled in Spring Security application, Thymeleaf includes CSRF token within form automatically. All default settings of Spring Boot can be changed using application.properties file such as settings related to Spring MVC, Spring Security, Thymleaf and database. To take a complete control on Spring MVC , Spring Security and database configuration, we should create JavaConfig respectively. In our example we will create a JavaConfig for Spring Security. We will create custom login and logout form and user will be authenticated using database. To interact with the database we are using JPA with Hibernate. The datasource and Hibernate properties will be configured in application.properties file. Now let us discuss complete example step by step.
Contents
- Technologies Used
- Project Structure using Eclipse
- Maven File
- Using Thymeleaf Template engine
- Using Static Content
- Database Configuration using application.properties
- MySQL Database Schema
- Spring Boot MVC Configuration
- Spring Boot Security Configuration
- Custom Login and Logout Pages
- Custom 403 Error Page for Access Denied Exception
- Create DAO
- Create Service
- Create Controller
- Run Application
- References
- Download Source Code
Technologies Used
Find the technologies being used in our example.1. Java 8
2. Spring Boot 1.5.3.RELEASE
3. Maven 3.3
4. MySQL 5.5
5. Eclipse Mars
Project Structure using Eclipse
Find the print screen of project structure in eclipse.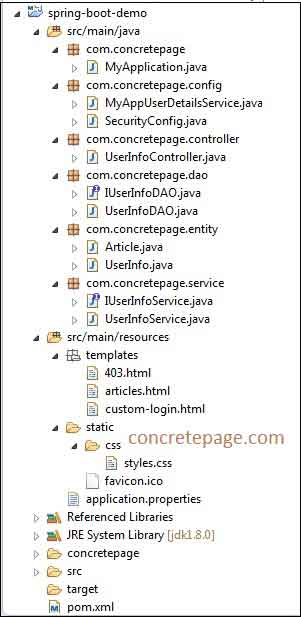
Maven File
Find the maven file used in our example.pom.xml
<?xml version="1.0" encoding="UTF-8"?>
<project xmlns="http://maven.apache.org/POM/4.0.0" xmlns:xsi="http://www.w3.org/2001/XMLSchema-instance"
	xsi:schemaLocation="http://maven.apache.org/POM/4.0.0 http://maven.apache.org/xsd/maven-4.0.0.xsd">
	<modelVersion>4.0.0</modelVersion>
	<groupId>com.concretepage</groupId>
	<artifactId>spring-boot-demo</artifactId>
	<version>0.0.1-SNAPSHOT</version>
	<packaging>jar</packaging>
	<name>spring-demo</name>
	<description>Spring Boot Demo Project</description>
	<parent>
		<groupId>org.springframework.boot</groupId>
		<artifactId>spring-boot-starter-parent</artifactId>
		<version>1.5.3.RELEASE</version>
	</parent>
	<properties>
		<java.version>1.8</java.version>
	</properties>
	<dependencies>
		<dependency>
		     <groupId>org.springframework.boot</groupId>
		     <artifactId>spring-boot-starter-web</artifactId>
		</dependency>
		<dependency>
		    <groupId>org.springframework.boot</groupId>
		    <artifactId>spring-boot-starter-security</artifactId>
		</dependency>
	        <dependency>
		    <groupId>org.springframework.boot</groupId>
		    <artifactId>spring-boot-starter-data-jpa</artifactId>
	        </dependency>
		<dependency>
		    <groupId>org.springframework.boot</groupId>
		    <artifactId>spring-boot-starter-thymeleaf</artifactId>
		</dependency>
	        <dependency>
		    <groupId>mysql</groupId>
		    <artifactId>mysql-connector-java</artifactId>
	        </dependency>
    	        <dependency>
                    <groupId>org.springframework.boot</groupId>
                    <artifactId>spring-boot-devtools</artifactId>
                    <optional>true</optional>
                </dependency>
	</dependencies>
	<build>
	   <plugins>
	      <plugin>
		<groupId>org.springframework.boot</groupId>
		<artifactId>spring-boot-maven-plugin</artifactId>
	      </plugin>
	   </plugins>
	</build>
</project>
Using Thymeleaf Template engine
To serve dynamic HTML content Spring Boot prefers template engines such as FreeMarker, Groovy, Thymeleaf, Mustache. To create view in Spring Boot MVC, JSP should be avoided because there are several known limitations with embedded servlets to process JSP. In our example we are using Thymeleaf template engine to create view. To enable Thymeleaf, we need to use following Spring Boot starter in our build file.spring-boot-starter-thymeleaf
Now the default location for template engines is as given below.
src/main/resources/templates
application.properties.
spring.thymeleaf.prefix=classpath:/templates/
spring.thymeleaf.suffix=.html
ThymeleafAutoConfiguration to auto configure Thymeleaf. Find the properties that can be used in application.properties to change the settings of Thymeleaf auto configuration.
spring.thymeleaf.cache: Enable template caching. Default is true.
spring.thymeleaf.check-template: Checks existence of template before rendering it. Default is true.
spring.thymeleaf.check-template-location: Checks existence of template location. Default is true.
spring.thymeleaf.content-type: Configures content type. Default is text/html.
spring.thymeleaf.enabled: Enables MVC Thymeleaf view resolution. Default is true.
spring.thymeleaf.encoding: Configures template encoding. Default is UTF-8.
spring.thymeleaf.excluded-view-names: Configures comma separated view names that should be excluded from the resolution.
spring.thymeleaf.mode: Configures template mode. Default is HTML 5.
spring.thymeleaf.prefix: Prefix that gets prepended to view name in URL creation. Default is classpath:/templates/
spring.thymeleaf.suffix: Suffix that gets appended to view name in URL creation. Default is .html .
spring.thymeleaf.template-resolver-order: Order of the template resolver in the chain.
spring.thymeleaf.view-names: Configures comma separated view names that can be resolved.
Using Static Content
By default Spring Boot uses/static directory in the classpath for static resources. If we run our project using executable JAR then we must not keep our static resources in src/main/webapp path because when JAR is packaged, it will be silently ignored by most of the build tools. The path src/main/webapp can be used when we only want to package project as WAR file. By default static resources are mapped on /** but we can change it as required using the following property. For example to relocate all resources to /resources/**, we can achieve it as following.
spring.mvc.static-path-pattern=/resources/**
Using JS and CSS files
To use CSS, just create a folder named as static within the directory
src\main\resources and put your files. We can also create folder name such as css for CSS files and js for JS files inside the static directory.
Using custom Favicon
For favicon, Spring Boot looks for
favicon.ico in the configured static content location. To change default favicon, just put your favicon.ico file in that location. To enable and disable favicon we need to configure spring.mvc.favicon.enabled in application.properties. Default value is true.
In our example we are using a CSS file as follows.
styles.css
.error{
    color: red;
    font-size: 20px;
}
.user{
    color: blue;
    font-size: 15px;
}
table {
    border-collapse: collapse;
}
table, th, td {
    border: 1px solid black;
}
Database Configuration using application.properties
For database configuration, we need to configure following Spring Boot starter in build file.spring-boot-starter-data-jpa
application.properties where we are configuring datasource and JPA with Hibernate.
application.properties
#spring.datasource.driver-class-name=com.mysql.jdbc.Driver
spring.datasource.url= jdbc:mysql://localhost:3306/concretepage
spring.datasource.username= root
spring.datasource.password=
spring.datasource.tomcat.max-wait= 20000
spring.datasource.tomcat.max-active= 50
spring.datasource.tomcat.max-idle= 20
spring.datasource.tomcat.min-idle= 15

spring.jpa.properties.hibernate.dialect = org.hibernate.dialect.MySQLDialect
spring.jpa.properties.hibernate.id.new_generator_mappings = false
spring.jpa.properties.hibernate.format_sql = true

logging.level.org.hibernate.SQL= DEBUG
logging.level.org.hibernate.type.descriptor.sql.BasicBinder= TRACE
MySQL Database Schema
Find the MySQL database schema used in our example.Database Schema
-- Dumping database structure for concretepage
CREATE DATABASE IF NOT EXISTS `concretepage`;
USE `concretepage`;
-- Dumping structure for table concretepage.articles
CREATE TABLE IF NOT EXISTS `articles` (
  `article_id` int(5) NOT NULL AUTO_INCREMENT,
  `title` varchar(200) NOT NULL,
  `category` varchar(100) NOT NULL,
  PRIMARY KEY (`article_id`)
) ENGINE=InnoDB AUTO_INCREMENT=4 DEFAULT CHARSET=latin1;
-- Dumping data for table concretepage.articles: ~3 rows (approximately)
INSERT INTO `articles` (`article_id`, `title`, `category`) VALUES
	(1, 'Java Concurrency', 'Java'),
	(2, 'Hibernate HQL ', 'Hibernate'),
	(3, 'Spring MVC with Hibernate', 'Spring');
-- Dumping structure for table concretepage.users
CREATE TABLE IF NOT EXISTS `users` (
  `username` varchar(50) NOT NULL,
  `password` varchar(100) NOT NULL,
  `full_name` varchar(100) NOT NULL,
  `role` varchar(50) NOT NULL,
  `country` varchar(100) NOT NULL,
  `enabled` tinyint(1) NOT NULL,
  PRIMARY KEY (`username`)
) ENGINE=InnoDB DEFAULT CHARSET=latin1;
-- Dumping data for table concretepage.users: ~2 rows (approximately)
/*!40000 ALTER TABLE `users` DISABLE KEYS */;
INSERT INTO `users` (`username`, `password`, `full_name`, `role`, `country`, `enabled`) VALUES
	('mukesh', '$2a$10$N0eqNiuikWCy9ETQ1rdau.XEELcyEO7kukkfoiNISk/9F7gw6eB0W', 'Mukesh Sharma', 'ROLE_ADMIN', 'India', 1),
	('tarun', '$2a$10$QifQnP.XqXDW0Lc4hSqEg.GhTqZHoN2Y52/hoWr4I5ePxK7D2Pi8q', 'Tarun Singh', 'ROLE_USER', 'India', 1);
Main.java
package com.concretepage;
import org.springframework.security.crypto.bcrypt.BCryptPasswordEncoder;
public class Main {
	public static void main(String[] args) {
		BCryptPasswordEncoder encoder = new BCryptPasswordEncoder();
		System.out.println(encoder.encode("m123"));
	}
}
Article.java
package com.concretepage.entity;
import java.io.Serializable;
import javax.persistence.Column;
import javax.persistence.Entity;
import javax.persistence.GeneratedValue;
import javax.persistence.GenerationType;
import javax.persistence.Id;
import javax.persistence.Table;
@Entity
@Table(name="articles")
public class Article implements Serializable {
	private static final long serialVersionUID = 1L;
	@Id
	@GeneratedValue(strategy=GenerationType.AUTO)
	@Column(name="article_id")
        private int articleId;
	@Column(name="title")
        private String title;
	@Column(name="category")
	private String category;
	public int getArticleId() {
		return articleId;
	}
	public void setArticleId(int articleId) {
		this.articleId = articleId;
	}
	public String getTitle() {
		return title;
	}
	public void setTitle(String title) {
		this.title = title;
	}
	public String getCategory() {
		return category;
	}
	public void setCategory(String category) {
		this.category = category;
	}
}
package com.concretepage.entity;
import java.io.Serializable;
import javax.persistence.Column;
import javax.persistence.Entity;
import javax.persistence.Id;
import javax.persistence.Table;
@Entity
@Table(name="users")
public class UserInfo implements Serializable {
	private static final long serialVersionUID = 1L;
	@Id
	@Column(name="username")
	private String userName;
	@Column(name="password")
	private String password;
	@Column(name="role")
	private String role;
	@Column(name="full_name")
	private String fullName;
	@Column(name="country")
	private String country;
	@Column(name="enabled")
	private short enabled;
	public String getUserName() {
		return userName;
	}
	public void setUserName(String userName) {
		this.userName = userName;
	}
	public String getPassword() {
		return password;
	}
	public void setPassword(String password) {
		this.password = password;
	}
	public String getRole() {
		return role;
	}
	public void setRole(String role) {
		this.role = role;
	}
	public String getFullName() {
		return fullName;
	}
	public void setFullName(String fullName) {
		this.fullName = fullName;
	}
	public String getCountry() {
		return country;
	}
	public void setCountry(String country) {
		this.country = country;
	}
	public short getEnabled() {
		return enabled;
	}
	public void setEnabled(short enabled) {
		this.enabled = enabled;
	}
}
Spring Boot MVC Configuration
To enable Spring Boot MVC we need to use following starter in build file.spring-boot-starter-web
application.properties. Find some properties.
spring.mvc.async.request-timeout: Timeout in milliseconds for asynchronous request.
spring.mvc.date-format: Date format to use.
spring.mvc.favicon.enabled: It enables and disables favicon. Default is true.
spring.mvc.locale: Locale to use.
spring.mvc.media-types.*: Maps file extensions to media type for content negotiation.
spring.mvc.servlet.load-on-startup: It configures startup priority for Spring Web Services Servlet. Default value is -1.
spring.mvc.static-path-pattern: It configures path pattern for static resources.
spring.mvc.view.prefix: It configures prefix for Spring view such as JSP.
spring.mvc.view.suffix: It configures view suffix.
To take a complete control on Spring MVC configuration we can create a configuration class annotated with
@Configuration and @EnableWebMvc. To override any settings we need to extend WebMvcConfigurerAdapter class.
Spring Boot Security Configuration
To configure Spring Boot Security, we need to use following Spring Boot starter in our build file.spring-boot-starter-security
application.properties. Find some of them.
security.user.name: It configures user name. Default user is user.
security.user.password: It configures password.
security.user.role: It configures role. Default role is USER.
security.enable-csrf: It enables CSRF. Default value is false.
When we want a complete control on Spring Security then we need to create java configuration annotated with
@Configuration and @EnableWebSecurity. To override any settings we need to extend WebSecurityConfigurerAdapter class. To secure a method we need to annotate our configuration class by @EnableGlobalMethodSecurity. Now find the security configuration used in our example.
SecurityConfig.java
package com.concretepage.config;
import org.springframework.beans.factory.annotation.Autowired;
import org.springframework.context.annotation.Configuration;
import org.springframework.security.config.annotation.authentication.builders.AuthenticationManagerBuilder;
import org.springframework.security.config.annotation.method.configuration.EnableGlobalMethodSecurity;
import org.springframework.security.config.annotation.web.builders.HttpSecurity;
import org.springframework.security.config.annotation.web.configuration.EnableWebSecurity;
import org.springframework.security.config.annotation.web.configuration.WebSecurityConfigurerAdapter;
import org.springframework.security.crypto.bcrypt.BCryptPasswordEncoder;
@Configuration
@EnableWebSecurity
@EnableGlobalMethodSecurity(securedEnabled=true)
public class SecurityConfig extends WebSecurityConfigurerAdapter {
	@Autowired
	private MyAppUserDetailsService myAppUserDetailsService;
	@Override
	protected void configure(HttpSecurity http) throws Exception {
		http.authorizeRequests()
		.antMatchers("/app/secure/**").hasAnyRole("ADMIN","USER")
		.and().formLogin()  //login configuration
                .loginPage("/app/login")
                .loginProcessingUrl("/app-login")
                .usernameParameter("app_username")
                .passwordParameter("app_password")
                .defaultSuccessUrl("/app/secure/article-details")
		.and().logout()    //logout configuration
		.logoutUrl("/app-logout")
		.logoutSuccessUrl("/app/login")
		.and().exceptionHandling() //exception handling configuration
		.accessDeniedPage("/app/error");
	}
        @Autowired
   	public void configureGlobal(AuthenticationManagerBuilder auth) throws Exception {
    	      BCryptPasswordEncoder passwordEncoder = new BCryptPasswordEncoder();
              auth.userDetailsService(myAppUserDetailsService).passwordEncoder(passwordEncoder);
	}
}
@EnableWebSecurity annotation, Thymeleaf includes CSRF token within form automatically. For password encoding we are using Spring BCryptPasswordEncoder class.
To authenticate user using database we need to implement
UserDetailsService.
MyAppUserDetailsService.java
package com.concretepage.config;
import java.util.Arrays;
import org.springframework.beans.factory.annotation.Autowired;
import org.springframework.security.core.GrantedAuthority;
import org.springframework.security.core.authority.SimpleGrantedAuthority;
import org.springframework.security.core.userdetails.User;
import org.springframework.security.core.userdetails.UserDetails;
import org.springframework.security.core.userdetails.UserDetailsService;
import org.springframework.security.core.userdetails.UsernameNotFoundException;
import org.springframework.stereotype.Service;
import com.concretepage.dao.IUserInfoDAO;
import com.concretepage.entity.UserInfo;
@Service
public class MyAppUserDetailsService implements UserDetailsService {
	@Autowired
	private IUserInfoDAO userInfoDAO;
	@Override
	public UserDetails loadUserByUsername(String userName)
			throws UsernameNotFoundException {
		UserInfo activeUserInfo = userInfoDAO.getActiveUser(userName);
		GrantedAuthority authority = new SimpleGrantedAuthority(activeUserInfo.getRole());
		UserDetails userDetails = (UserDetails)new User(activeUserInfo.getUserName(),
				activeUserInfo.getPassword(), Arrays.asList(authority));
		return userDetails;
	}
}
Custom Login and Logout Pages
Find the custom login and logout pages using Thymeleaf template engine. As we are using spring security configured in JavaConfig, CSRF protection is enabled by default. At run time CSRF token will be included within form by Thymeleaf automatically.custom-login.html
<!DOCTYPE html>
<html xmlns="http://www.w3.org/1999/xhtml" xmlns:th="http://www.thymeleaf.org">
    <head>
        <title> Spring Boot MVC Security using Thymeleaf </title>
        <link rel="stylesheet" href="/css/styles.css"/>
    </head>
    <body>
        <h3> Spring Boot MVC Security using Thymeleaf </h3>
        <p th:if="${param.error}" class="error">
            Bad Credentials
        </p>
        <form th:action="@{/app-login}" method="POST">
            User Name : <input type="text" name="app_username"/> <br/><br/>
            Password: <input type="password" name="app_password"/> <br/><br/>
            <input type="submit" value="Login"/>
        </form>
    </body>
</html>
<!DOCTYPE html>
<html xmlns="http://www.w3.org/1999/xhtml" xmlns:th="http://www.thymeleaf.org">
<head>
      <title>Spring Boot MVC Security using Thymeleaf</title>
      <link rel="stylesheet" href="/css/styles.css"/>
</head>
<body>
   <h3>User Articles Details</h3>
   <div>
	    Logged in user: <b th:inline="text"  class="user"> [[${#httpServletRequest.remoteUser}]] </b>
	    <form th:action="@{/app-logout}" method="POST">
	         <input type="submit" value="Logout"/>
	    </form>
   </div> <br/>
   <table>
	<tr th:each="article : ${userArticles}">
	    <td th:text="${article.articleId}">Id</td>
	    <td th:text="${article.title}">Title</td>
	    <td th:text="${article.category}">Category</td>
	</tr>
   </table>
</body>
</html>
Custom 403 Error Page for Access Denied Exception
When the user tries to access a method that is secured and not authorized to requesting user role then access denied exception is thrown. We have created an error page with custom error message.403.html
<!DOCTYPE html>
<html xmlns="http://www.w3.org/1999/xhtml" xmlns:th="http://www.thymeleaf.org">
<head>
      <title>Spring Boot MVC Security using Thymeleaf</title>
      <link rel="stylesheet" href="/css/styles.css"/>
</head>
<body>
   <h3>Access Denied Exception</h3>
   <div>
	    Logged in user: <b th:inline="text"  class="user"> [[${#httpServletRequest.remoteUser}]] </b>
	    <form th:action="@{/app-logout}" method="POST">
	         <input type="submit" value="Logout"/>
	    </form>
   </div>
   <p class="error" th:text="${errorMsg}">Error</p>
</body>
</html>
Create DAO
Find the DAO interface and class used in our example.IUserInfoDAO.java
package com.concretepage.dao;
import java.util.List;
import com.concretepage.entity.Article;
import com.concretepage.entity.UserInfo;
public interface IUserInfoDAO {
	UserInfo getActiveUser(String userName);
	List<Article> getAllUserArticles();
}
package com.concretepage.dao;
import java.util.List;
import javax.persistence.EntityManager;
import javax.persistence.PersistenceContext;
import org.springframework.stereotype.Repository;
import org.springframework.transaction.annotation.Transactional;
import com.concretepage.entity.Article;
import com.concretepage.entity.UserInfo;
@Repository
@Transactional
public class UserInfoDAO implements IUserInfoDAO {
	@PersistenceContext
	private EntityManager entityManager;
	public UserInfo getActiveUser(String userName) {
		UserInfo activeUserInfo = new UserInfo();
		short enabled = 1;
		List<?> list = entityManager.createQuery("SELECT u FROM UserInfo u WHERE userName=? and enabled=?")
				.setParameter(1, userName).setParameter(2, enabled).getResultList();
		if(!list.isEmpty()) {
			activeUserInfo = (UserInfo)list.get(0);
		}
		return activeUserInfo;
	}
	@SuppressWarnings("unchecked")
	@Override
	public List<Article> getAllUserArticles() {
		String hql = "FROM Article as atcl ORDER BY atcl.articleId";
		return (List<Article>) entityManager.createQuery(hql).getResultList();
	}
}
Create Service
We have created a secured method in our service class that can be accessed by user with ADMIN role. Find the service interface and class used in our example.IUserInfoService.java
package com.concretepage.service;
import java.util.List;
import org.springframework.security.access.annotation.Secured;
import com.concretepage.entity.Article;
public interface IUserInfoService {
     @Secured ({"ROLE_ADMIN"})
     List<Article> getAllUserArticles();
}
package com.concretepage.service;
import java.util.List;
import org.springframework.beans.factory.annotation.Autowired;
import org.springframework.stereotype.Service;
import com.concretepage.dao.IUserInfoDAO;
import com.concretepage.entity.Article;
@Service
public class UserInfoService implements IUserInfoService {
	@Autowired
	private IUserInfoDAO userInfoDAO;
	@Override
	public List<Article> getAllUserArticles(){
		return userInfoDAO.getAllUserArticles();
	}
}
Create Controller
Find the controller used in our example.UserInfoController.java
package com.concretepage.controller;
import org.springframework.beans.factory.annotation.Autowired;
import org.springframework.stereotype.Controller;
import org.springframework.web.bind.annotation.GetMapping;
import org.springframework.web.bind.annotation.RequestMapping;
import org.springframework.web.servlet.ModelAndView;
import com.concretepage.service.IUserInfoService;
@Controller
@RequestMapping("app")
public class UserInfoController {
	@Autowired
	private IUserInfoService userInfoService;
	@GetMapping("login")
	public ModelAndView login() {
	    ModelAndView mav = new ModelAndView();
	    mav.setViewName("custom-login");
	    return mav;
        }
	@GetMapping("secure/article-details")
	public ModelAndView getAllUserArticles() {
	    ModelAndView mav = new ModelAndView();
	    mav.addObject("userArticles", userInfoService.getAllUserArticles());
	    mav.setViewName("articles");
	    return mav;
        }
	@GetMapping("error")
	public ModelAndView error() {
	    ModelAndView mav = new ModelAndView();
	    String errorMessage= "You are not authorized for the requested data.";
	    mav.addObject("errorMsg", errorMessage);
	    mav.setViewName("403");
	    return mav;
        }
}
Run Application
To run the application, first create table in MySQL as given in the example. Now we can run REST web service in following ways.a. Using Eclipse: Download the project source code using the download link given at the end of page. Import the project into eclipse. Using command prompt, go to the root folder of the project and run.
mvn clean eclipse:eclipse
MyApplication by clicking Run as -> Java Application. Main class is given as below.
MyApplication.java
package com.concretepage;
import org.springframework.boot.SpringApplication;
import org.springframework.boot.autoconfigure.SpringBootApplication;
@SpringBootApplication
public class MyApplication {
	public static void main(String[] args) {
		SpringApplication.run(MyApplication.class, args);
        }
}
b. Using Maven Command: Download the project source code. Go to the root folder of the project using command prompt and run the command.
mvn spring-boot:run
c. Using Executable JAR: Using command prompt, go to the root folder of the project and run the command.
mvn clean package
java -jar target/spring-boot-demo-0.0.1-SNAPSHOT.jar
Now access the URL as given below.
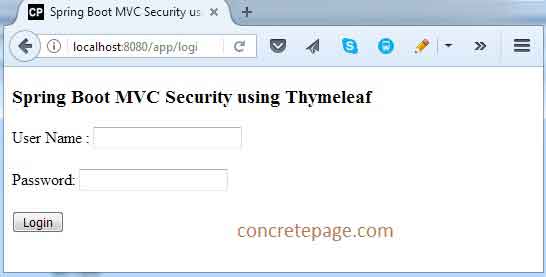
http://localhost:8080/app/login
1. Find the login page print screen.
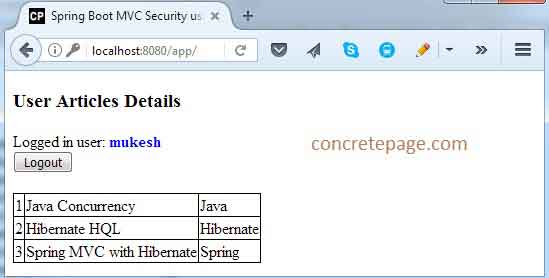
2. After successful we will get following screen.
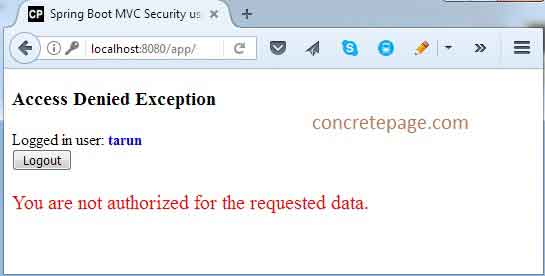
3. Now login the application using the credential tarun/t123 with USER role.
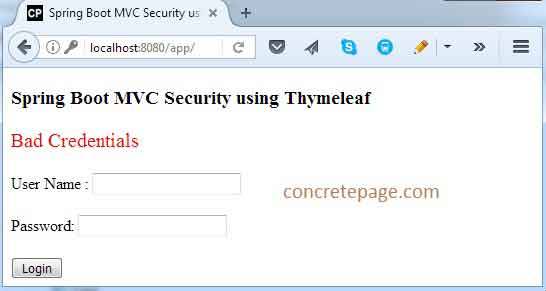
4. If we enter wrong credential then we will get error message.
I am done now. Happy Spring Boot learning!
References
Securing a Web ApplicationSpring Boot Reference Guide
Spring Boot Security REST + JPA + Hibernate + MySQL CRUD Example
Spring 4 Security + Thymeleaf Integration Custom Login Page and Logout Example with CSRF Token using JavaConfig


