Spring Batch + H2 Database Example
August 04, 2019
This page will walk through Spring Batch H2 database example. Spring Batch performs batch processing using reader, processor and writer. In Java configuration file, we need to configure Spring Batch step using reader, processor and writer and then create Spring Batch job using step. The configuration class needs be annotated with @EnableBatchProcessing.
H2 database is the open source Java SQL database. In our example we will create a batch application which will read data from a CSV file and write into H2 database. In our Spring Batch application, we will use
FlatFileItemReader to create reader and JdbcBatchItemWriter to create writer. To create a processor we need to create a class by implementing ItemProcessor. We will also create listener to listen the job and scheduler to schedule the job. Now find the complete example step-by-step.
Contents
Technologies Used
Find the technologies being used in our example.1. Java 11
2. Spring 5.1.8.RELEASE
3. Spring Batch 4.1.2.RELEASE
4. Spring Boot 2.1.6.RELEASE
5. H2 Database 1.4.197
6. Maven 3.5.2
7. Eclipse 2018-099
1. Create H2 Database
H2 is the open source Java SQL database. It is very fast and uses JDBC API. H2 database can be used as embedded mode, server mode and in-memory databases. Console can be accessed using browser. To install and work with H2 database, find the steps.1. Go to official website link. Download and install in your computer.
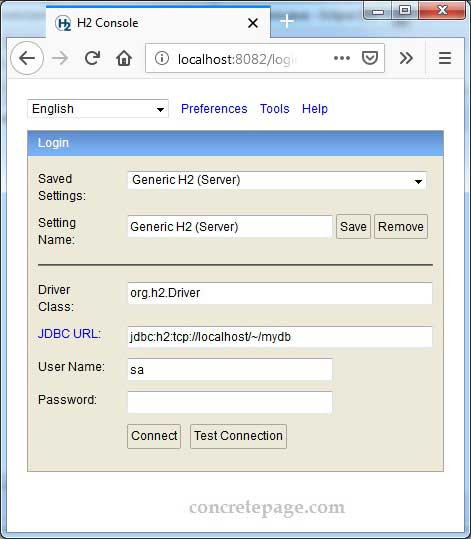
2. Open H2 Console (Command Line) and access URL http://localhost:8082 in browser. Select server mode and in JDBC URL we can change 'test' database name as we want. In our example we will change database name as 'mydb'. Find the print screen.

3. In our demo application, we will read data from CSV as employee and write them in H2 database as profile. Find the SQL to create for profile table in H2 database.
CREATE TABLE profile (
   empCode INT(11),
   empName VARCHAR(50),
   profileName VARCHAR(50)
);
4. In server mode, The JDBC URL will be jdbc:h2:tcp://localhost/~/mydb
5. If we choose embedded mode, the JDBC URL will be jdbc:h2:~/mydb
6. In embedded Mode, database may only be open in one virtual machine (and class loader) at any time where as in server mode, many applications can connect to the same database at the same time, by connecting to this server.
7. To connect to the H2 database using our Spring application, we need to use driver class name as
org.h2.Driver and resolve it using Maven dependency as following.
<dependency>
  <groupId>com.h2database</groupId>
  <artifactId>h2</artifactId>
</dependency>
2. Project Structure
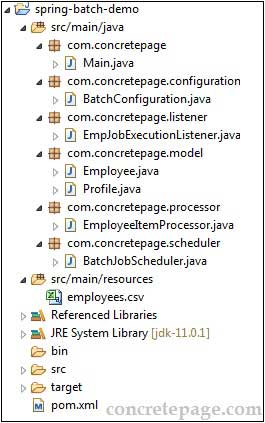
In our example we are using Eclipse IDE. Find the project structure.
3. Maven Dependencies
Find the Maven dependencies of our project.pom.xml
<?xml version="1.0" encoding="UTF-8"?>
<project xmlns="http://maven.apache.org/POM/4.0.0"
	xmlns:xsi="http://www.w3.org/2001/XMLSchema-instance"
	xsi:schemaLocation="http://maven.apache.org/POM/4.0.0 http://maven.apache.org/xsd/maven-4.0.0.xsd">
	<modelVersion>4.0.0</modelVersion>
	<groupId>com.concretepage</groupId>
	<artifactId>spring-demo</artifactId>
	<version>0.0.1-SNAPSHOT</version>
	<packaging>jar</packaging>
	<name>Spring</name>
	<description>Spring Demo Project</description>
	<parent>
		<groupId>org.springframework.boot</groupId>
		<artifactId>spring-boot-starter-parent</artifactId>
		<version>2.1.6.RELEASE</version>
		<relativePath />
	</parent>
	<properties>
		<context.path>spring-app</context.path>
		<java.version>11</java.version>
	</properties>
	<dependencies>
		<dependency>
			<groupId>org.springframework.boot</groupId>
			<artifactId>spring-boot-starter-batch</artifactId>
		</dependency>
		<dependency>
			<groupId>com.h2database</groupId>
			<artifactId>h2</artifactId>
		</dependency>
	</dependencies>
	<build>
		<plugins>
			<plugin>
				<groupId>org.springframework.boot</groupId>
				<artifactId>spring-boot-maven-plugin</artifactId>
			</plugin>
		</plugins>
	</build>
</project>
h2: Resolves H2 dependencies such as
org.h2.Driver i.e. H2 driver class name.
4. CSV File
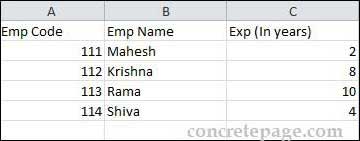
Find the CSV file print screen that we will read in our batch process.
5. Create Batch Configuration
To enable batch processing, we need to annotate JavaConfig class with@EnableBatchProcessing. We need to create a reader to read a file such as CSV file, create processor to process input data before writing, create writer to write in database or in any other file, create step using reader, processor and writer and then create job using step and listener.
BatchConfiguration.java
package com.concretepage.configuration;
import javax.sql.DataSource;
import org.springframework.batch.core.Job;
import org.springframework.batch.core.Step;
import org.springframework.batch.core.configuration.annotation.EnableBatchProcessing;
import org.springframework.batch.core.configuration.annotation.JobBuilderFactory;
import org.springframework.batch.core.configuration.annotation.StepBuilderFactory;
import org.springframework.batch.core.launch.support.RunIdIncrementer;
import org.springframework.batch.item.ItemProcessor;
import org.springframework.batch.item.ItemReader;
import org.springframework.batch.item.ItemWriter;
import org.springframework.batch.item.database.BeanPropertyItemSqlParameterSourceProvider;
import org.springframework.batch.item.database.JdbcBatchItemWriter;
import org.springframework.batch.item.database.builder.JdbcBatchItemWriterBuilder;
import org.springframework.batch.item.file.FlatFileItemReader;
import org.springframework.batch.item.file.builder.FlatFileItemReaderBuilder;
import org.springframework.batch.item.file.mapping.BeanWrapperFieldSetMapper;
import org.springframework.beans.factory.annotation.Autowired;
import org.springframework.context.annotation.Bean;
import org.springframework.context.annotation.Configuration;
import org.springframework.core.io.ClassPathResource;
import org.springframework.jdbc.core.JdbcTemplate;
import org.springframework.scheduling.annotation.EnableScheduling;
import com.concretepage.listener.EmpJobExecutionListener;
import com.concretepage.model.Employee;
import com.concretepage.model.Profile;
import com.concretepage.processor.EmployeeItemProcessor;
import com.zaxxer.hikari.HikariDataSource;

@Configuration
@EnableBatchProcessing
@EnableScheduling
public class BatchConfiguration {
	@Autowired
	public JobBuilderFactory jobBuilderFactory;

	@Autowired
	public StepBuilderFactory stepBuilderFactory;

	@Bean
	public FlatFileItemReader<Employee> reader() {
		return new FlatFileItemReaderBuilder<Employee>()
		  .name("employeeItemReader")
		  .resource(new ClassPathResource("employees.csv"))
		  .delimited()
		  .names(new String[]{ "empCode", "empName", "expInYears" })
		  .fieldSetMapper(new BeanWrapperFieldSetMapper<Employee>() {{
			   setTargetType(Employee.class);
		  }})
		  .linesToSkip(1)
		  .build();
	}

	@Bean
	public JdbcBatchItemWriter<Profile> writer(DataSource dataSource) {
		return new JdbcBatchItemWriterBuilder<Profile>()
		   .itemSqlParameterSourceProvider(new BeanPropertyItemSqlParameterSourceProvider<Profile>())
		   .sql("INSERT INTO profile (empCode, empName, profileName) VALUES (:empCode, :empName, :profileName)")
		   .dataSource(dataSource)
		   .build();
	}

	@Bean
	public ItemProcessor<Employee, Profile> processor() {
		return new EmployeeItemProcessor();
	}

	@Bean
	public Job createEmployeeJob(EmpJobExecutionListener listener, Step step1) {
		return jobBuilderFactory
		  .get("createEmployeeJob")
		  .incrementer(new RunIdIncrementer())
		  .listener(listener)
		  .flow(step1)
		  .end()
		  .build();
	}

	@Bean
	public Step step1(ItemReader<Employee> reader, ItemWriter<Profile> writer,
			ItemProcessor<Employee, Profile> processor) {
		 return stepBuilderFactory
		   .get("step1")
		   .<Employee, Profile>chunk(5)
		   .reader(reader)
		   .processor(processor)
		   .writer(writer)
		   .build();
	}

	@Bean
	public DataSource dataSource() {
		HikariDataSource dataSource = new HikariDataSource();
		dataSource.setDriverClassName("org.h2.Driver");
		dataSource.setJdbcUrl("jdbc:h2:tcp://localhost/~/mydb");
		dataSource.setUsername("sa");
		dataSource.setPassword("");
		return dataSource;
	}

	@Bean
	public JdbcTemplate jdbcTemplate(DataSource dataSource) {
		return new JdbcTemplate(dataSource);
	}
}
ItemReader whose implementing classes are used to create reader. Here we are using FlatFileItemReader. The FlatFileItemReader is the restartable ItemReader that reads line from the given resource. In our example we are reading CSV file from classpath.
2. Writer: Create a bean for writer. Spring Batch provides
ItemWriter whose implementing classes are used to create writer. In our example we are using JdbcBatchItemWriter which uses NamedParameterJdbcTemplate to execute the batch items. We are writing data into H2 database.
3. Processor: The role of processor is to process input data for output that needs to be written. Create a bean of processor in batch configuration and configure it with step. To create processor, we need to create a class by implementing
ItemProcessor.
EmployeeItemProcessor.java
package com.concretepage.processor;
import org.springframework.batch.item.ItemProcessor;
import com.concretepage.model.Profile;
import com.concretepage.model.Employee;

public class EmployeeItemProcessor implements ItemProcessor<Employee, Profile> {
    @Override
    public Profile process(final Employee emp) throws Exception {
	String profileName = "";
        if (emp.getExpInYears() < 5) {
        	profileName = "Developer";
        } else if (emp.getExpInYears() >= 5 && emp.getExpInYears() <= 8) {
        	profileName = "Team Lead";
        } else if (emp.getExpInYears() > 8) {
        	profileName = "Manager";
        }
        System.out.println("Emp Code: " + emp.getEmpCode() +
        		", Emp Name: " + emp.getEmpName() + ", Profile Name:" + profileName);
	return new Profile(emp.getEmpCode(), emp.getEmpName(), profileName);
    }
}
Employee and our writer will write data as Profile. So the role of processor is converting employee data into profile.
4. Step: Create a bean for
Step that will configure reader, processor and writer.
5. Job: Create a bean for
Job that will configure step and job listener if any.
6. Create datasource using HikariCP connection pool to write data into H2 database.
7. In our example we will use scheduler to schedule the job. To enable scheduler we need to annotate configuration class with
@EnableScheduling.
Find the domain classes used in our demo application.
Employee.java
package com.concretepage.model;
public class Employee {
	private long empCode;
	private String empName;
	private int expInYears;
        //setters and getters
}
package com.concretepage.model;
public class Profile {
	private long empCode;
	private String empName;
	private String profileName;
	public Profile(long empCode, String empName, String profileName) {
		this.empCode = empCode;
		this.empName = empName;
		this.profileName = profileName;
	}
        //setters and getters
}
6. Create Listener
To create Spring Batch listener, create a component by implementingJobExecutionListener. Find the listener class used in our example.
EmpJobExecutionListener.java
package com.concretepage.listener;
import java.sql.ResultSet;
import java.sql.SQLException;
import java.util.List;
import org.springframework.batch.core.BatchStatus;
import org.springframework.batch.core.JobExecution;
import org.springframework.batch.core.JobExecutionListener;
import org.springframework.beans.factory.annotation.Autowired;
import org.springframework.jdbc.core.JdbcTemplate;
import org.springframework.jdbc.core.RowMapper;
import org.springframework.stereotype.Component;
import com.concretepage.model.Profile;
@Component
public class EmpJobExecutionListener implements JobExecutionListener {
	@Autowired
	public JdbcTemplate jdbcTemplate;

	@Override
	public void beforeJob(JobExecution jobExecution) {
	    System.out.println("Executing job id " + jobExecution.getId());
	}

	@Override
	public void afterJob(JobExecution jobExecution) {
	    if(jobExecution.getStatus() == BatchStatus.COMPLETED) {
	        List<Profile> result = jdbcTemplate.query("SELECT empCode, empName, profileName FROM profile",
	        		new RowMapper<Profile>() {
	            @Override
	            public Profile mapRow(ResultSet rs, int row) throws SQLException {
	                return new Profile(rs.getLong(1), rs.getString(2), rs.getString(3));
	            }
	        });
	        System.out.println("Number of Records:"+result.size());
	    }
	}
}
beforeJob will execute before job start and afterJob will execute after completion of job.
7. Create Scheduler
Find the scheduler to schedule the Spring Batch job.BatchJobScheduler.java
package com.concretepage.scheduler;
import org.springframework.batch.core.Job;
import org.springframework.batch.core.JobParameters;
import org.springframework.batch.core.JobParametersBuilder;
import org.springframework.batch.core.JobParametersInvalidException;
import org.springframework.batch.core.launch.JobLauncher;
import org.springframework.batch.core.repository.JobExecutionAlreadyRunningException;
import org.springframework.batch.core.repository.JobInstanceAlreadyCompleteException;
import org.springframework.batch.core.repository.JobRestartException;
import org.springframework.beans.factory.annotation.Autowired;
import org.springframework.scheduling.annotation.Scheduled;
import org.springframework.stereotype.Component;
@Component
public class BatchJobScheduler {
	@Autowired
	private Job job;

	@Autowired
	private JobLauncher jobLauncher;

	@Scheduled(fixedDelay = 8000)
	public void runBatchJob() {
		JobParameters params = new JobParametersBuilder().addLong("jobId", System.currentTimeMillis())
				.toJobParameters();
		try {

			jobLauncher.run(job, params);

		} catch (JobExecutionAlreadyRunningException e) {
			e.printStackTrace();
		} catch (JobRestartException e) {
			e.printStackTrace();
		} catch (JobInstanceAlreadyCompleteException e) {
			e.printStackTrace();
		} catch (JobParametersInvalidException e) {
			e.printStackTrace();
		}
	}
}
8. Run Application
To run the application, find the Spring Boot Main class.Main.java
package com.concretepage;
import org.springframework.boot.SpringApplication;
import org.springframework.boot.autoconfigure.SpringBootApplication;
@SpringBootApplication
public class Main {
    public static void main(String[] args) {
        SpringApplication.run(Main.class, args);
    }
}
To run the application as JAR, find the steps.
1. Go to the root directory of the project using command prompt and run the mvn clean package command.
2. In target directory a JAR will be created.
3. To run the application using JAR, run the command.
java -jar target/spring-demo-0.0.1-SNAPSHOT.jar
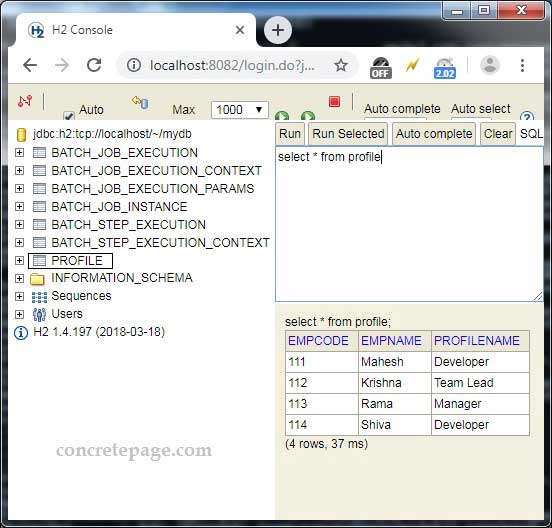
When we run Spring Batch application, it also creates its default tables. After successful run, we can check our data in H2 console.

References
Creating a Batch ServiceSpring Batch Introduction


