Spring Boot CLI Example
December 07, 2023
Spring Boot CLI is Command Line Interface to run Spring Boot command. Spring provides spring command that is used to create, run and test the Spring Boot application. Spring Boot CLI application uses groovy and in this way with a minimum number of lines of code we create our application and launch it. Spring Boot CLI with groovy has following features.
1. Spring Boot CLI application uses groovy. We create groovy files in our application and for this we need not to provide any JAR dependency of groovy. Spring Boot configures the groovy JAR dependencies itself.
2. While writing groovy files, we need not to write import statements until required. Before writing import statement we should check if we are getting import error. In this way we write minimum number of lines of code as much as possible.
3. Spring Boot CLI does not require any build tools. Spring Boot automatically grabs the Spring dependencies JAR in the same way as Maven and Gradle do. The version is picked up from Spring Boot CLI version.
4. Spring Boot downloads JAR dependencies keeping in mind that what Spring annotation and classes we have used in our application coding. If we are using
@Controller annotation then Spring Boot downloads Spring web application JAR dependencies.
5. To download JAR for third party dependencies such as thymeleaf, Spring Boot uses
@Grab annotation groovy feature.
6. Spring Boot provides Spring run command to run application and spring test command to run Spring test application.
7. We can create executable JAR file using Spring Boot command line. For packaging of the application, Spring Boot provides spring jar command.
8. Using command line interface we can create project from Spring initializer site using spring init command.
9. Spring Boot provides integrated shell for Windows user using the command spring shell .
10. We need not to create Spring Boot main() method when using Spring Boot CLI. It is provided automatically by Spring Boot CLI.
Here on this page we will install Spring Boot CLI and then we will create a sample Spring Boot CLI application and run it and test it.
Contents
- 1. Install Spring Boot CLI
- 2. Demo Project Structure
- 3. Spring Boot CLI Hello World Example
- 4. Using @Grab Annotation
- 5. Spring Boot CLI Test Application
- 6. Packaging Application using Spring Boot CLI
- 7. Create a New Project using Spring Boot CLI
- 8. Using Embedded Shell
- 9. References
- 10. Download Source Code
1. Install Spring Boot CLI
To work with Spring Boot CLI, first we need to install it in our system. There are many ways to install Spring Boot CLI.1. Manual installation
2. Installation with SDKMAN!
3. OSX Homebrew installation
4. MacPorts installation
5. Command-line completion
Find the link for Spring Boot CLI installation detail. In my example I will install Spring Boot CLI using manual installation in my Windows 7 OS. Find the below steps.
Step 1: Download Spring Boot CLI using below link
spring-boot-cli-1.4.3.RELEASE-bin.zip.
Step 2: Unzip it and keep somewhere in your system. Suppose I have kept it as follows.
C:\spring-1.4.3.RELEASE
Now we need to set following environment variables in our system.
1. SPRING_HOME with the value C:\spring-1.4.3.RELEASE
2. PATH with the value C:\spring-1.4.3.RELEASE\bin
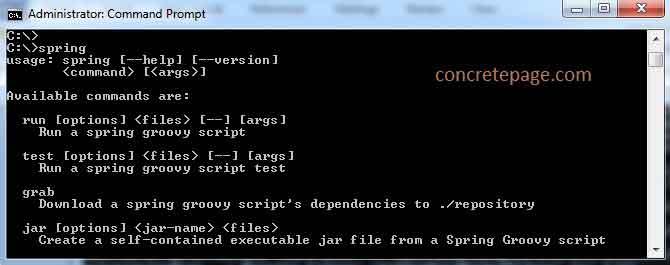
Step 3: Now we will test our installation. Open the command prompt and type the command spring, we will get following result.

spring help run : Gives details of supported commands.
spring version : Gives version of Spring Boot CLI.
Now we are done to start working with Spring Boot CLI.
2. Demo Project Structure
Find the demo project structure which we will run using Spring Boot CLI and groovy.
spring-app
   |
    --message.groovy
    --hello.groovy
    --tests.groovy
    --templates
         |
          --hello.html
    --static
        |
         --index.html
3. Spring Boot CLI Hello World Example
We will create a simple "Hello World" web application using Groovy. Find the code below.hello.groovy
@RestController
class HelloController {
    @RequestMapping("/home")
    String home() {
        "Hello World!"
    }
}
1. Default import statements. In most of the cases we need not to import API. Import only if that is not part of default import statements.
2. No main method for Spring boot. It will be automatically created.
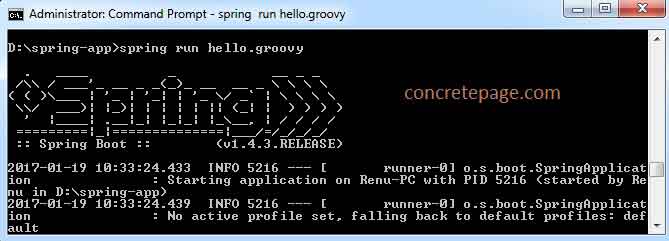
To compile and run Groovy source code, Spring Boot CLI provides run command that we call as follows.
spring run hello.groovy
1. It downloads all the dependency JAR. The version of dependency JAR is defined by the version of Spring Boot CLI we are using. Downloading the JAR take place only for the first time.
2. The dependency JAR are defined by the classes and annotations used in the code. As we are using
@RestController, so it downloads JAR related to Spring MVC and embedded Tomcat.
3. Now it compiles the code and start embedded tomcat server on the default port 8080 .
Find the print screen.


spring run hello.groovy -- --server.port=8484
If we have multiple groovy files and to run all those groovy files together we can use following command.
spring run *.groovy
4. Using @Grab Annotation
Groovy provides@Grab annotation to resolve JAR dependencies. Spring Boot also supports @Grab annotation to resolve only third party dependencies. Spring dependencies are grabbed automatically on the basis of Spring annotation and classes used in our application. It downloads the JAR in the same way as Maven and Gradle without using any build tool. We use @Grab annotation to download third party dependencies as follows.
@Grab('spring-boot-starter-thymeleaf')
class MessageController {}
message.groovy
@Controller
@Grab('spring-boot-starter-thymeleaf')
class MessageController {
    @RequestMapping("/msg")
	String getMsg(Model model) {
    	String msg = "Welcome to Everyone!";
        model.addAttribute("message", msg);
        return "hello";
    }
}
<!DOCTYPE HTML>
<html xmlns:th="http://www.thymeleaf.org">
<head>
    <title>Spring Boot CLI Example</title>
    <meta http-equiv="Content-Type" content="text/html; charset=UTF-8" />
</head>
<body>
    <p th:text="'Message: ' + ${message}" />
</body>
</html>
<!DOCTYPE HTML>
<html>
<head>
    <title>Spring Boot CLI Example</title>
    <meta http-equiv="Content-Type" content="text/html; charset=UTF-8" />
</head>
<body>
    <p>Click to get <a href="/msg">Message</a> </p>
</body>
</html>
spring run *.groovy
Spring Boot needs
@Grab annotation only to resolve third party JAR, for example spring-boot-starter-thymeleaf, freemarker etc. Spring Boot automatically grabs the Spring JAR as required. For example if we are using following annotations and classes then the related JAR dependencies will automatically be downloaded.
1. @Controller @RestController @EnableWebMvc : In this case Spring MVC and embedded tomcat will be downloaded.
2. @EnableWebSecurity : Spring security related JAR will be downloaded.
3. @EnableJms : JMS application related JAR will be downloaded.
4. @Test : Spring Test application related JAR will be downloaded.
We can find detail in "Deduced grab dependencies section" in the link.
5. Spring Boot CLI Test Application
Spring Boot CLI provides test command using which we can test our Spring Boot application. Find the groovy class used in our example to testhello.groovy.
tests.groovy
class ApplicationTests {
    @Test
    void HelloAppTest() {
        assertEquals("Hello World!", new HelloController().home())
    }
}
spring test hello.groovy tests.groovy
spring test : Spring Boot CLI command to test the application.
hello.groovy: Application file that needs to be tested.
tests.groovy: Test file to test the application file.
After running the command we get the result as follows.

6. Packaging Application using Spring Boot CLI
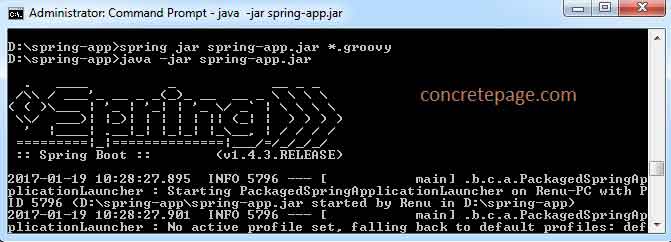
Spring Boot CLI provides jar command to package our application. We can use it as follows.spring jar spring-app.jar *.groovy
spring-app.jar : This is executable JAR
spring-app.jar.original : This is original JAR.
Executable jar is run as follows.
java -jar spring-app.jar

public/**, resources/**, static/**, templates/**, META-INF/**
repository/**, build/**, target/**, **/*.jar, **/*.groovy
spring help jar
7. Create a New Project using Spring Boot CLI
Using init command, Spring Boot CLI can create a new project with maven as default build tool that uses service of https://start.spring.io . Suppose we want to create a web project using thymeleaf then we will run command as follows.spring init --dependencies=web,thymeleaf my-app.zip
spring-boot-starter-web
spring-boot-starter-thymeleaf

spring init --build=gradle --java-version=1.8 --dependencies=web,thymeleaf --packaging=war my-app.zip
8. Using Embedded Shell
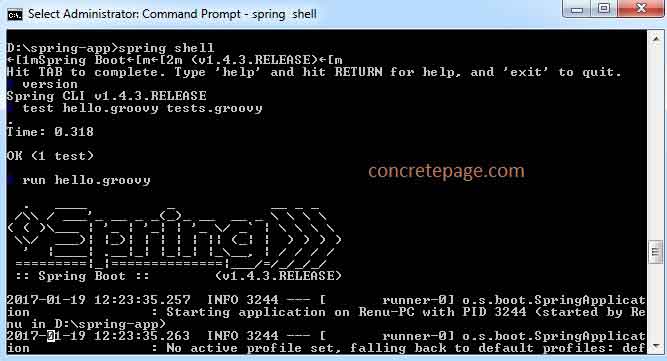
Spring Boot has command line completion scripts for BASH and Zsh shells. If we are using WINDOWS, Spring Boot provides shell command to launch an integrated shell. If using WINDOWS then launch integrated shell using the following command.spring shell
$ version
$ test hello.groovy tests.groovy
$ run hello.groovy

I am done now. Happy Spring Boot learning!
9. References
Installing Spring BootUsing the CLI


