Spring WebSocket Example
September 09, 2019
WebSocket protocol provides two-way communication channel between client and server over a single TCP connection. This TCP protocol works over HTTP and allows re-use of existing firewalls rules. In WebSocket protocol interaction, HTTP uses Upgrade header such as Upgrade: websocket. After successful handshake, the TCP socket remains open for both the client and the server to continue to send and receive message. The WebSocket protocol based application is useful where the combination of low latency, high frequency, and high volume is required, for example game, financial apps and chat application because they are much closer to real-time.
SockJS is a browser JavaScript library that provides a WebSocket-like object. SockJS handles the WebSocket communication even if browser does not support WebSocket protocol. SockJS first tries to use native WebSocket and if it fails then it uses a variety of browser-specific transport protocols and presents them through WebSocket-like abstractions.
STOMP is a Simple Text Orientated Messaging Protocol. Stomp client is a JavaScript library. Stomp client is instantiated using SockJS client object. Stomp client connects with STOMP message broker and can send and receive messages.
On this page we will create a chat application using Spring WebSocket. Find the complete example step-by-step.
Contents
1. Technologies Used
Find the technologies being used in our example.1. Java 11
2. Spring 5.1.9.RELEASE
3. Spring Boot 2.1.7.RELEASE
4. Maven 3.5.2
5. Tomcat 9.0.10
6. Eclipse 2018-099
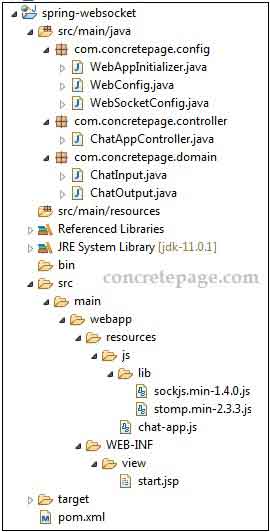
2. Project Structure
Find the project structure of our chat demo application.
3. Maven Dependencies
Find the Maven dependencies of our project.pom.xml
<?xml version="1.0" encoding="UTF-8"?>
<project xmlns="http://maven.apache.org/POM/4.0.0"
	xmlns:xsi="http://www.w3.org/2001/XMLSchema-instance"
	xsi:schemaLocation="http://maven.apache.org/POM/4.0.0 http://maven.apache.org/xsd/maven-4.0.0.xsd">
	<modelVersion>4.0.0</modelVersion>
	<groupId>com.concretepage</groupId>
	<artifactId>spring-demo</artifactId>
	<version>0.0.1-SNAPSHOT</version>
	<packaging>war</packaging>
	<name>Spring</name>
	<description>Spring Demo Project</description>
	<parent>
		<groupId>org.springframework.boot</groupId>
		<artifactId>spring-boot-starter-parent</artifactId>
		<version>2.1.7.RELEASE</version>
		<relativePath />
	</parent>
	<properties>
		<context.path>spring-app</context.path>
		<java.version>11</java.version>
	</properties>
	<dependencies>
		<dependency>
		    <groupId>org.springframework.boot</groupId>
		    <artifactId>spring-boot-starter-websocket</artifactId>
		</dependency>
		<dependency>
		    <groupId>org.springframework.boot</groupId>
		    <artifactId>spring-boot-starter-data-jpa</artifactId>
		</dependency>
		<dependency>
		    <groupId>org.springframework</groupId>
		    <artifactId>spring-messaging</artifactId>
		</dependency>
		<dependency>
		    <groupId>javax.servlet</groupId>
		    <artifactId>jstl</artifactId>
		</dependency>
	</dependencies>
	<build>
	  <plugins>
	    <plugin>
		  <groupId>org.apache.maven.plugins</groupId>
		  <artifactId>maven-war-plugin</artifactId>
		  <version>3.2.0</version>
		  <configuration>
			 <warName>${context.path}</warName>
		  </configuration>
		</plugin>
	  </plugins>
	</build>
</project>
4. WebSocket Configuration
Find the WebSocket Java configuration class.WebSocketConfig.java
package com.concretepage.config;
import org.springframework.context.annotation.Configuration;
import org.springframework.messaging.simp.config.MessageBrokerRegistry;
import org.springframework.web.socket.config.annotation.EnableWebSocketMessageBroker;
import org.springframework.web.socket.config.annotation.StompEndpointRegistry;
import org.springframework.web.socket.config.annotation.WebSocketMessageBrokerConfigurer;

@Configuration
@EnableWebSocketMessageBroker
public class WebSocketConfig implements WebSocketMessageBrokerConfigurer {
	@Override
	public void configureMessageBroker(MessageBrokerRegistry registry) {
		registry.enableSimpleBroker("/topic");
		registry.setApplicationDestinationPrefixes("/chatApp");
	}

	@Override
	public void registerStompEndpoints(StompEndpointRegistry registry) {
		registry.addEndpoint("/chat").withSockJS();
	}
}
@EnableWebSocketMessageBroker annotation is added at class level with @Configuration annotation.
2. WebSocketMessageBrokerConfigurer: Provides methods for configuring message handling with simple messaging protocols, for example STOMP, from WebSocket clients.
WebSocketMessageBrokerConfigurer is implemented to customize the default configuration of @EnableWebSocketMessageBroker annotation. We are overriding its following methods.
a. configureMessageBroker() : Configures message broker options.
a. registerStompEndpoints() : Registers STOMP endpoints mapping each to a specific URL and enabling and configuring SockJS fallback options.
4.1 MessageBrokerRegistry
MessageBrokerRegistry configures message broker options. Find some of its methods.
enableSimpleBroker(String... destinationPrefixes): Enables simple message broker and configures prefixes to filter destinations, such as /topic or /queue.
enableStompBrokerRelay(String... destinationPrefixes): Enables a STOMP broker relay and configures the destination prefixes.
setApplicationDestinationPrefixes(String... prefixes): Configures one or more prefixes to filter destinations targeting application annotated methods.
setCacheLimit(int cacheLimit): Configures the cache limit to apply for registrations with the broker.
Now find the code snippet.
@Override
public void configureMessageBroker(MessageBrokerRegistry registry) {
   registry.enableSimpleBroker("/topic");
   registry.setApplicationDestinationPrefixes("/chatApp");
}
enableSimpleBroker() are used specified by STOMP such as /topic/ or /queue/. The meaning of these prefixes are decided by STOMP spec differently in different scenario. Generally in simple broker, the use of /topic/ prefix is for publish-subscribe (one-to-many) and the use of /queue/ is for point-to-point (one-to-one) message exchanges.
According to above
MessageBrokerRegistry configuration,
The prefix
/topic/ of URL will be used to subscribe the server by STOMP client.
The
chatApp is the application destination prefix of URL to send the message by STOMP client.
4.2 StompEndpointRegistry
StompEndpointRegistry is a contract for registering STOMP over WebSocket endpoints. It has following methods.
addEndpoint(String... paths): Registers a STOMP over WebSocket endpoint at the given mapping path.
setErrorHandler(StompSubProtocolErrorHandler errorHandler): Registers error handler.
setOrder(int order): Sets the order of handler mapping used for STOMP.
setUrlPathHelper(UrlPathHelper urlPathHelper): Sets a
UrlPathHelper.
In our demo, we are configuring
StompEndpointRegistry as following.
@Override
public void registerStompEndpoints(StompEndpointRegistry registry) {
   registry.addEndpoint("/chat").withSockJS();
}
5. Create Controller: @MessageMapping and @SendTo
Find the controller of our chat application.ChatAppController.java
package com.concretepage.controller;
import java.time.ZonedDateTime;
import java.time.format.DateTimeFormatter;
import org.springframework.messaging.handler.annotation.MessageMapping;
import org.springframework.messaging.handler.annotation.SendTo;
import org.springframework.stereotype.Controller;
import org.springframework.web.bind.annotation.RequestMapping;
import com.concretepage.domain.ChatInput;
import com.concretepage.domain.ChatOutput;

@Controller
public class ChatAppController {
	DateTimeFormatter formatter = DateTimeFormatter.ofPattern("yyyy-MM-dd HH:mm:ss");

	@RequestMapping("/start")
	public String start() {
		return "start";
	}

	@MessageMapping("/chat")
	@SendTo("/topic/output")
	public ChatOutput chat(ChatInput input) {
		try {
			Thread.sleep(2000);
		} catch (InterruptedException e) {
			e.printStackTrace();
		}
		ChatOutput output = new ChatOutput();
		output.setUser(input.getUser());
		output.setMessage(input.getMessage());
		output.setDateTime(formatter.format(ZonedDateTime.now()));
		return output;
	}
}
Message with message handling methods.
@SendTo: Converts method return value to Spring
Message and send it to specified destination.
Find the domain classes used in our demo application.
ChatInput.java
package com.concretepage.domain;
public class ChatInput {
	private String user;
	private String message;
	//Setters and getters
}
package com.concretepage.domain;
public class ChatOutput {
	private String user;
	private String message;
	private String dateTime;
	//Setters and getters
}
WebConfig.java
package com.concretepage.config;
import org.springframework.context.annotation.Bean;
import org.springframework.context.annotation.ComponentScan;
import org.springframework.context.annotation.Configuration;
import org.springframework.web.servlet.config.annotation.EnableWebMvc;
import org.springframework.web.servlet.config.annotation.ResourceHandlerRegistry;
import org.springframework.web.servlet.config.annotation.WebMvcConfigurer;
import org.springframework.web.servlet.view.JstlView;
import org.springframework.web.servlet.view.UrlBasedViewResolver;

@Configuration
@ComponentScan("com.concretepage")
@EnableWebMvc
public class WebConfig implements WebMvcConfigurer {
	@Bean
	public UrlBasedViewResolver setupViewResolver() {
		UrlBasedViewResolver resolver = new UrlBasedViewResolver();
		resolver.setPrefix("/WEB-INF/view/");
		resolver.setSuffix(".jsp");
		resolver.setViewClass(JstlView.class);
		return resolver;
	}
	@Override
	public void addResourceHandlers(ResourceHandlerRegistry registry) {
		registry.addResourceHandler("/resources/**").addResourceLocations("/resources/js/");
	}
}
package com.concretepage.config;
import org.springframework.web.servlet.support.AbstractAnnotationConfigDispatcherServletInitializer;
public class WebAppInitializer extends AbstractAnnotationConfigDispatcherServletInitializer {
	@Override
	protected Class<?>[] getRootConfigClasses() {
		return new Class[] { WebConfig.class };
	}
	@Override
	protected Class<?>[] getServletConfigClasses() {
		return null;
	}
	@Override
	protected String[] getServletMappings() {
		return new String[] { "/" };
	}
}
6. WebSocket Client using SockJS and STOMP
Find the WebSocket client using SockJS and STOMP.chat-app.js
var stompClient = null;

function connect() {
    var socket = new SockJS('/spring-app/chat');
	stompClient = Stomp.over(socket);
    stompClient.connect({}, function(frame) {
        setConnected(true);
        console.log('Connected: ' + frame);
        stompClient.subscribe('/topic/output', function(output){
        	chatOutput(JSON.parse(output.body));
        });
    });
}

function disconnect() {
    stompClient.disconnect();
    setConnected(false);
    console.log("Disconnected");
}

function setConnected(connected) {
    document.getElementById('connect').disabled = connected;
    document.getElementById('disconnect').disabled = !connected;
    document.getElementById('chatBlock').style.visibility = connected ? 'visible' : 'hidden';
    document.getElementById('chatResponse').innerHTML = '';
}

function sendMssage() {
    var user = document.getElementById('user').value;
    var message = document.getElementById('message').value;
    stompClient.send("/chatApp/chat", {}, JSON.stringify({ 'user': user, 'message': message }));
    document.getElementById('message').value="";
}

function chatOutput(jsonMsg) {
    var response = document.getElementById('chatResponse');
    var p = document.createElement('p');
	message = jsonMsg.user + " ("+ jsonMsg.dateTime +"): " + jsonMsg.message;
    p.appendChild(document.createTextNode(message));
    response.appendChild(p);
}
<!DOCTYPE html>
<html>
<head>
    <title>Chat App</title>
    <script src="resources/lib/sockjs.min-1.4.0.js"></script>
    <script src="resources/lib/stomp.min-2.3.3.js"></script>
    <script src="resources/chat-app.js"></script>
</head>
<body>
<h1>Chat App</h1>
<div>
    <div>
        <button id="connect" onclick="connect();">Connect to Chat Room</button>
        <button id="disconnect" disabled="disabled" onclick="disconnect();">Disconnect</button><br/><br/>
    </div>
    <div id="chatBlock" style="visibility:hidden">
        <label>User Name: </label><input type="text" id="user"/><br/><br/>
        <label>Message: </label><textarea id="message" /></textarea><br/><br/>
        <button id="sendNum" onclick="sendMssage();">Send</button>
        <p id="chatResponse"></p>
    </div>
</div>
</body>
</html>
7. WebSocket Flow of Messages
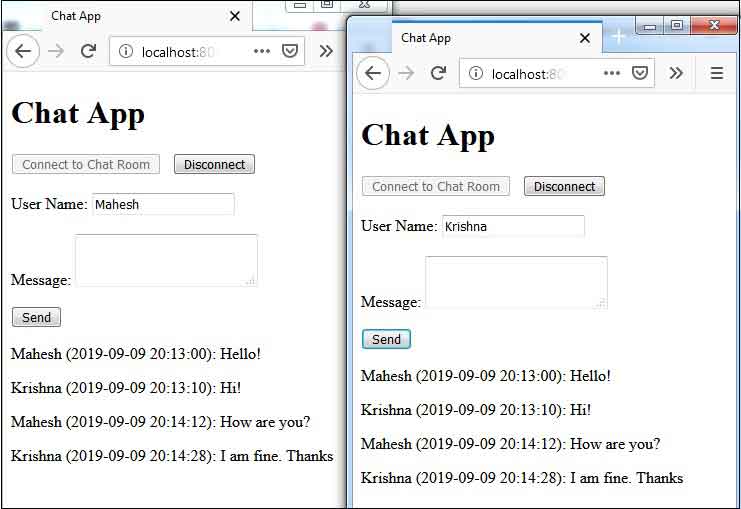
After code deployment, access application using URLhttp://localhost:8080/spring-app/start
/spring-app/chat/*
/topic/output
Upgrade header to upgrade or to switch WebSocket protocol. Find the sample request header for such interaction.
WebSocket Request Header
Sec-WebSocket-Version: 13
Origin: http://localhost:8080
Sec-WebSocket-Extensions: permessage-deflate
Sec-WebSocket-Key: K2ev2DlQSUTDPP2iAQZ5rQ==
Connection: keep-alive, Upgrade
Cookie: JSESSIONID=92AFFFD5E72689B2D0009B907707FA81
Pragma: no-cache
Cache-Control: no-cache
Upgrade: websocket
WebSocket Response Header
Upgrade: websocket
Connection: upgrade
Sec-WebSocket-Accept: 6k7RTzp96YreGzxBkgi1UUDud14=
Sec-WebSocket-Extensions: permessage-deflate
/chatApp/chat
/topic/output
8. Run Application
To test our demo application, find the steps.1. Download source code from the download link given at the end of the article.
2. Go to the root directory of the project using command prompt.
3. Build the project using Maven with following command.
mvn clean package
4. Deploy the WAR file in tomcat.
5. Access the following URL.
http://localhost:8080/spring-app/start

9. References
Spring Doc: WebSocketsUsing WebSocket to build an interactive web application


