Spring 4 Security + JSF 2 + PrimeFaces 5 Integration Annotation Example
March 17, 2016
On this page we will provide spring 4 security, JSF 2 and primefaces 5 integration annotation example. We will create a custom login page using HTML form. After successful authentication, a UI created in primefaces will open. Data is served by JSF managed bean and security is handled by spring security module. In our application we are using CSRF protection and for that we have included CSRF parameter within form in our pages. We are using JavaConfig for spring security configurations. User authentication will be done using in-memory authentication. We will discuss here integration step by step.
Contents
- Software Used
- Gradle to Build Project
- Project Structure in Eclipse
- JavaConfig for Spring 4 Security
- Create Spring 4 Security Custom Login Page with CSRF Protection
- Create JSF 2 Managed Bean
- web.xml for FacesServlet
- Create UI using PrimeFaces 5 dataScroller with Logout Form
- Spring Security Web Application and Dispatcher Servlet Initializer
- Output
- Download Source Code
Software Used
Find the software used in our demo.1. Java 8
2. Spring 4.2.5.RELEASE
3. Tomcat 8
4. Gradle
5. Eclipse
Gradle to Build Project
Find the gradle to resolve the JAR dependencies and build the project.build.gradle
apply plugin: 'java'
apply plugin: 'eclipse'
apply plugin: 'war'
archivesBaseName = 'spring4-primefaces5-jsf2'
version = '1'
repositories {
    mavenCentral()
}
dependencies {
    compile 'com.sun.faces:jsf-api:2.2.13'
    compile 'com.sun.faces:jsf-impl:2.2.13'
    compile 'org.primefaces:primefaces:5.1'
    compile 'javax.enterprise:cdi-api:1.2'
    compile 'org.springframework.boot:spring-boot-starter-web:1.3.3.RELEASE'
    compile 'org.springframework.boot:spring-boot-starter-security:1.3.3.RELEASE'
    providedRuntime 'org.springframework.boot:spring-boot-starter-tomcat:1.3.3.RELEASE'
}
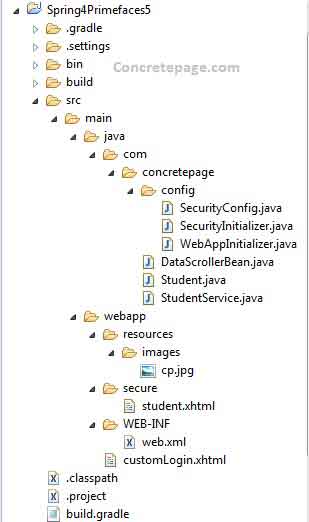
Project Structure in Eclipse
Find the print screen of project structure in eclipse.
JavaConfig for Spring 4 Security
Find the JavaConfig used for spring 4 security.SecurityConfig.java
package com.concretepage.config;
import org.springframework.beans.factory.annotation.Autowired;
import org.springframework.context.annotation.ComponentScan;
import org.springframework.context.annotation.Configuration;
import org.springframework.security.config.annotation.authentication.builders.AuthenticationManagerBuilder;
import org.springframework.security.config.annotation.web.builders.HttpSecurity;
import org.springframework.security.config.annotation.web.configuration.EnableWebSecurity;
import org.springframework.security.config.annotation.web.configuration.WebSecurityConfigurerAdapter;
@Configuration
@EnableWebSecurity
public class SecurityConfig extends WebSecurityConfigurerAdapter {
	@Override
	protected void configure(HttpSecurity http) throws Exception {
		http.authorizeRequests().
		antMatchers("/secure/**").access("hasRole('ROLE_ADMIN')").
		and().formLogin().  //login configuration
                loginPage("/customLogin.xhtml").
                loginProcessingUrl("/appLogin").
                usernameParameter("app_username").
                passwordParameter("app_password").
                defaultSuccessUrl("/secure/student.xhtml").
		and().logout().    //logout configuration
		logoutUrl("/appLogout").
		logoutSuccessUrl("/customLogin.xhtml");

	}
	@Autowired
	public void configureGlobal(AuthenticationManagerBuilder auth) throws Exception {
		auth.inMemoryAuthentication().withUser("concretepage").password("concrete123").roles("ADMIN");
	}
}
configure(HttpSecurity http) : Override this method to configure
HttpSecurity. Here we configure custom login page, URL to validate username and password, logout URL etc.
configureGlobal(AuthenticationManagerBuilder auth) : Using
AuthenticationManagerBuilder here we will perform in-memory authentication by creating a user with a role.
Create Spring 4 Security Custom Login Page with CSRF Protection
Now we will create a custom login page. Login form will be a simple HTML form. We need to include CSRF parameter using hidden HTML field. Form must be submitted as POST.customLogin.xhtml
<html lang="en" xmlns="http://www.w3.org/1999/xhtml" xmlns:h="http://java.sun.com/jsf/html">
    <h:head>
        <title>Spring 4 Security  + JSF 2 + PrimeFaces 5  Integration Example</title>
    </h:head>
    <h:body>
                <h3>Spring 4 Security  + JSF 2 + PrimeFaces 5  Integration Example</h3>
                <font color="red">
		     <h:outputLabel value="${SPRING_SECURITY_LAST_EXCEPTION.message}"/>
                </font>
		<form action="${request.contextPath}/appLogin" method="POST">
			<h:outputLabel value="Enter UserName:" />
			<input type="text" name="app_username"/><br/><br/>
			<h:outputLabel value="Enter Password:" />
			<input type="password" name="app_password"/> <br/><br/>
			<input type="submit" value="Login"/>
			<input type="hidden" name="${_csrf.parameterName}" value="${_csrf.token}"/>
		</form>
    </h:body>
</html>
Create JSF 2 Managed Bean
Now we will create JSF managed bean. Here we are using JSF annotations.DataScrollerBean.java
package com.concretepage;
import java.io.Serializable;
import java.util.List;
import javax.annotation.PostConstruct;
import javax.faces.bean.ManagedBean;
import javax.faces.bean.ManagedProperty;
import javax.faces.bean.ViewScoped;
@ManagedBean(name = "dataScrollerBean")
@ViewScoped
public class DataScrollerBean implements Serializable {
	private static final long serialVersionUID = 1L;
	private List<Student> students;
        @ManagedProperty("#{studentService}")
        private StudentService studentService;
        @PostConstruct
        public void init() {
    	        students = studentService.getStudents();
        }
	public List<Student> getStudents() {
		return students;
	}
	public void setStudentService(StudentService studentService) {
		this.studentService = studentService;
	}
}
@ManagedBean : This annotation enables the class to be registered as managed bean with runtime. Managed bean classes are scanned at application startup time before serving any request.
@ViewScoped : This annotation enables the managed bean to be considered as view element for the runtime.
@ManagedProperty: It is used to inject the value into the property.
@PostConstruct: It instructs the method to be executed only after dependency injection is done.
StudentService.java
package com.concretepage;
import java.io.Serializable;
import java.util.ArrayList;
import java.util.List;
import javax.faces.bean.ApplicationScoped;
import javax.faces.bean.ManagedBean;
@ManagedBean(name = "studentService")
@ApplicationScoped
public class StudentService implements Serializable {
	private static final long serialVersionUID = 1L;
	static List<Student> list = new ArrayList<Student>();
	static{
		for (int i= 1; i<=100; i++){
			list.add(new Student(i, "Student-"+i, "Location-"+i));
		}
	}
	public List<Student> getStudents(){
		return list;
	}
}
package com.concretepage;
import java.io.Serializable;
public class Student implements Serializable {
	private static final long serialVersionUID = 1L;
	private Integer id;
	private String name;
	private String location;
	public Student(Integer id, String name, String location){
		this.id = id;
		this.name = name;
		this.location = location;
	}
	public Integer getId() {
		return id;
	}
	public void setId(Integer id) {
		this.id = id;
	}
	public String getName() {
		return name;
	}
	public void setName(String name) {
		this.name = name;
	}
	public String getLocation() {
		return location;
	}
	public void setLocation(String location) {
		this.location = location;
	}
}
web.xml for FacesServlet
In web.xml we will configureFacesServlet which is responsible to manage web request lifecycle of the application which UI has been created using JSF.
web.xml
<?xml version="1.0" encoding="UTF-8"?>
<web-app xmlns:xsi="http://www.w3.org/2001/XMLSchema-instance" xmlns="http://java.sun.com/xml/ns/javaee"
    xmlns:web="http://java.sun.com/xml/ns/javaee/web-app_3_0.xsd" xsi:schemaLocation="http://java.sun.com/xml/ns/javaee
    http://java.sun.com/xml/ns/javaee/web-app_3_0.xsd" id="WebApp_ID" version="3.0">
    <display-name>Spring 4 Security  + JSF 2 + PrimeFaces 5  Integration Example</display-name>
    <servlet>
      <servlet-name>FacesServlet</servlet-name>
      <servlet-class>javax.faces.webapp.FacesServlet</servlet-class>
      <load-on-startup>1</load-on-startup>
    </servlet>
    <servlet-mapping>
      <servlet-name>FacesServlet</servlet-name>
      <url-pattern>*.xhtml</url-pattern>
    </servlet-mapping>
    <servlet-mapping>
      <servlet-name>FacesServlet</servlet-name>
      <url-pattern>*.jpg</url-pattern>
    </servlet-mapping>
</web-app>
Create UI using PrimeFaces 5 dataScroller with Logout Form
This is a sample UI which is using primefaces. Tabulated data of students will be shown here. We are using primefaces dataScroller that loads more data on scroll down of the page.student.xhtml
<html lang="en" xmlns="http://www.w3.org/1999/xhtml" xmlns:h="http://java.sun.com/jsf/html"
	xmlns:f="http://java.sun.com/jsf/core" xmlns:p="http://primefaces.org/ui">
    <h:head>
        <title>Spring 4 Security  + JSF 2 + PrimeFaces 5  Integration Example</title>
    </h:head>
    <h:body>
       <form action="${request.contextPath}/appLogout" method="POST">
          <input type="submit" value="Logout"/>
          <input type="hidden" name="${_csrf.parameterName}" value="${_csrf.token}"/>
       </form>
       <h3>Spring 4 Security  + JSF 2 + PrimeFaces 5  Integration Example</h3>
	<h:form>
             <p:dataScroller value="#{dataScrollerBean.students}" var="student" chunkSize="10">
		        <f:facet name="header">
		            Scroll Down to Load More Students
		        </f:facet>
		        <h:panelGrid columns="2" style="width:100%">
		            <p:graphicImage name="images/cp.jpg" />
		            <p:outputPanel>
		                <h:panelGrid columns="2" cellpadding="5">
		                    <h:outputText value="Id:" />
		                    <h:outputText value="#{student.id}" />
		                    <h:outputText value="Name:" />
		                    <h:outputText value="#{student.name}"/>
		                    <h:outputText value="Location:" />
		                    <h:outputText value="#{student.location}"/>
		                </h:panelGrid>
		            </p:outputPanel>
		        </h:panelGrid>
	     </p:dataScroller>
             <input type="hidden" name="${_csrf.parameterName}" value="${_csrf.token}"/>
	</h:form>
    </h:body>
</html>
Spring Security Web Application and Dispatcher Servlet Initializer
Find the class that registersDelegatingFilterProxy.
SecurityInitializer.java
package com.concretepage.config;
import org.springframework.security.web.context.AbstractSecurityWebApplicationInitializer;
public class SecurityInitializer extends AbstractSecurityWebApplicationInitializer {
}
DispatcherServlet.
WebAppInitializer.java
package com.concretepage.config;
import org.springframework.web.servlet.support.AbstractAnnotationConfigDispatcherServletInitializer;
public class WebAppInitializer extends AbstractAnnotationConfigDispatcherServletInitializer {
	@Override
	protected Class<?>[] getRootConfigClasses() {
		return new Class[] { SecurityConfig.class };
	}
	@Override
	protected Class<?>[] getServletConfigClasses() {
		return null;
	}
	@Override
	protected String[] getServletMappings() {
		return new String[] { "/" };
	}
}
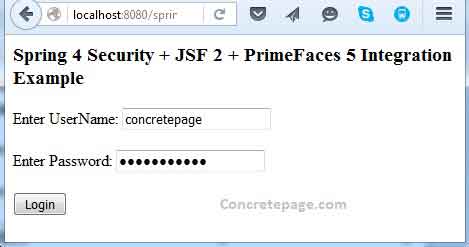
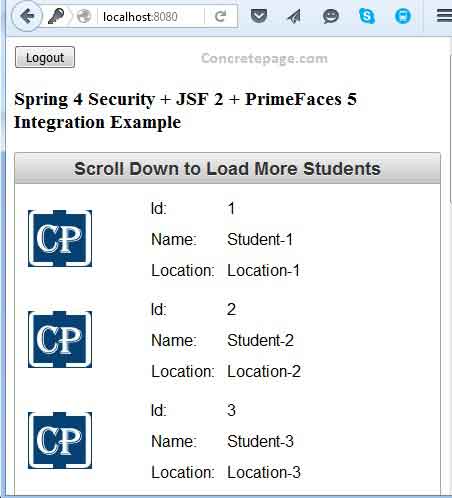
Output
To run the application use the URL http://localhost:8080/spring4-primefaces5-jsf2-1/customLogin.xhtml

References
1. PrimeFaces 5 DataScroller Example2. Spring 4 MVC Security Custom Login Form and Logout Example with CSRF Protection using Annotation and XML Configuration


