Spring MVC without Controller
June 25, 2019
On this page we will provide Spring MVC without controller using ViewControllerRegistry with addViewController(), addRedirectViewController() and addStatusController() example. In case when there is no custom controller logic, we can use addViewControllers() method in our JavaConfig that will map URLs to views and hence there is no need to create actual controller class. We need to pre-define URLs and their mapping views with HTTP status code using ViewControllerRegistry class within addViewControllers() method in our JavaConfig. We can configure URL redirect here. We can also configure a URL that will return only pre-defined HTTP status code in header without rendering body. We can achieve all these functionality in XML configuration too and we will provide here in our example. Find the complete example step by step.
Spring MVC with WebMvcConfigurerAdapter.addViewControllers() without Controller Class
We can write spring MVC without using controller class. We need to overrideaddViewControllers() from WebMvcConfigurerAdapter in our JavaConfig. addViewControllers() configures automated controllers with pre-defined view name and status code. We can map a URL with a view, a URL with another URL to redirect, a URL that responds only pre-defined status code using addViewControllers().
ViewControllerRegistry
ViewControllerRegistry registers view controller. We need not to create actual controller class when using ViewControllerRegistry. It is used when we just need to map a URL with a view.
addViewController(String urlPath): It adds a view controller for the given URL. This method returns
ViewControllerRegistration and using ViewControllerRegistration.setViewName() a corresponding view is mapped.
addRedirectViewController(String urlPath, String redirectUrl): It maps a URL to another URL to redirect on it. It has been introduced in spring 4.1.
addStatusController(String urlPath, HttpStatus statusCode): It maps a URL with given status code. It has also been introduced in spring 4.1.
Software Used
Find the software used in our demo.1. Java 8
2. Spring 4.2.5.RELEASE
3. Tomcat 8
4. Gradle
5. Eclipse
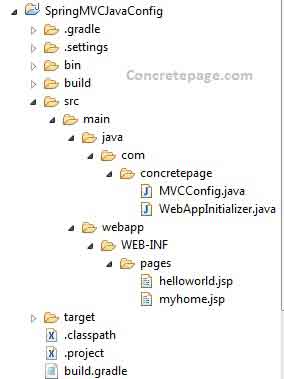
Project Structure in Eclipse
Find the print screen of project structure in eclipse.
Gradle to Build Project
Find the gradle file to build the project.build.gradle
apply plugin: 'java'
apply plugin: 'eclipse'
apply plugin: 'war'
archivesBaseName = 'spring4mvc'
version = '1'
repositories {
    mavenCentral()
}
dependencies {
	compile 'org.springframework.boot:spring-boot-starter-web:1.3.3.RELEASE'
        providedRuntime 'org.springframework.boot:spring-boot-starter-tomcat:1.3.3.RELEASE'
}
Create Views
Find the views used in our example.myhome.jsp
<html>
<head><title>Home Page</title></head>
<body>
   <h3> Home Page </h3>
</body>
</html>
<html>
<head><title>Hello World!</title></head>
<body>
   <h3>Hello World!</h3>
</body>
</html>
Create JavaConfig and XML configuration for View Controller
Find the JavaConfig foraddViewControllers().
MVCConfig.java
package com.concretepage;
import org.springframework.context.annotation.Bean;
import org.springframework.context.annotation.Configuration;
import org.springframework.http.HttpStatus;
import org.springframework.web.servlet.config.annotation.EnableWebMvc;
import org.springframework.web.servlet.config.annotation.ViewControllerRegistry;
import org.springframework.web.servlet.config.annotation.WebMvcConfigurerAdapter;
import org.springframework.web.servlet.view.InternalResourceViewResolver;
@Configuration
@EnableWebMvc
public class MVCConfig extends WebMvcConfigurerAdapter {
    @Bean
    public InternalResourceViewResolver viewResolver() {
	InternalResourceViewResolver resolver = new InternalResourceViewResolver();
        resolver.setPrefix("/WEB-INF/pages/");
        resolver.setSuffix(".jsp");
        return resolver;
    }
    @Override
    public void addViewControllers(ViewControllerRegistry registry) {
        registry.addViewController("/home").setViewName("myhome");
        registry.addViewController("/hello").setViewName("helloworld");
        registry.addRedirectViewController("/home", "/hello");
        registry.addStatusController("/detail", HttpStatus.BAD_REQUEST);
    }
}
1. When we access URL /hello then helloworld.jsp will run.
2. When we access URL /home then helloworld.jsp will run because it will be redirected to the URL /hello.
3. When we access URL /detail then we will get header response with 400 HTTP status code.
The equivalent XML configuration is given below.
dispatcher-servlet.xml
<?xml version="1.0" encoding="UTF-8"?>
<beans xmlns="http://www.springframework.org/schema/beans"
    xmlns:mvc="http://www.springframework.org/schema/mvc"
    xmlns:xsi="http://www.w3.org/2001/XMLSchema-instance"
    xsi:schemaLocation="http://www.springframework.org/schema/beans
        http://www.springframework.org/schema/beans/spring-beans.xsd
        http://www.springframework.org/schema/mvc
        http://www.springframework.org/schema/mvc/spring-mvc.xsd">

    <bean class="org.springframework.web.servlet.view.InternalResourceViewResolver">
	  <property name="prefix" value="/WEB-INF/pages/"/>
	  <property name="suffix" value=".jsp"/>
    </bean>
    <mvc:view-controller path="/home" view-name="myhome" />
    <mvc:view-controller path="/hello" view-name="helloworld"/>
    <mvc:redirect-view-controller path="/home" redirect-url="/hello"/>
    <mvc:status-controller status-code="400" path="/detail"/>
</beans>
Web Application Initializer
Find the web application initializer to run example using JavaConfig.
package com.concretepage;
import org.springframework.web.servlet.support.AbstractAnnotationConfigDispatcherServletInitializer;
public class WebAppInitializer extends AbstractAnnotationConfigDispatcherServletInitializer {
	@Override
	protected Class<?>[] getRootConfigClasses() {
		return new Class[] { MVCConfig.class };
	}
	@Override
	protected Class<?>[] getServletConfigClasses() {
		return null;
	}
	@Override
	protected String[] getServletMappings() {
		return new String[] { "/" };
	}
}
Output
1. When we run http://localhost:8080/spring4mvc-1/home and http://localhost:8080/spring4mvc-1/hello, we will get same output as below.


