JSF 2 Simple Login Example with @ManagedBean Annotation
January 17, 2015
JSF 2 has introduced @ManagedBean annotation to declare a class as managed bean. Here in this page we will create a simple JSF login application. A managed bean is associated with UI to get and set values. Create properties for input field and method for form action in managed bean. To start developing JSF, first configure FacesServlet in web.xml. Use JSF UI component to display pages. Now find the simple login example for JSF 2 demo.
Software Required To Run Example
Find the required software to develop the sample application and run.1. Java 6
2. Tomcat 7
3. Eclipse
4. Gradle
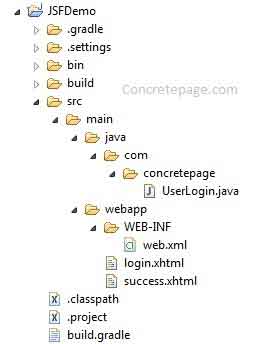
Project Structure in Eclipse
Find the project structure in eclipse used for example.
Configure javax.faces.webapp.FacesServlet in web.xml
The first step to develop JSF application is to configure javax.faces.webapp.FacesServlet in web.xml. We can configure mappings for different URL to be served by javax.faces.webapp.FacesServlet. In our example we are using xhtml file and hence setting mappings for the same.web.xml
<?xml version="1.0" encoding="ISO-8859-1" ?>
<web-app xmlns="http://java.sun.com/xml/ns/j2ee"
    xmlns:xsi="http://www.w3.org/2001/XMLSchema-instance"
    xsi:schemaLocation="http://java.sun.com/xml/ns/j2ee http://java.sun.com/xml/ns/j2ee/web-app_2_4.xsd"
    version="3.0">
    <display-name>Login Application in JSF 2</display-name>
    <servlet>
      <servlet-name>FacesServlet</servlet-name>
      <servlet-class>javax.faces.webapp.FacesServlet</servlet-class>
      <load-on-startup>1</load-on-startup>
    </servlet>
    <servlet-mapping>
      <servlet-name>FacesServlet</servlet-name>
      <url-pattern>/faces/*</url-pattern>
    </servlet-mapping>
    <servlet-mapping>
      <servlet-name>FacesServlet</servlet-name>
      <url-pattern>*.xhtml</url-pattern>
    </servlet-mapping>
</web-app>
Create Bean using @ManagedBean
@ManagedBean declares a class to be registered as managed bean. It has been introduced in JSF 2. Find the elements of @ManagedBean.name: Declares the managed bean name. If not available, the default name is class name with first character lower case. In our example, we have a managed bean class as UserLogin. If there is no name element then managed bean name will be as userLogin .
eager: The value of eager element can be true and false. If true and bean scope is application, then managed is processed at deployment time.
@RequestScoped: Declares the bean to be request scope.
Find the managed bean for the example.
UserLogin.java
package com.concretepage;
import javax.faces.bean.ManagedBean;
import javax.faces.bean.RequestScoped;
@ManagedBean(name = "userLogin", eager = true)
@RequestScoped
public class UserLogin {
    private String message ="Enter username and password.";
    private String username;
    private String password;
    public String login(){
    	if("concretepage".equalsIgnoreCase(username) && "concretepage".equalsIgnoreCase(password)) {
    		message ="Successfully logged-in.";
    		return "success";
    	} else {
    		message ="Wrong credentials.";
    		return "login";
    	}
    }
    public String getMessage() {
	return message;
    }
    public void setMessage(String message) {
	this.message = message;
    }
    public String getUsername() {
	return username;
    }
    public void setUsername(String username) {
	this.username = username;
    }
    public String getPassword() {
	return password;
    }
    public void setPassword(String password) {
	this.password = password;
    }
}
Create UI using JSF Component Tags
JSF provides different tag libraries for UI component. For html tag library, use the URL as http://java.sun.com/jsf/html.h:head: Declares head for html page.
h:body: Declares body for html page.
h:form: Declares form for html page.
h:outputLabel: Declares label.
h:inputText: Creates input field.
h:inputSecret: Creates password field.
h:commandButton: Creates button in which we can assign action for form submission.
Find the Login page.
login.xhtml
<html lang="en"
      xmlns="http://www.w3.org/1999/xhtml"
      xmlns:h="http://java.sun.com/jsf/html">
    <h:head>
        <title>Login Application in JSF 2</title>
    </h:head>
    <h:body>
       <h3>Login Application in JSF 2</h3>
        <b>#{userLogin.message}</b> <br/><br/>
		<h:form id="loginForm">
			<h:outputLabel value="User Name:" />
			<h:inputText value="#{userLogin.username}" /> <br />
			<h:outputLabel value="Password:" />
			<h:inputSecret value="#{userLogin.password}"></h:inputSecret><br/>
			<h:commandButton value="Submit" action="#{userLogin.login}"></h:commandButton>
		</h:form>
    </h:body>
</html>
success.xhtml
<html lang="en"
      xmlns="http://www.w3.org/1999/xhtml"
      xmlns:h="http://java.sun.com/jsf/html">
    <h:head>
        <title>Login Application in JSF 2</title>
    </h:head>
    <h:body>
        <h3>Login Application in JSF 2</h3>
        #{userLogin.message}
    </h:body>
</html>
Gradle File to Resolve JSF Jar Dependency
Find the gradle file to resolve JSF jar dependency.build.gradle
apply plugin: 'java'
apply plugin: 'eclipse'
apply plugin: 'war'
archivesBaseName = 'JSFDemo'
version = '1'
repositories {
    mavenCentral()
}
dependencies {
    compile 'com.sun.faces:jsf-api:2.2.9'
    compile 'com.sun.faces:jsf-impl:2.2.9'
    compile 'jstl:jstl:1.2'
}
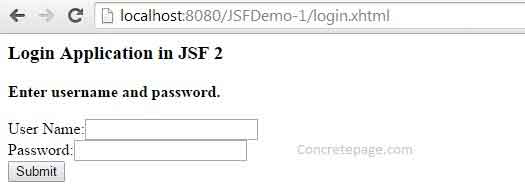
Output
Create War file and deploy into tomcat. Access the URL as http://localhost:8080/JSFDemo-1/login.xhtml , we will get below UI.


