Create Custom Converter in JSF 2 with @FacesConverter Annotation
January 19, 2015
In this page we will learn how to create custom converter in JSF 2 using @FacesConverter Annotation. The custom converter if annotated with @FacesConverter, is automatically registered with runtime. To create a custom converter, the converter class must implement interface javax.faces.convert.FacesConverter. While using converter on UI, the input filed has to use converter id attribute defined by @FacesConverter Annotation.
In our example we have a student converter. We enter student data as string and (-) separated. Managed bean gets this data as a student object converted by student converter.
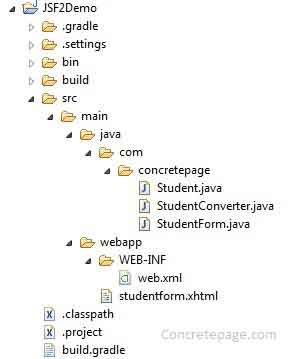
Project Structure in Eclipse
Find the project structure in eclipse for custom converter.
Use @FacesConverter and javax.faces.convert.FacesConverter to Create Converter
To create a converter, we have to annotate our class with @FacesConverter and implement javax.faces.convert.FacesConverter interface.@FacesConverter: This is an annotation approach to register a converter with runtime. The value assigned to @FacesConverter is converter id which will be used at view level.
javax.faces.convert.FacesConverter: This is an interface which has two methods to be overridden. The methods are getAsObject and getAsString. getAsObject converts string as an object and getAsString converts object as an string.
In our example, we are implementing a student converter. The input field will accept student data as (-) separated and managed bean will get it as Student class. Where we will change it to upper case. And while showing on UI, It will again be changed in string.
StudentConverter.java
package com.concretepage;
import javax.faces.component.UIComponent;
import javax.faces.context.FacesContext;
import javax.faces.convert.Converter;
import javax.faces.convert.FacesConverter;
@FacesConverter("stdcon")
public class StudentConverter implements Converter {
	@Override
	public Object getAsObject(FacesContext context, UIComponent component,
			String value) {
		String[] strArr = value.split("-");
		if (strArr.length >= 3) {
			Student student = new Student();
			student.setName(strArr[0]);
			student.setAge(Integer.parseInt(strArr[1]));
			student.setCollege(strArr[2]);
			return student;
		}
		return null;
	}
	@Override
	public String getAsString(FacesContext context, UIComponent component,
			Object value) {
		if (value != null ){
			Student student = (Student)value;
			StringBuffer strBuff = new StringBuffer(student.getName()).append("-");
			strBuff.append(student.getAge()).append("-").append(student.getCollege());
			String studentStr = strBuff.toString();
			return studentStr;
		}
		return null;
	}
}
Student.java
package com.concretepage;
public class Student {
	private String name;
	private Integer age;
	private String college;
	public String getName() {
		return name;
	}
	public void setName(String name) {
		this.name = name;
	}
	public Integer getAge() {
		return age;
	}
	public void setAge(Integer age) {
		this.age = age;
	}
	public String getCollege() {
		return college;
	}
	public void setCollege(String college) {
		this.college = college;
	}
}
"converter" attribute in h:inputText
To refer the custom converter in view, we have to use our converter id. In our example , we have converter id as stdcon.studentform.xhtml
<html lang="en"
      xmlns="http://www.w3.org/1999/xhtml"
      xmlns:h="http://java.sun.com/jsf/html">
    <h:head>
        <title>Custom Converter in JSF 2</title>
    </h:head>
    <h:body>
       <h3>Custom Converter in JSF 2</h3>
		<h:form id="studentForm">
			<h:outputLabel value="Student Data:" />
			<h:inputText value="#{studentForm.student}" converter="stdcon"/> <br />
			<h:commandButton value="Submit" action="#{studentForm.changeStudentData}"></h:commandButton>
		</h:form>
    </h:body>
</html>
Create Managed Bean for the Demo
In the managed bean, we are implementing a method which will simply do some changes in data. Just making name and college as capital.StudentForm.java
package com.concretepage;
import javax.faces.bean.ManagedBean;
import javax.faces.bean.RequestScoped;
@ManagedBean(name = "studentForm", eager = true)
@RequestScoped
public class StudentForm {
    private Student student;
    public String changeStudentData(){
    	student.setName(student.getName().toUpperCase());
    	student.setCollege(student.getCollege().toUpperCase());
    	return "studentform";
    }
    public Student getStudent() {
	return student;
    }
    public void setStudent(Student student) {
	this.student = student;
    }
}
web.xml
Find the web.xml for JSF 2 demo.web.xml
<?xml version="1.0" encoding="ISO-8859-1" ?>
<web-app xmlns="http://java.sun.com/xml/ns/j2ee"
    xmlns:xsi="http://www.w3.org/2001/XMLSchema-instance"
    xsi:schemaLocation="http://java.sun.com/xml/ns/j2ee http://java.sun.com/xml/ns/j2ee/web-app_2_4.xsd"
    version="3.0">
	<display-name>Custom Converter in JSF 2</display-name>
    <servlet>
      <servlet-name>FacesServlet</servlet-name>
      <servlet-class>javax.faces.webapp.FacesServlet</servlet-class>
      <load-on-startup>1</load-on-startup>
    </servlet>
    <servlet-mapping>
      <servlet-name>FacesServlet</servlet-name>
      <url-pattern>/faces/*</url-pattern>
    </servlet-mapping>
    <servlet-mapping>
      <servlet-name>FacesServlet</servlet-name>
      <url-pattern>*.xhtml</url-pattern>
    </servlet-mapping>
</web-app>
build.gradle
Find the gradle to resolve JSF 2 jar dependencies.build.gradle
apply plugin: 'java'
apply plugin: 'eclipse'
apply plugin: 'war'
archivesBaseName = 'JSF2Demo'
version = '1'
repositories {
    mavenCentral()
}
dependencies {
    compile 'com.sun.faces:jsf-api:2.2.9'
    compile 'com.sun.faces:jsf-impl:2.2.9'
    compile 'jstl:jstl:1.2'
}
Output
In the output, we have an input field in which we are entering data with (-) separated and after submit, values are being capital. Access the URL as http://localhost:8080/JSF2Demo-1/studentform.xhtml and enter data as below.


