Spring Boot XML Configuration Example
March 18, 2017
On this page we will provide spring boot XML configuration example. We will create a REST web service with XML configuration. We will import our XML file in java configuration. We need to use @ImportResource with @Configuration in our spring boot application. We can keep our XML files in project classpath. Here we will create a spring boot web application that will work as REST web service. We will create a service class and that will be configured in XML configuration. We will also configure Jackson2 message converter in our XML configuration to indent JSON response.
To load XML configuration,
@ImportResource is used as follows.
@ImportResource("classpath:app-config.xml")
@ImportResource with @SpringBootApplication in our spring boot application. Find the complete example step by step.
Contents
Software Used
We are using following software in our example.1. Java 8
2. Spring Boot 1.5.2.RELEASE
3. Maven 3.3
4. Eclipse Mars
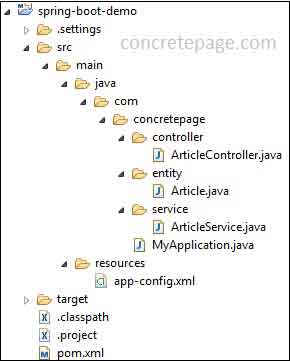
Project Structure in Eclipse
Find the project structure in eclipse.
Maven File
Find the maven file used in our example.pom.xml
<?xml version="1.0" encoding="UTF-8"?>
<project xmlns="http://maven.apache.org/POM/4.0.0" xmlns:xsi="http://www.w3.org/2001/XMLSchema-instance"
	xsi:schemaLocation="http://maven.apache.org/POM/4.0.0 http://maven.apache.org/xsd/maven-4.0.0.xsd">

	<modelVersion>4.0.0</modelVersion>
	<groupId>com.concretepage</groupId>
	<artifactId>spring-boot-demo</artifactId>
	<version>0.0.1-SNAPSHOT</version>
	<packaging>jar</packaging>
	<name>spring-demo</name>
	<description>Spring Boot Demo Project</description>
	<parent>
		<groupId>org.springframework.boot</groupId>
		<artifactId>spring-boot-starter-parent</artifactId>
		<version>1.5.2.RELEASE</version>
	</parent>
	<properties>
		<java.version>1.8</java.version>
	</properties>
	<dependencies>
	   <dependency>
		<groupId>org.springframework.boot</groupId>
		<artifactId>spring-boot-starter-web</artifactId>
	   </dependency>
    	   <dependency>
                <groupId>org.springframework.boot</groupId>
                <artifactId>spring-boot-devtools</artifactId>
                <optional>true</optional>
           </dependency>
	</dependencies>
	<build>
	   <plugins>
		<plugin>
			<groupId>org.springframework.boot</groupId>
			<artifactId>spring-boot-maven-plugin</artifactId>
		</plugin>
	   </plugins>
	</build>
</project>
spring-boot-starter-parent : Parent POM for dependency management.
spring-boot-starter-web: Starter for building web, REST applications. It uses tomcat server as default embedded server.
spring-boot-devtools : It provides developer tools. These tools are helpful in application development mode. One of the features of developer tool is automatic restart of the server for any change in code.
spring-boot-maven-plugin : It is used to create executable JAR of the application.
Create XML Configuration
I have created a sample XML configuration.app-config.xml
<?xml version="1.0" encoding="UTF-8"?>
<beans xmlns="http://www.springframework.org/schema/beans"
    xmlns:mvc="http://www.springframework.org/schema/mvc"
    xmlns:xsi="http://www.w3.org/2001/XMLSchema-instance"
    xsi:schemaLocation="
        http://www.springframework.org/schema/beans
        http://www.springframework.org/schema/beans/spring-beans.xsd
        http://www.springframework.org/schema/mvc
        http://www.springframework.org/schema/mvc/spring-mvc.xsd">

        <bean class="com.concretepage.service.ArticleService"/>
	<bean name="jackson2ObjectMapper" class="org.springframework.http.converter.json.Jackson2ObjectMapperFactoryBean">
	    <property name="indentOutput" value="true"/>
	</bean>
	<mvc:annotation-driven>
	    <mvc:message-converters>
	        <bean class="org.springframework.http.converter.json.MappingJackson2HttpMessageConverter">
	            <property name="objectMapper" ref="jackson2ObjectMapper" />
	        </bean>
	    </mvc:message-converters>
	</mvc:annotation-driven>
</beans>
Use @ImportResource to Import XML Configuration
XML file is imported in configuration file using@ImportResource with @Configuration. In our main class we are using @SpringBootApplication annotation. @SpringBootApplication is the combination of @Configuration, @EnableAutoConfiguration and @ComponentScan annotations.
MyApplication.java
package com.concretepage;
import org.springframework.boot.SpringApplication;
import org.springframework.boot.autoconfigure.SpringBootApplication;
import org.springframework.context.annotation.ImportResource;
@SpringBootApplication
@ImportResource("classpath:app-config.xml")
public class MyApplication {
	public static void main(String[] args) {
		SpringApplication.run(MyApplication.class, args);
        }
}
Create Service and Controller
Find the service used in our example.ArticleService.java
package com.concretepage.service;
import java.util.ArrayList;
import java.util.List;
import com.concretepage.entity.Article;
public class ArticleService {
	public List<Article> getAllArticles(){
		List<Article> list = new ArrayList<Article>();
		list.add(new Article(1, "Java Concurrency", "Java"));
		list.add(new Article(2, "Hibernate HQL", "Hibernate"));
		list.add(new Article(3, "Spring MVC with Hibernate", "Spring"));
		return list;
	}
}
package com.concretepage.entity;
public class Article {
        private int articleId;
        private String title;
	private String category;
        public Article(int articleId, String title, String category) {
    	    this.articleId = articleId;
    	    this.title = title;
    	    this.category = category;
        }
	public int getArticleId() {
		return articleId;
	}
	public String getTitle() {
		return title;
	}
	public String getCategory() {
		return category;
	}
}
ArticleController.java
package com.concretepage.controller;
import java.util.List;
import org.springframework.beans.factory.annotation.Autowired;
import org.springframework.web.bind.annotation.GetMapping;
import org.springframework.web.bind.annotation.RequestMapping;
import org.springframework.web.bind.annotation.RestController;
import com.concretepage.entity.Article;
import com.concretepage.service.ArticleService;
@RestController
@RequestMapping("user")
public class ArticleController {
	@Autowired
	private ArticleService articleService;
	@GetMapping("articles")
	public List<Article> getAllArticles() {
		List<Article> list = articleService.getAllArticles();
		return list;
	}
}
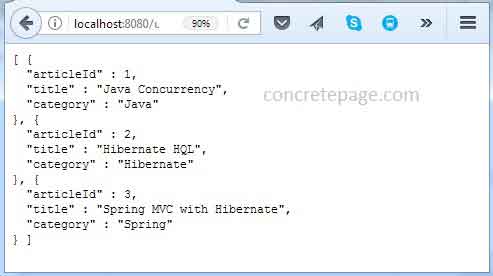
Test Application
Find the steps to test the application.1. Download the project source code and import into eclipse.
2. Go to the root folder using command prompt and run the command
mvn clean eclipse:eclipse
3. Open the
MyApplication class and run as java application.
4. Access the URL
http://localhost:8080/user/articles


