Spring Boot + H2 Database Example
November 29, 2023
On this page, I will create Spring Boot application using H2 database with CRUD example. H2 database is used as embedded mode, server mode and in-memory databases. Spring Boot can auto-configure H2 console in development phase. The driver class for H2 database is org.h2.Driver. In Spring Boot applications, all configurations related to datasource, JPA, connection pool and H2 web console is performed in application.properties file.
In our demo application, we are using
CrudRepository to perform CRUD operation with H2 database.
Contents
1. H2 Database
H2 database is the open source Java SQL database that uses JDBC API. H2 database is very fast and can be used as embedded mode, server mode and in-memory databases. H2 Console can be accessed using browser.To install and work with H2 database, find the steps.
1. Go to official website link. Download and install in your computer.
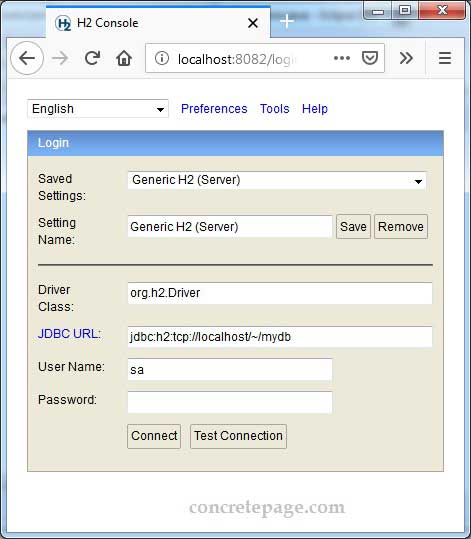
2. Open H2 Console (Command Line) and access URL http://localhost:8082 in browser. Spring Boot can also auto-configure H2 console in development phase for developer. Now select server mode and in JDBC URL we can change 'test' database name as we want. In our example we will change database name as 'mydb'. Find the print screen.

3. In our demo application, we will create Spring Boot application using H2 database. Find the SQL to create a H2 table used in our demo.
CREATE TABLE IF NOT EXISTS students (
  roll_num bigint(5) NOT NULL AUTO_INCREMENT,
  name varchar(100) NOT NULL,
  age int(3) NOT NULL,
  PRIMARY KEY (roll_num)
);

INSERT INTO students (roll_num, name, age) VALUES
	(1, 'Mahesh', 19),
	(2, 'Krishna', 18);
4. In server mode, The JDBC URL will be jdbc:h2:tcp://localhost/~/mydb
5. If we choose embedded mode, the JDBC URL will be jdbc:h2:~/mydb
6. In embedded Mode, database may only be open in one virtual machine (and class loader) at any time where as in server mode, many applications can connect to the same database at the same time, by connecting to this server.
7. To connect to the H2 database using our Spring application, we need to use driver class name as
org.h2.Driver and resolve it using Maven dependency as following.
<dependency>
  <groupId>com.h2database</groupId>
  <artifactId>h2</artifactId>
</dependency>
2. Maven Dependencies
Find the Maven file to resolve dependencies.pom.xml
<parent>
	<groupId>org.springframework.boot</groupId>
	<artifactId>spring-boot-starter-parent</artifactId>
	<version>2.1.6.RELEASE</version>
	<relativePath />
</parent>
<properties>
	<context.path>spring-app</context.path>
	<java.version>11</java.version>
</properties>
<dependencies>
	<dependency>
		<groupId>org.springframework.boot</groupId>
		<artifactId>spring-boot-starter-web</artifactId>
	</dependency>
	<dependency>
		<groupId>org.springframework.boot</groupId>
		<artifactId>spring-boot-starter-data-jpa</artifactId>
	</dependency>
	<dependency>
		<groupId>com.h2database</groupId>
		<artifactId>h2</artifactId>
	</dependency>
	<dependency>
		<groupId>org.springframework.boot</groupId>
		<artifactId>spring-boot-devtools</artifactId>
		<optional>true</optional>
	</dependency>
</dependencies>
3. Connect to H2 Database
H2 database driver class name isorg.h2.Driver. Find the Spring datasource configurations in application.properties file to connect H2 database with server mode.
spring.datasource.driver-class-name=org.h2.Driver
spring.datasource.url=jdbc:h2:tcp://localhost/~/mydb
spring.datasource.username=sa
spring.datasource.password=cp
4. Configure H2 Web Console
Spring Boot can auto-configure H2 web console in following conditions.1. We are developing servlet-based web application.
2. The com.h2database:h2 is on the classpath. We need following Maven dependency.
<dependency>
	<groupId>com.h2database</groupId>
	<artifactId>h2</artifactId>
</dependency>
application.properties file.
The purpose of auto-configuring H2 web console is only in development phase and not in production. If our application is using developer tools and when we create archive file for production, H2 web console will not be available automatically.
If we have enabled spring.h2.console.enabled to true, then we must make it false before creating JAR/WAR for production.
To use developer tools in our application we need following Maven dependency.
<dependency>
	<groupId>org.springframework.boot</groupId>
	<artifactId>spring-boot-devtools</artifactId>
        <optional>true</optional>
</dependency>
application.properties file related to H2 web console.
spring.h2.console.path: The default H2 web console path, auto-configured by Spring Boot, is
/h2-console and it can be changed by using this property. In our example we have set spring.h2.console.path=/h2 that can be accessed using http://localhost:8080/h2 URL.
spring.h2.console.enabled: Whether to enable the console. Default is false.
spring.h2.console.settings.trace: Whether to enable trace output. Default is false.
spring.h2.console.settings.web-allow-others: Whether to enable remote access. Default is false.
5. Complete Example with CRUD Operation
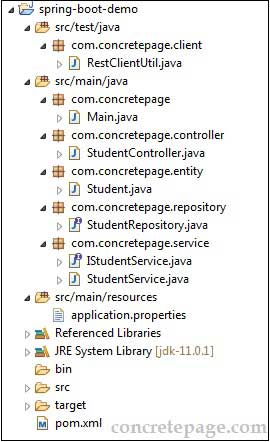
Find the project structure of our demo application.
application.properties
#Datasource Configuration
spring.datasource.driver-class-name=org.h2.Driver
spring.datasource.url=jdbc:h2:tcp://localhost/~/mydb
spring.datasource.username=sa
spring.datasource.password=

#JPA Configuration
spring.jpa.hibernate.ddl-auto=none
spring.jpa.show-sql=true

#Connection Pool Configuration
spring.datasource.hikari.connection-timeout=20000
spring.datasource.hikari.minimum-idle=5
spring.datasource.hikari.maximum-pool-size=12
spring.datasource.hikari.idle-timeout=300000
spring.datasource.hikari.max-lifetime=1200000

#H2 Web Console
#spring.h2.console.enabled=true
spring.h2.console.path=/h2
spring.h2.console.settings.trace=false
spring.h2.console.settings.web-allow-others=true
package com.concretepage.repository;
import org.springframework.data.repository.CrudRepository;
import com.concretepage.entity.Student;
public interface StudentRepository extends CrudRepository<Student, Long>  {
}
package com.concretepage.service;
import java.util.List;
import com.concretepage.entity.Student;
public interface IStudentService {
     List<Student> getAllStudents();
     Student getStudentByRollNum(long rollNum);
     boolean addStudent(Student student);
     void updateStudent(Student student);
     void deleteStudent(long rollNum);
}
package com.concretepage.service;
import java.util.ArrayList;
import java.util.List;
import org.springframework.beans.factory.annotation.Autowired;
import org.springframework.stereotype.Service;
import com.concretepage.entity.Student;
import com.concretepage.repository.StudentRepository;

@Service
public class StudentService implements IStudentService {
	@Autowired
	private StudentRepository studentRepository;

	@Override
	public Student getStudentByRollNum(long rollNum) {
		Student obj = studentRepository.findById(rollNum).get();
		return obj;
	}

	@Override
	public List<Student> getAllStudents() {
		List<Student> list = new ArrayList<>();
		studentRepository.findAll().forEach(e -> list.add(e));
		return list;
	}

	@Override
	public boolean addStudent(Student student) {
		studentRepository.save(student);
		return true;

	}

	@Override
	public void updateStudent(Student student) {
		studentRepository.save(student);
	}

	@Override
	public void deleteStudent(long rollNum) {
		studentRepository.delete(getStudentByRollNum(rollNum));
	}
}
package com.concretepage.entity;
import java.io.Serializable;
import javax.persistence.Column;
import javax.persistence.Entity;
import javax.persistence.GeneratedValue;
import javax.persistence.GenerationType;
import javax.persistence.Id;
import javax.persistence.Table;
@Entity
@Table(name="students")
public class Student implements Serializable {
	private static final long serialVersionUID = 1L;
	@Id
	@GeneratedValue(strategy=GenerationType.AUTO)
	@Column(name="roll_num")
        private long rollNum;
	@Column(name="name")
        private String name;
	@Column(name="age")
	private int age;

       //setters and getters
}
package com.concretepage.controller;
import java.util.List;
import org.springframework.beans.factory.annotation.Autowired;
import org.springframework.http.HttpHeaders;
import org.springframework.http.HttpStatus;
import org.springframework.http.ResponseEntity;
import org.springframework.stereotype.Controller;
import org.springframework.web.bind.annotation.DeleteMapping;
import org.springframework.web.bind.annotation.GetMapping;
import org.springframework.web.bind.annotation.PathVariable;
import org.springframework.web.bind.annotation.PostMapping;
import org.springframework.web.bind.annotation.PutMapping;
import org.springframework.web.bind.annotation.RequestBody;
import org.springframework.web.util.UriComponentsBuilder;
import com.concretepage.entity.Student;
import com.concretepage.service.IStudentService;
@Controller
public class StudentController {
	@Autowired
	private IStudentService studentService;

	@GetMapping("student/{rollNum}")
	public ResponseEntity<Student> getStudentByRollNum(@PathVariable("rollNum") long rollNum) {
		Student student = studentService.getStudentByRollNum(rollNum);
		return new ResponseEntity<Student>(student, HttpStatus.OK);
	}

	@GetMapping("students")
	public ResponseEntity<List<Student>> getAllStudents() {
		List<Student> list = studentService.getAllStudents();
		return new ResponseEntity<List<Student>>(list, HttpStatus.OK);
	}

	@PostMapping("student")
	public ResponseEntity<Void> addStudent(@RequestBody Student student, UriComponentsBuilder builder) {
		studentService.addStudent(student);
		HttpHeaders headers = new HttpHeaders();
		headers.setLocation(builder.path("/student/{rollNum}").buildAndExpand(student.getRollNum()).toUri());
		return new ResponseEntity<Void>(headers, HttpStatus.CREATED);
	}

	@PutMapping("student")
	public ResponseEntity<Student> updateStudent(@RequestBody Student student) {
		studentService.updateStudent(student);
		return new ResponseEntity<Student>(student, HttpStatus.OK);
	}

	@DeleteMapping("student/{rollNum}")
	public ResponseEntity<Void> deleteStudent(@PathVariable("rollNum") long rollNum) {
		studentService.deleteStudent(rollNum);
		return new ResponseEntity<Void>(HttpStatus.NO_CONTENT);
	}
}
package com.concretepage;
import org.springframework.boot.SpringApplication;
import org.springframework.boot.autoconfigure.SpringBootApplication;
@SpringBootApplication
public class Main {
	public static void main(String[] args) {
		SpringApplication.run(Main.class, args);
        }
}
6. Run Application
We can directly run the Main class as Java Application or by mvn spring-boot:run command using command prompt.To run the application as JAR, find the steps.
1. Go to the root directory of the project using command prompt and run the mvn clean package command.
2. In target directory a JAR will be created.
3. To run the application using JAR, run the command.
java -jar target/spring-demo-0.0.1-SNAPSHOT.jar
To open H2 web console enabled by Spring Boot, we need to start our application in development mode by running the
Main class as Java Application or by mvn spring-boot:run command using command prompt.
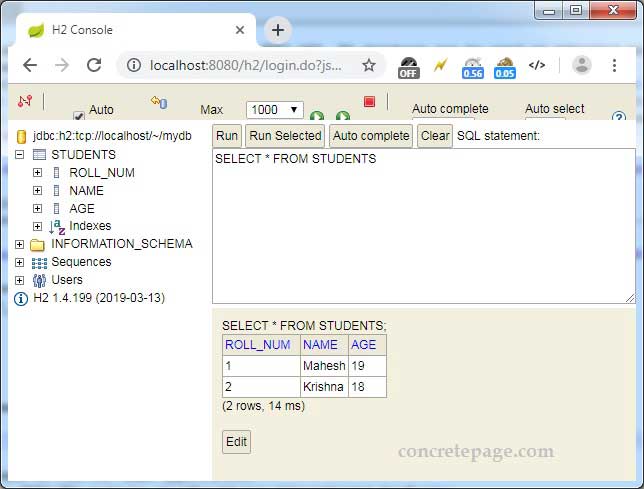
Find the data in H2 database.

7. References
Spring Boot Reference GuideH2 Database Engine


