Spring MVC + Thymeleaf Example
June 25, 2019
This page will walk through Spring MVC and Thymeleaf annotation integration tutorial with internationalization example using SpringTemplateEngine and ThymeleafViewResolver. Thymeleaf provides thymeleaf-spring4 JAR to integrate with spring. To achieve it we have to configure ServletContextTemplateResolver, SpringTemplateEngine and ThymeleafViewResolver bean in JavaConfig. To resolve message source, we have to create bean for MessageSource spring class. To send values from spring controller to Thymeleaf templates, we set values in ModelAndView using addObject() method. In our example we will provide a blog application.
Software used in Demo
1. Java 82. Thymeleaf-spring4 3.0.0.ALPHA03
3. Spring 4
4. Tomcat 8
5. Gradle
6. Eclipse
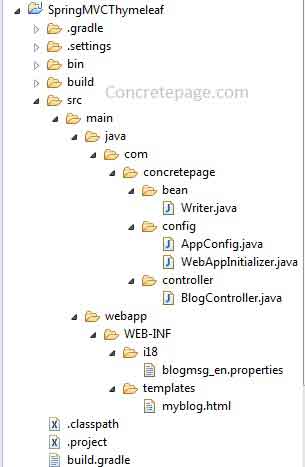
Project Structure in Eclipse

build.gradle: Resolve thymeleaf-spring4 Jar
apply plugin: 'java'
apply plugin: 'eclipse'
apply plugin: 'war'
archivesBaseName = 'Spring4'
version = '1'
repositories {
    mavenCentral()
}
dependencies {
    compile 'org.springframework.boot:spring-boot-starter-web:1.2.3.RELEASE'
    compile 'org.thymeleaf:thymeleaf-spring4:3.0.0.ALPHA03'
    providedRuntime 'org.springframework.boot:spring-boot-starter-tomcat:1.2.3.RELEASE'
}
Configuration for ServletContextTemplateResolver, SpringTemplateEngine and ThymeleafViewResolver
AppConfig.java
package com.concretepage.config;
import org.springframework.context.MessageSource;
import org.springframework.context.annotation.Bean;
import org.springframework.context.annotation.ComponentScan;
import org.springframework.context.annotation.Configuration;
import org.springframework.context.support.ReloadableResourceBundleMessageSource;
import org.springframework.web.servlet.config.annotation.EnableWebMvc;
import org.springframework.web.servlet.config.annotation.WebMvcConfigurerAdapter;
import org.thymeleaf.spring4.SpringTemplateEngine;
import org.thymeleaf.spring4.view.ThymeleafViewResolver;
import org.thymeleaf.templateresolver.ServletContextTemplateResolver;
@Configuration
@ComponentScan("com.concretepage")
@EnableWebMvc
public class AppConfig extends WebMvcConfigurerAdapter  {
    //start Thymeleaf specific configuration
    @Bean(name ="templateResolver")
    public ServletContextTemplateResolver getTemplateResolver() {
    	ServletContextTemplateResolver templateResolver = new ServletContextTemplateResolver();
    	templateResolver.setPrefix("/WEB-INF/templates/");
    	templateResolver.setSuffix(".html");
    	templateResolver.setTemplateMode("XHTML");
	return templateResolver;
    }
    @Bean(name ="templateEngine")
    public SpringTemplateEngine getTemplateEngine() {
    	SpringTemplateEngine templateEngine = new SpringTemplateEngine();
    	templateEngine.setTemplateResolver(getTemplateResolver());
	return templateEngine;
    }
    @Bean(name="viewResolver")
    public ThymeleafViewResolver getViewResolver(){
    	ThymeleafViewResolver viewResolver = new ThymeleafViewResolver();
    	viewResolver.setTemplateEngine(getTemplateEngine());
	return viewResolver;
    }
    //end Thymeleaf specific configuration
    @Bean(name ="messageSource")
    public MessageSource getMessageSource() {
        ReloadableResourceBundleMessageSource messageSource = new ReloadableResourceBundleMessageSource();
        messageSource.setBasename("/WEB-INF/i18/blogmsg");
        messageSource.setDefaultEncoding("UTF-8");
        return messageSource;
    }
}
ServletContextTemplateResolver: It resolves templates with provided prefix and suffix and other settings.
SpringTemplateEngine: It processes templates. We need to assign
ServletContextTemplateResolver instance to it. Bean name must be templateEngine.
ThymeleafViewResolver: It runs after controller ends its execution. It receives the view name to be processed.
Find the
WebApplicationInitializer implementation.
WebAppInitializer.java
package com.concretepage.config;
import javax.servlet.ServletContext;
import javax.servlet.ServletException;
import javax.servlet.ServletRegistration.Dynamic;
import org.springframework.web.WebApplicationInitializer;
import org.springframework.web.context.support.AnnotationConfigWebApplicationContext;
import org.springframework.web.servlet.DispatcherServlet;
public class WebAppInitializer implements WebApplicationInitializer {
	public void onStartup(ServletContext servletContext) throws ServletException {
        AnnotationConfigWebApplicationContext ctx = new AnnotationConfigWebApplicationContext();
        ctx.register(AppConfig.class);
        ctx.setServletContext(servletContext);
        Dynamic dynamic = servletContext.addServlet("dispatcher", new DispatcherServlet(ctx));
        dynamic.addMapping("/");
        dynamic.setLoadOnStartup(1);
   }
}
Bean used in Demo
Writer.java
package com.concretepage.bean;
import java.util.ArrayList;
import java.util.List;
import org.springframework.stereotype.Service;
@Service
public class Writer {
	private String name;
	private String location;
	public Writer(){}
	public Writer(String name, String location) {
		this.name = name;
		this.location = location;
	}
	public String getName() {
		return name;
	}
	public void setName(String name) {
		this.name = name;
	}
	public String getLocation() {
		return location;
	}
	public void setLocation(String location) {
		this.location = location;
	}
	public List<Writer> getWriters() {
	        List<Writer> list = new ArrayList<>();
	        list.add(new Writer("Ram","Ayodhya"));
	        list.add(new Writer("Krishna","Mathura"));
	        list.add(new Writer("Shankar","Himalaya"));
		return list;
	}
}
Property File
blogmsg_en.properties
myblog.title= Thymeleaf Blog
myblog.msg= Find the demo for Spring and Thymeleaf integration.
myblog.writers= Bloggers
Controller
The value set inModelAndView using addObject() is accssed by Thymeleaf while processing templates. Find the controller.
BlogController.java
package com.concretepage.controller;
import java.util.Date;
import org.springframework.beans.factory.annotation.Autowired;
import org.springframework.stereotype.Controller;
import org.springframework.web.bind.annotation.RequestMapping;
import org.springframework.web.servlet.ModelAndView;
import com.concretepage.bean.Writer;
@Controller
public class BlogController {
	@Autowired
	private Writer writer;
	@RequestMapping(value = "/blog")
	 public ModelAndView getBlog(ModelAndView mv) {
		mv.addObject("currentDate", new Date());
		mv.addObject("writers", writer.getWriters());
	        mv.setViewName("myblog");
	        return mv;
	}
}
Create UI Template
Find the HTML file which is working as our UI template.WEB-INF\templates\myblog.html
<!DOCTYPE html SYSTEM "http://www.thymeleaf.org/dtd/xhtml1-strict-thymeleaf-4.dtd">
<html xmlns="http://www.w3.org/1999/xhtml" xmlns:th="http://www.thymeleaf.org">
  <head>
    <title th:text="#{myblog.title}">Blog Title</title>
    <meta http-equiv="Content-Type" content="text/html; charset=UTF-8" />
  </head>
  <body>
    <h3 th:text="#{myblog.title}"> Blog Title </h3>
    Date : <b th:text="${currentDate}">Sat Oct 24 2015</b><br/>
    <p th:text="#{myblog.msg}">Blog Message</p>
    <h3 th:text="#{myblog.writers}"> Writers </h3>
    <table>
        <tr th:each="writer : ${writers}">
          <td th:text="${writer.name}">name</td>
          <td> - </td>
        <td th:text="${writer.location}">location</td>
    </table>
  </body>
</html>
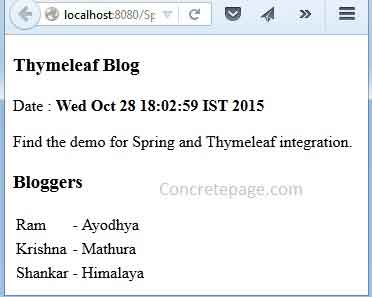
Output
For output, run the URL http://localhost:8080/Spring4-1/blog.


