Spring 4 + JSF 2 Integration Example using @Autowired Annotation
January 26, 2015
This page will provide the Spring 4 and JSF 2 integration example using @Autowired annotation. Spring provides
org.springframework.web.jsf.el.SpringBeanFacesELResolver
SpringBeanFacesELResolver will be configured in faces-config.xml. To use spring bean by @Autowired annotation, we need to annotate managed bean class by @Component. In our example we are registering Spring bean using @Configuration class and using WebApplicationInitializer class to register DispatcherServlet, ContextLoaderListener and RequestContextListener. Find the example step by step.
Software Required to Run Example
Find the required software to run the example.1. Java 7
2. Tomcat 8
3. Gradle
4. Eclipse
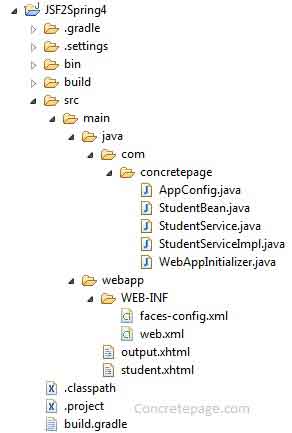
Project Structure in Eclipse
Find the demo project structure in eclipse.
Gradle File to Resolve JAR Dependency
Find the gradle file to resolve the spring and JSF JAR dependency.build.gradle
apply plugin: 'java'
apply plugin: 'eclipse'
apply plugin: 'war'
archivesBaseName = 'JSF2Spring4'
version = '1'
repositories {
    mavenCentral()
}
dependencies {
    compile 'com.sun.faces:jsf-api:2.2.9'
    compile 'com.sun.faces:jsf-impl:2.2.9'
    compile 'jstl:jstl:1.2'
    compile 'org.springframework.boot:spring-boot-starter-web:1.2.0.RELEASE'
}
Integrate Spring Bean and Managed Bean using @Autowired Annotation
JSF uses managed bean and spring uses spring bean so to use together we will annotate the class with both annotations as @ManagedBean and @Component. @ManagedBean helps to serve bean for JSF and @Component annotation enables the class to use bean using @Autowired Annotation.StudentBean.java
package com.concretepage;
import javax.faces.bean.ManagedBean;
import javax.faces.bean.RequestScoped;
import org.springframework.beans.factory.annotation.Autowired;
import org.springframework.stereotype.Component;
@ManagedBean(name = "studentBean", eager = true)
@RequestScoped
@Component
public class StudentBean {
	private String name;
	private Integer id;
	@Autowired
	public StudentService userService;
	public String fetchStudent(){
		name = userService.getStudent(id);
		return "output";
	}
	public String getName() {
		return name;
	}
	public void setName(String name) {
		this.name = name;
	}
	public Integer getId() {
		return id;
	}
	public void setId(Integer id) {
		this.id = id;
	}
}
faces-config.xml
Find the faces-config.xml that will configureorg.springframework.web.jsf.el.SpringBeanFacesELResolver
faces-config.xml
<?xml version="1.0" encoding="UTF-8"?>
<faces-config xmlns="http://java.sun.com/xml/ns/javaee"
	xmlns:xsi="http://www.w3.org/2001/XMLSchema-instance"
	xsi:schemaLocation="http://java.sun.com/xml/ns/javaee http://java.sun.com/xml/ns/javaee/web-facesconfig_2_1.xsd"
	version="2.1">
 	<application>
		<el-resolver>
    		 org.springframework.web.jsf.el.SpringBeanFacesELResolver
		</el-resolver>
  	</application>
 </faces-config>
Spring Configuration Class
In the configuration class we are configuring a bean to use in our demo. The configuration class should be annotated with @ComponentScan annotation.AppConfig.java
package com.concretepage;
import org.springframework.context.annotation.Bean;
import org.springframework.context.annotation.ComponentScan;
import org.springframework.context.annotation.Configuration;
@Configuration
@ComponentScan("com.concretepage")
public class AppConfig {
   @Bean
   public StudentService studentService(){
	   return new StudentServiceImpl();
   }
}
StudentService.java
package com.concretepage;
public interface StudentService {
   String getStudent(Integer id);
}
StudentServiceImpl.java
package com.concretepage;
import java.util.HashMap;
import java.util.Map;
public class StudentServiceImpl implements StudentService {
	Map<Integer, String> map = new HashMap<Integer, String>();
	{
		map.put(1, "Ram");
		map.put(2, "Shyam");
		map.put(3, "Rahim");
	}
	@Override
	public String getStudent(Integer id) {
		System.out.println("Fetching student for the id:"+ id);
		return map.get(id);
	}
}
Spring WebApplicationInitializer Class
We are using WebApplicationInitializer class to register DispatcherServlet, ContextLoaderListener and RequestContextListener class.WebAppInitializer.java
package com.concretepage;
import javax.servlet.ServletContext;
import javax.servlet.ServletException;
import javax.servlet.ServletRegistration.Dynamic;
import org.springframework.web.WebApplicationInitializer;
import org.springframework.web.context.ContextLoaderListener;
import org.springframework.web.context.request.RequestContextListener;
import org.springframework.web.context.support.AnnotationConfigWebApplicationContext;
import org.springframework.web.servlet.DispatcherServlet;
public class WebAppInitializer implements WebApplicationInitializer {
	public void onStartup(ServletContext servletContext) throws ServletException {
        AnnotationConfigWebApplicationContext ctx = new AnnotationConfigWebApplicationContext();
        ctx.register(AppConfig.class);
        ctx.setServletContext(servletContext);
        servletContext.addListener(new ContextLoaderListener(ctx));
        servletContext.addListener(new RequestContextListener());
        Dynamic dynamic = servletContext.addServlet("dispatcher", new DispatcherServlet(ctx));
        dynamic.addMapping("/");
        dynamic.setLoadOnStartup(1);
   }
}
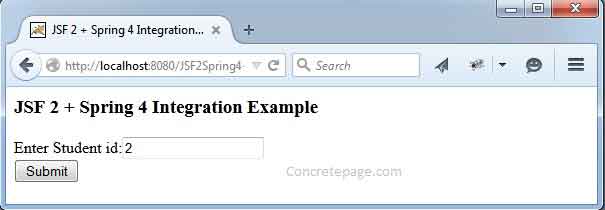
Create UI to get Input using JSF 2
Find the XHTML for view. We have created a simple input field to take input using JSF.student.xhtml
<html lang="en"
      xmlns="http://www.w3.org/1999/xhtml"
      xmlns:h="http://java.sun.com/jsf/html">
    <h:head>
        <title>JSF 2 + Spring 4 Integration Example</title>
    </h:head>
    <h:body>
       <h3>JSF 2 + Spring 4 Integration Example</h3>
		<h:form id="studentForm">
			<h:outputLabel value="Enter Student id:" />
			<h:inputText value="#{studentBean.id}" /> <br />
			<h:commandButton value="Submit" action="#{studentBean.fetchStudent}"/>
		</h:form>
    </h:body>
output.xhtml
<html lang="en"
      xmlns="http://www.w3.org/1999/xhtml"
      xmlns:h="http://java.sun.com/jsf/html">
    <h:head>
        <title>JSF 2 + Spring 4 Integration Example</title>
    </h:head>
    <h:body>
       <h3>JSF 2 + Spring 4 Integration Example</h3>
            Student Name: #{studentBean.name}
    </h:body>
</html>
web.xml for JSF
Find the web.xml to configure javax.faces.webapp.FacesServlet.web.xml
<?xml version="1.0" encoding="ISO-8859-1" ?>
<web-app xmlns="http://java.sun.com/xml/ns/j2ee"
    xmlns:xsi="http://www.w3.org/2001/XMLSchema-instance"
    xsi:schemaLocation="http://java.sun.com/xml/ns/j2ee http://java.sun.com/xml/ns/j2ee/web-app_2_4.xsd"
    version="3.0">
	<display-name>JSF 2 + Spring 4 Integration Example </display-name>
    <servlet>
      <servlet-name>FacesServlet</servlet-name>
      <servlet-class>javax.faces.webapp.FacesServlet</servlet-class>
      <load-on-startup>1</load-on-startup>
    </servlet>
    <servlet-mapping>
      <servlet-name>FacesServlet</servlet-name>
      <url-pattern>/faces/*</url-pattern>
    </servlet-mapping>
    <servlet-mapping>
      <servlet-name>FacesServlet</servlet-name>
      <url-pattern>*.xhtml</url-pattern>
    </servlet-mapping>
</web-app>
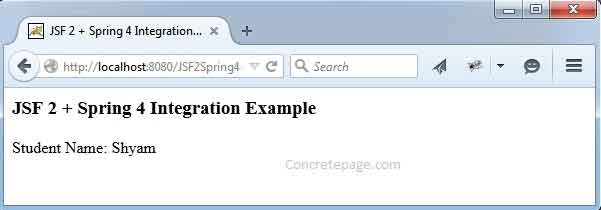
Output
Deploy the war file and access the URL as http://localhost:8080/JSF2Spring4-1/student.xhtml.


