JSF 2 Composite Components Example | Create Custom Tag
January 23, 2015
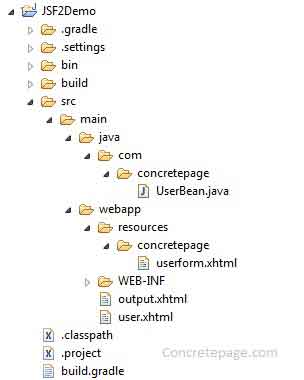
In this page we will learn creating composite component in JSF 2 with the help of composite:interface, composite:attribute and composite:implementation tag. JSF 2 allows to create template which can be reused where ever we want. To do it, create a directory named as resources parallel to WEB-INF. Inside resources directory, create a folder as we want and then create template file . The name of our template file will be our custom tag name.
Project Structure in Eclipse

Create Template with Composite Interface and Implementation
We will create a template with the help of composite:interface, composite:attribute and composite:implementation. Perform some basic task.1. Create a directory named as resources parallel to WEB-INF
2. Create your own directory and inside it create your own file and import xmlns:composite="http://java.sun.com/jsf/composite
For the example, if we create template file as Resources/concretepage/ userform.xhtml then to use it, we will import it any JSF file as
xmlns:concretepage = "http://java.sun.com/jsf/composite/concretepage"
Here our own tag is concretepage and can be used in any JSF file as <concretepage />. We can define its attribute using tag composite:interface which defines the name of tag attribute using sub tag composite:attribute . Now create the template using composite:implementation tag. Find the template file.
userform.xhtml
<html lang="en"
      xmlns="http://www.w3.org/1999/xhtml"
      xmlns:h="http://java.sun.com/jsf/html"
      xmlns:f="http://java.sun.com/jsf/core"
      xmlns:composite="http://java.sun.com/jsf/composite">
    <h:body>
	    <composite:interface>
	       <composite:attribute name="nameLabel"/>
	       <composite:attribute name="nameValue"/>
	       <composite:attribute name="ageLabel"/>
	       <composite:attribute name="ageValue"/>
	       <composite:attribute name="locationLabel"/>
	       <composite:attribute name="locationValue"/>
	       <composite:attribute name="submitButtonLabel"/>
	       <composite:attribute name="submitButtonAction" method-signature="java.lang.String save()" />
	    </composite:interface>
	    <composite:implementation>
	       <h:panelGrid columns="2" id="userPanel">
		       #{cc.attrs.nameLabel}:
		       <h:inputText value="#{cc.attrs.nameValue}"/>
		       #{cc.attrs.ageLabel}:
		       <h:inputText value="#{cc.attrs.ageValue}"/>
		       #{cc.attrs.locationLabel}:
		       <h:inputText value="#{cc.attrs.locationValue}"/>
	       </h:panelGrid>
	       <h:commandButton value="#{cc.attrs.submitButtonLabel}"  action="#{cc.attrs.submitButtonAction}"/>
	    </composite:implementation>
    </h:body>
</html>
Use Template
To use our template, we need to import asxmlns:concretepage = "http://java.sun.com/jsf/composite/concretepage"
Now we have a new tag which has the attribute defined in userform.xhtml.
user.xhtml
<html lang="en"
      xmlns="http://www.w3.org/1999/xhtml"
      xmlns:h="http://java.sun.com/jsf/html"
      xmlns:f="http://java.sun.com/jsf/core"
      xmlns:concretepage = "http://java.sun.com/jsf/composite/concretepage">
    <h:head>
        <title>Composite Components in JSF 2</title>
    </h:head>
    <h:body>
       <h3>Composite Components in JSF 2</h3>
        <h:form id="userForm">
           <concretepage:userform
	        nameLabel ="Enter Name"
			nameValue ="#{userBean.name}"
			ageLabel ="Enter Age"
			ageValue ="#{userBean.age}"
			locationLabel ="Enter Location"
			locationValue ="#{userBean.location}"
			submitButtonLabel ="Submit Data"
			submitButtonAction ="#{userBean.save}" />
		</h:form>
    </h:body>
</html>
output.xhtml
<html lang="en"
      xmlns="http://www.w3.org/1999/xhtml"
      xmlns:h="http://java.sun.com/jsf/html"
      xmlns:f="http://java.sun.com/jsf/core">
    <h:head>
        <title>Composite Components in JSF 2</title>
    </h:head>
    <h:body>
       <h3>Composite Components in JSF 2</h3>
       Name : #{userBean.name}  <br/>
       Age : #{userBean.age}  <br/>
       Location : #{userBean.location}  <br/>
    </h:body>
</html>
Managed Bean
Find the managed bean used in the example.UserBean.java
package com.concretepage;
import javax.faces.bean.ManagedBean;
import javax.faces.bean.RequestScoped;
@ManagedBean(name = "userBean", eager = true)
@RequestScoped
public class UserBean {
	private String name;
	private Integer age;
	private String location;
	public String save(){
		System.out.println("Inside save");
		return "output";
	}
	public String getName() {
		return name;
	}
	public void setName(String name) {
		this.name = name;
	}
	public Integer getAge() {
		return age;
	}
	public void setAge(Integer age) {
		this.age = age;
	}
	public String getLocation() {
		return location;
	}
	public void setLocation(String location) {
		this.location = location;
	}
}
Output
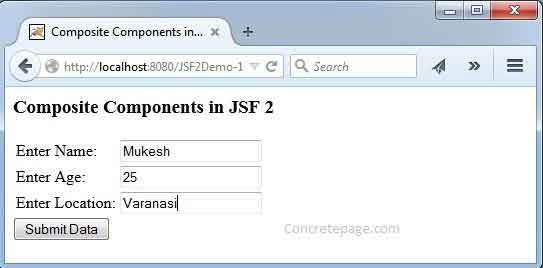
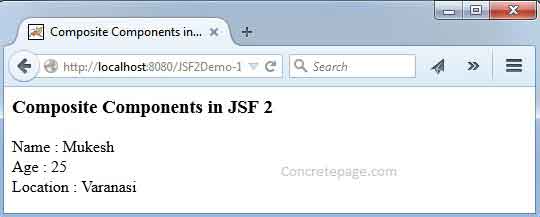
To check the output, access the URLhttp://localhost:8080/JSF2Demo-1/user.xhtml. We will find the page as below.


