Angular FormControl setValue()
December 21, 2020
On this page we will provide FormControl.setValue() examples. The FormControl.setValue() sets a new value to this control. Find the method declaration.
setValue(value: any,
 options: { onlySelf?: boolean; emitEvent?: boolean; emitModelToViewChange?: boolean; emitViewToModelChange?: boolean; } = {}): void
value: The new value for the control.
The options determines how the control propagates changes and emits events when the value changes. The options consists following configurations:
onlySelf: If true, each value change will affect only this control and not its parent. Default is false.
emitEvent: If true, both the
statusChanges and valueChanges observables emit events with the latest status and value when the control value is changed. If it is false, no events are emitted. The default is true.
emitModelToViewChange: When true, each change triggers an
onChange event to update the view. The default is true.
emitViewToModelChange: When true, each change triggers an
ngModelChange event to update the model. The default is true.
The
FormControl also provides patchValue() to patch value. The functionality of patchValue() is same as setValue() in FormControl. The FormControl.patchValue() exists only for symmetry with FormGroup.patchValue() and FormArray.patchValue().
Contents
1. Technologies Used
Find the technologies being used in our example.1. Angular 11.0.3
2. Node.js 12.5.0
3. NPM 6.9.0
2. Using setValue()
Here we will provide simple use ofFormControl.setValue() method. In our code we have initialized a FormControl and we have a setter method to set value as 'India'.
countryName = new FormControl();
setCountryName() {
    this.countryName.setValue('India');
}
<input [formControl]="countryName">
<button type="button" (click)="setCountryName()">Set Country Name</button>
{{countryName.value}}
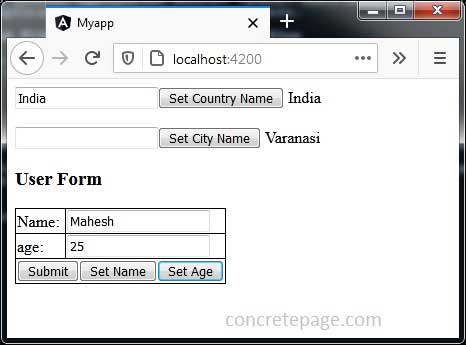
countryName.value will display value as 'India'.
3. Using setValue() with Options
We can useFormControl.setValue() with configuration options as following.
this.cityName.setValue('Varanasi', {
  onlySelf: false,
  emitEvent: true,
  emitModelToViewChange: true,
  emitViewToModelChange: true
});
emitModelToViewChange value as false.
cityName = new FormControl();
setCityName() {
    this.cityName.setValue('Varanasi', {
      emitModelToViewChange: false
    });
}
<input [formControl]="cityName">
<button type="button" (click)="setCityName()">Set City Name</button>
{{cityName.value}}
setValue() by clicking the button, this value in text box will not change but cityName.value will change.
4. With FormGroup
In this example we have created aFormGroup that contains FormControl. Now look into the code.
this.userForm = this.formBuilder.group({
  name: '',
  age: ''
});
setName() {
  this.userForm.get('name').setValue('Mahesh');
}
setAge() {
  this.userForm.get('age').setValue(25);
}
FormGroup i.e. 'userForm' and then using setValue() of FormControl.
5. Complete Example
reactive-form.component.ts
import { Component, OnInit } from '@angular/core';
import { FormControl, FormGroup, FormBuilder } from '@angular/forms';

@Component({
  selector: 'app-reactive-form',
  templateUrl: './reactive-form.component.html'
})
export class ReactiveFormComponent implements OnInit {
  countryName = new FormControl();
  cityName = new FormControl();

  setCountryName() {
    this.countryName.setValue('India');
  }
  setCityName() {
    this.cityName.setValue('Varanasi', {
      emitModelToViewChange: false
    });
  }
  userForm: FormGroup;
  constructor(private formBuilder: FormBuilder) {
  }
  ngOnInit() {
    this.userForm = this.formBuilder.group({
      name: '',
      age: ''
    });
  }
  onFormSubmit() {
    console.log(this.userForm.value);
    this.userForm.reset();
  }
  setName() {
    this.userForm.get('name').setValue('Mahesh');
  }
  setAge() {
    this.userForm.get('age').setValue(25);
  }
}
<input [formControl]="countryName">
<button type="button" (click)="setCountryName()">Set Country Name</button>
{{countryName.value}}
<br/><br/>
<input [formControl]="cityName">
<button type="button" (click)="setCityName()">Set City Name</button>
{{cityName.value}}
<br/>

<h3>User Form</h3>
<form [formGroup]="userForm" (ngSubmit)="onFormSubmit()">
	<table>
		<tr>
			<td>Name: </td>
			<td>
				<input formControlName="name">
			</td>
		</tr>
		<tr>
			<td>age: </td>
			<td>
				<input formControlName="age">
			</td>
		</tr>
		<tr>
			<td colspan="2">
				<button>Submit</button>
				<button type="button" (click)="setName()">Set Name</button>
				<button type="button" (click)="setAge()">Set Age</button>
			</td>
		</tr>
	</table>
</form>
import { Component } from '@angular/core';

@Component({
   selector: 'app-root',
   template: `
		<app-reactive-form></app-reactive-form>
             `
})
export class AppComponent {
}
import { NgModule } from '@angular/core';
import { BrowserModule } from '@angular/platform-browser';
import { ReactiveFormsModule } from '@angular/forms';
import { AppComponent } from './app.component';
import { ReactiveFormComponent } from './reactive-form.component';

@NgModule({
  imports: [
      BrowserModule,
      ReactiveFormsModule,
  ],
  declarations: [
      AppComponent,
      ReactiveFormComponent
  ],
  providers: [
  ],
  bootstrap: [
      AppComponent
  ]
})
export class AppModule { }
6. Run Application
To run the application, find the steps.1. Download source code using download link given below on this page.
2. Use downloaded src in your Angular CLI application. To install Angular CLI, find the link.
3. Run ng serve using command prompt.
4. Access the URL http://localhost:4200
Find the print screen of the output.

7. References
Angular FormControlAngular FormBuilder


