Angular Material Tab Change Event
March 20, 2021
Angular Material tabs are created as group of tabs using MatTabGroup whose selector is mat-tab-group. It has following events.
selectedTabChange: Event emitted when tab selection has changed.
selectedIndexChange: Event emitted when selected index of tab has changed.
focusChange: Event emitted when tab focus has changed within a tab group.
animationDone: Event emitted when body animation has completed.
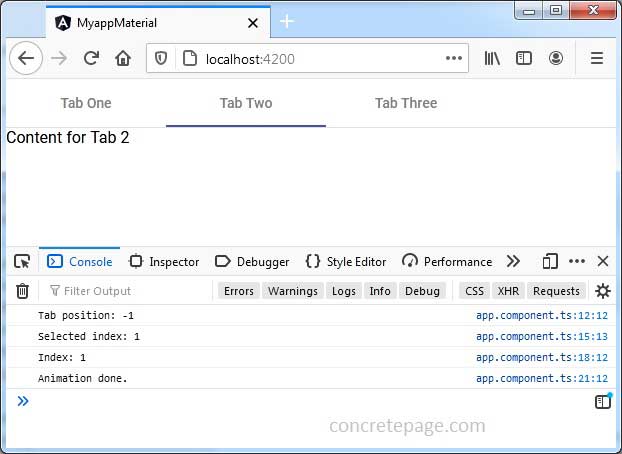
The above events will emit in following order.
'focusChange' -> 'selectedIndexChange' -> 'selectedTabChange' -> 'animationDone'
Now let us discuss all the above events in detail.
Contents
Technologies Used
Find the technologies being used in our example.1. Angular 11.0.3
2. Angular Material 11.2.0
3. Node.js 12.5.0
4. NPM 6.9.0
focusChange Event
The focusChange event is emitted when tab focus has changed within a tab group.
@Output()
focusChange: EventEmitter<MatTabChangeEvent>
HTML code:
<mat-tab-group
  (focusChange)="myTabFocusChange($event)">
  ------
</mat-tab-group>
myTabFocusChange(changeEvent: MatTabChangeEvent) {
   console.log('Tab position: ' + changeEvent.tab.position);
}
selectedIndexChange Event
The selectedIndexChange event is emitted when selected index of tab has changed.
@Output()
selectedIndexChange: EventEmitter<number>
HTML code:
<mat-tab-group
  (selectedIndexChange)="myTabSelectedIndexChange($event)">
  ------
</mat-tab-group>
myTabSelectedIndexChange(index: number) {
   console.log('Selected index: ' + index);
}
selectedTabChange Event
The selectedTabChange event is emitted when tab selection has changed.
@Output()
selectedTabChange: EventEmitter<MatTabChangeEvent>
HTML code:
<mat-tab-group
  (selectedTabChange)="myTabSelectedTabChange($event)">
  ------
</mat-tab-group>
myTabSelectedTabChange(changeEvent: MatTabChangeEvent) {
   console.log('Index: ' + changeEvent.index);
}
animationDone Event
The animationDone event is emitted when body animation has completed.
@Output()
animationDone: EventEmitter<void>
HTML code:
<mat-tab-group
  (animationDone)="myTabAnimationDone()">
  ------
</mat-tab-group>
myTabAnimationDone() {
  console.log('Animation done.');
}
Complete Example
app.component.html<mat-tab-group (focusChange)="myTabFocusChange($event)" (selectedIndexChange)="myTabSelectedIndexChange($event)" (selectedTabChange)="myTabSelectedTabChange($event)" (animationDone)="myTabAnimationDone()"> <mat-tab label="Tab One"> Content for Tab 1 </mat-tab> <mat-tab label="Tab Two"> Content for Tab 2 </mat-tab> <mat-tab label="Tab Three"> Content for Tab 3 </mat-tab> </mat-tab-group>
import { Component, OnInit } from '@angular/core';
import { MatTabChangeEvent } from '@angular/material/tabs';

@Component({
  selector: 'app-root',
  templateUrl: './app.component.html'
})
export class AppComponent implements OnInit {
  ngOnInit() {
  }
  myTabFocusChange(changeEvent: MatTabChangeEvent) {
    console.log('Tab position: ' + changeEvent.tab.position);
  }
  myTabSelectedIndexChange(index: number) {
     console.log('Selected index: ' + index);
  }
  myTabSelectedTabChange(changeEvent: MatTabChangeEvent) {
    console.log('Index: ' + changeEvent.index);
  }
  myTabAnimationDone() {
    console.log('Animation done.');
  }
}
import { BrowserModule } from '@angular/platform-browser';
import { NgModule } from '@angular/core';
import { BrowserAnimationsModule } from '@angular/platform-browser/animations';
import { MatTabsModule } from '@angular/material/tabs';

import { AppComponent } from './app.component';

@NgModule({
  declarations: [
    AppComponent
  ],
  imports: [
    BrowserModule,
    BrowserAnimationsModule,
    MatTabsModule
  ],
  providers: [],
  bootstrap: [AppComponent]
})
export class AppModule { }
Run Application
To run the application, find the steps.1. Install Angular CLI using link.
2. Install Angular Material using link.
3. Download source code using download link given below on this page.
4. Use downloaded src in your Angular CLI application.
5. Run ng serve using command prompt.
6. Access the URL http://localhost:4200
Find the print screen of the output.


