Angular Material Menu Position
September 23, 2022
On this page we will learn to customize Menu position in our Angular Material application. Angular Material Menu is created using <mat-menu> element. The <mat-menu> is a floating panel containing list of options.
By default, the Menu displays below (y-axis), after (x-axis), without overlapping its trigger. The Menu position can be changed by using the following properties of
<mat-menu> element.
xPosition : The position changes on x-axis. The values are before and after.
yPosition : The position changes on y-axis. The values are above and below.
Technologies Used
Find the technologies being used in our example.1. Angular 13.1.0
2. Angular Material 13.3.9
3. Node.js 12.20.0
4. NPM 8.2.0
Using xPosition and yPosition
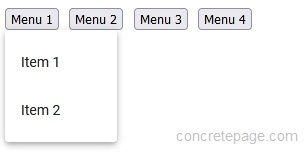
Case-1 : xPosition="after" and yPosition="below"<button mat-button [matMenuTriggerFor]="menu1">Menu 1</button> <mat-menu #menu1="matMenu" xPosition="after" yPosition="below"> ------ </mat-menu>

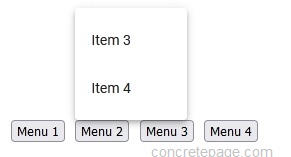
<button mat-button [matMenuTriggerFor]="menu2">Menu 2</button>
<mat-menu #menu2="matMenu" xPosition="after" yPosition="above">
   ------
</mat-menu>

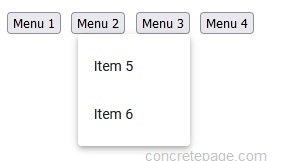
<button mat-button [matMenuTriggerFor]="menu3">Menu 3</button>
<mat-menu #menu3="matMenu" xPosition="before" yPosition="below">
   ------
</mat-menu>

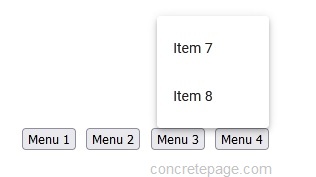
<button mat-button [matMenuTriggerFor]="menu4">Menu 4</button>
<mat-menu #menu4="matMenu" xPosition="before" yPosition="above" overlapTrigger="true">
   ------
</mat-menu>

Using overlapTrigger
By default, the Menu will display without overlapping its trigger. We can force the Menu to overlap the trigger by setting overlapTrigger="true". TheoverlapTrigger attribute accepts boolean value.
<button mat-button [matMenuTriggerFor]="menu">Menu</button>
<mat-menu #menu4="matMenu" xPosition="before" yPosition="above" overlapTrigger="true">
   ------
</mat-menu>
Complete Example
menu-app.component.html
<div class="menu">
  <button mat-button [matMenuTriggerFor]="menu1">Menu 1</button>
  <mat-menu #menu1="matMenu" xPosition="after" yPosition="below">
    <button mat-menu-item>Item 1</button>
    <button mat-menu-item>Item 2</button>
  </mat-menu>

  <button mat-button [matMenuTriggerFor]="menu2">Menu 2</button>
  <mat-menu #menu2="matMenu" xPosition="after" yPosition="above">
    <button mat-menu-item>Item 3</button>
    <button mat-menu-item>Item 4</button>
  </mat-menu>

  <button mat-button [matMenuTriggerFor]="menu3">Menu 3</button>
  <mat-menu #menu3="matMenu" xPosition="before" yPosition="below">
    <button mat-menu-item>Item 5</button>
    <button mat-menu-item>Item 6</button>
  </mat-menu>

  <button mat-button [matMenuTriggerFor]="menu4">Menu 4</button>
  <mat-menu #menu4="matMenu" xPosition="before" yPosition="above" overlapTrigger="true">
    <button mat-menu-item>Item 7</button>
    <button mat-menu-item>Item 8</button>
  </mat-menu>
</div>
import { Component } from '@angular/core';

@Component({
	selector: 'app-menu',
	templateUrl: './menu-app.component.html'
})
export class MenuAppComponent {
}
import { Component } from '@angular/core';

@Component({
  selector: 'app-root',
  template: `
           <app-menu></app-menu>
          `
})
export class AppComponent {
}
import { NgModule } from '@angular/core';
import { BrowserModule } from '@angular/platform-browser';
import { BrowserAnimationsModule } from '@angular/platform-browser/animations';
import { MatMenuModule } from '@angular/material/menu';
import { MatButtonModule } from '@angular/material/button';

import { AppComponent } from './app.component';
import { MenuAppComponent } from './menu-app.component';


@NgModule({
      imports: [
            BrowserModule,
            BrowserAnimationsModule,
            MatMenuModule,
	    MatButtonModule
      ],
      declarations: [
            AppComponent,
            MenuAppComponent
      ],
      providers: [
      ],
      bootstrap: [
            AppComponent
      ]
})
export class AppModule { }
Run Application
To run the application, find the steps.1. Install Angular CLI using link.
2. Install Angular Material using link.
3. Download source code using download link given below on this page.
4. Use downloaded src in your Angular CLI application.
5. Run ng serve using command prompt.
6. Access the URL http://localhost:4200


