Angular Material Dialog Position : Right, Left, Top, Bottom
November 11, 2022
On this page we will learn to set Material Dialog position in right, left, top, bottom or anywhere in the display area in our Angular Material application.
1. Material dialog is opened using
MatDialog.open method. The parameters are ComponentType/TemplateRef and MatDialogConfig.
2. The
MatDialogConfig has a position property to set the position of the dialog. The position property takes the instance of DialogPosition.
3. The properties of
DialogPosition are right, left, top and bottom whose values can be set in px, em, % etc.
4. The default position of dialog is in center.
1. Technologies Used
Find the technologies being used in our example.1. Angular 13.1.0
2. Angular Material 13.3.9
3. Node.js 12.20.0
4. NPM 8.2.0
2. MatDialog.open
TheMatDialog.open method opens a modal dialog containing the given component.
MatDialog.open
component: ComponentType<T> : Type of the component to load into the dialog.
config?: MatDialogConfig<D> : Extra configuration options.
Returns :
MatDialogRef<T, R>
3. MatDialogConfig
TheMatDialogConfig is the configuration for opening a modal dialog. Find some of its properties.
data : Data being injected into the child component.
height : Height of the dialog.
width : Width of the dialog.
position : Position of the dialog. It accepts
DialogPosition.
4. Position
By default, dialog position is in center. We can change it by usingposition property of MatDialogConfig. The position property accepts DialogPosition instance.
DialogPosition
The
DialogPosition overrides dialog position. It has four optional properties.
top : Override top position.
bottom : Override bottom position.
left : Override left position.
right : Override right position.
The values of above properties can be set in px, em, % etc. To keep dialog on top and in right position, we use
postion property of MatDialogConfig as following.
this.dialogRef = this.dialog.open(UserDialogComponent,
  {
	data: this.user,
	height: '350px',
	width: '250px',
	position: {right:'10px', top: '10px'}
  });
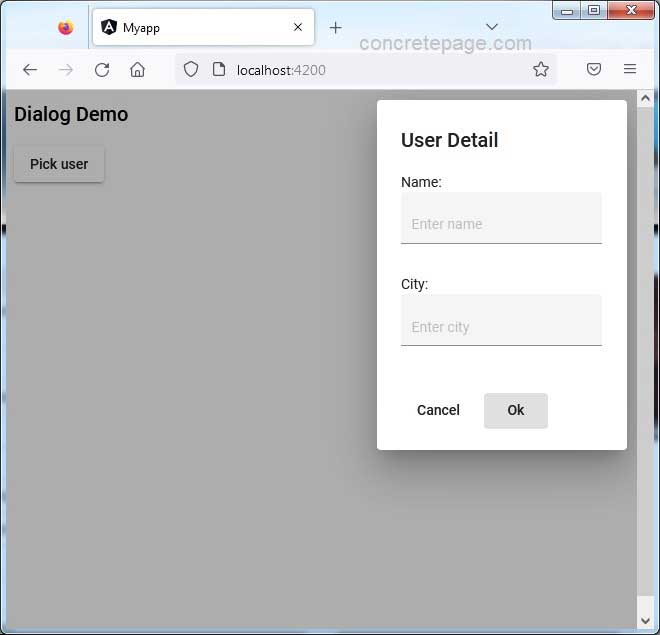
1. Dialog on top-right.
{top: '0px', right:'0px'}
{top: '0px', left:'0px'}
{bottom: '0px', right:'0px'}
{bottom: '0px', left:'0px'}
{top:'0px'}
{bottom:'0px'}
{right:'0px'}
{left:'0px'}
Note: Using the combination of left/right and top/bottom properties, we can set dialog position anywhere in the display area.
5. Complete Example
A. Dialog Opener Componentexample-dialog.component.ts
import { Component } from '@angular/core';
import { MatDialog, DialogPosition } from '@angular/material/dialog';
import { UserDialogComponent } from './user-dialog.component';
import { User } from './user';

@Component({
  selector: 'example-dialog',
  templateUrl: './example-dialog.component.html',
})
export class ExampleDialogComponent {
  user = { name: '', city: '' };
  dialogRef: any;

  constructor(public dialog: MatDialog) { }

  openUserDialog() {
    this.dialogRef = this.dialog.open(UserDialogComponent,
      {
        data: this.user,
        height: '350px',
        width: '250px',
        position: { right: '10px', top: '10px' }
      });

    this.dialogRef.afterClosed().subscribe((result: User) => {
      console.log('The User dialog was closed.');
      console.log(result?.name + ' - ' + result?.city);
    });
  }
}
<h2>Dialog Demo</h2>
<p>
  <button mat-raised-button (click)="openUserDialog()">Pick user</button>
  <br /> {{user.name}}
  <br /> {{user.city}}
</p>
user-dialog.component.ts
import { Component, Inject } from '@angular/core';
import { MatDialogRef, MAT_DIALOG_DATA } from '@angular/material/dialog';
import { User } from './user';

@Component({
  templateUrl: './user-dialog.component.html',
})
export class UserDialogComponent {
  constructor(
    public dialogRef: MatDialogRef<UserDialogComponent>,
    @Inject(MAT_DIALOG_DATA) public data: User,
  ) { }
  onCancelUserDialog(): void {
    this.dialogRef.close();
  }
}
<h2 mat-dialog-title>User Detail</h2>
<div mat-dialog-content>
  <p>Name:
    <mat-form-field appearance="fill">
      <input matInput [(ngModel)]="data.name" placeholder="Enter name">
    </mat-form-field>
  </p>
  <p>City:
    <mat-form-field appearance="fill">
      <input matInput [(ngModel)]="data.city" placeholder="Enter city">
    </mat-form-field>
  </p>
</div>
<div mat-dialog-actions>
  <button mat-button (click)="onCancelUserDialog()">Cancel</button>
  <button mat-button [mat-dialog-close]="data" cdkFocusInitial>Ok</button>
</div>
export interface User {
    name: string;
    city: string;
}
import { Component } from '@angular/core';

@Component({
  selector: 'app-root',
  template: `<example-dialog></example-dialog>`
})
export class AppComponent {
}
import { BrowserModule } from '@angular/platform-browser';
import { NgModule } from '@angular/core';
import { BrowserAnimationsModule } from '@angular/platform-browser/animations';
import { FormsModule } from '@angular/forms';
import { ReactiveFormsModule } from '@angular/forms';
import { MatFormFieldModule } from '@angular/material/form-field';
import { MatButtonModule } from '@angular/material/button';
import { MatInputModule } from '@angular/material/input';
import { MatDialogModule } from '@angular/material/dialog';

import { AppComponent } from './app.component';
import { ExampleDialogComponent } from './example-dialog.component';
import { UserDialogComponent } from './user-dialog.component';

@NgModule({
  declarations: [
    AppComponent,
    ExampleDialogComponent,
    UserDialogComponent
  ],
  imports: [
    BrowserModule,
    BrowserAnimationsModule,
    FormsModule,
    ReactiveFormsModule,
    MatFormFieldModule,
    MatButtonModule,
    MatInputModule,
    MatDialogModule
  ],
  providers: [],
  bootstrap: [AppComponent]
})
export class AppModule { }
6. Run Application
To run the application, find the steps.1. Install Angular CLI using link.
2. Install Angular Material using link.
3. Download source code using download link given below on this page.
4. Use downloaded src in your Angular CLI application.
5. Run ng serve using command prompt.
6. Access the URL http://localhost:4200
Find the print screen of the output.


