Angular Material Datepicker : Get Value
June 24, 2020
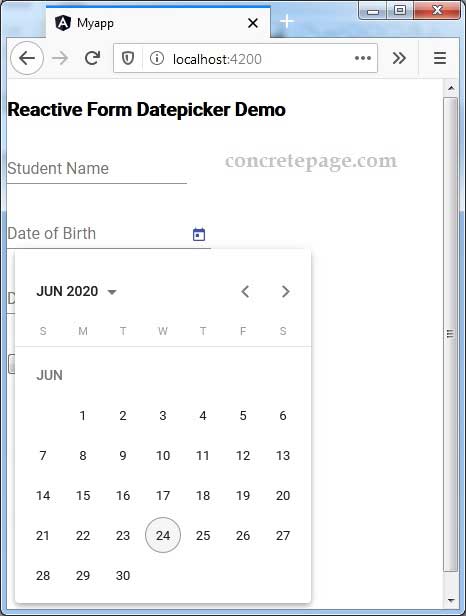
This page will walk through creating Angular Material Datepicker and getting selected value. A Datepicker is used to enter a date either through text input or by selecting a date from a calendar. A Datepicker is made of several components and directives working together. A Datepicker is created with a text input and a calendar popup in the application. The text input connects the calendar popup using matDatepicker property. The calendar popup is created using <mat-datepicker> element and to provide toggle button for calendar popup, we need to use <mat-datepicker-toggle> element. To use Datepicker in our application, we need to import MatDatepickerModule in application module.
On this page we will create Datepicker and fetch selected value using
NgModel, FormControl and FormGroup.
Contents
Technologies Used
Find the technologies being used in our example.1. Angular 9.1.11
2. Angular Material 9.2.4
3. Node.js 12.5.0
4. NPM 6.9.0
Create Datepicker
To use Angular Datepicker, we need to importMatDatepickerModule.
import { MatDatepickerModule } from '@angular/material/datepicker';
DateAdapter. We can import one of the following modules i.e. MatNativeDateModule, MatMomentDateModule, or we can provide a custom implementation.
Here in our demo, we will import
MatNativeDateModule.
import { MatNativeDateModule } from '@angular/material/core';
MatInputModule.
import { MatInputModule } from '@angular/material/input';
Now find the code to create a Datepicker in our application.
<mat-form-field>
  <mat-label>Date of Birth</mat-label>
  <input matInput [matDatepicker]="dob">
  <mat-datepicker-toggle matSuffix [for]="dob"></mat-datepicker-toggle>
  <mat-datepicker #dob></mat-datepicker>
</mat-form-field>
matDatepicker property on the text input.
<input matInput [matDatepicker]="dob">
<mat-datepicker #dob></mat-datepicker>
<mat-datepicker-toggle>.
<input matInput [matDatepicker]="dob">
<mat-datepicker-toggle matSuffix [for]="dob"></mat-datepicker-toggle>
<mat-datepicker #dob></mat-datepicker>
matSuffix attribute and for prefix, use matPrefix attribute.
Get Value with NgModel
Suppose we have following property in our component.dateOfBirth: string;
ngModel, find the code.
<mat-form-field>
  <mat-label>Date of Birth</mat-label>
  <input matInput [matDatepicker]="dob" [(ngModel)]="dateOfBirth">
  <mat-datepicker-toggle matSuffix [for]="dob"></mat-datepicker-toggle>
  <mat-datepicker #dob></mat-datepicker>
</mat-form-field>
{{dateOfBirth}}
dateOfBirth.
Get Value with FormControl
Suppose we have aFormControl property in our component.
dateOfBirth = new FormControl();
FormControl.
<mat-form-field>
  <mat-label>Date of Birth</mat-label>
  <input matInput [matDatepicker]="dob" [formControl]="dateOfBirth">
  <mat-datepicker-toggle matSuffix [for]="dob"></mat-datepicker-toggle>
  <mat-datepicker #dob></mat-datepicker>
</mat-form-field>
{{dateOfBirth.value}}
Get Value with FormGroup
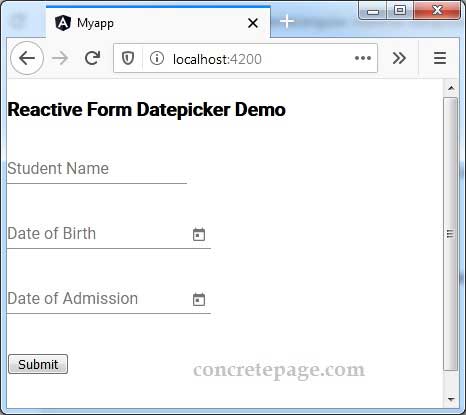
Here we will create a reactive form with two Datepicker. We will fetch form data on form submit. Find the complete example.student.component.html
<h3>Reactive Form Datepicker Demo</h3>
<form [formGroup]="studentForm" (ngSubmit)="onFormSubmit()">
  <mat-form-field>
    <mat-label>Student Name</mat-label>
    <input matInput formControlName="name">
  </mat-form-field>
  <br/>
  <mat-form-field>
    <mat-label>Date of Birth</mat-label>
    <input matInput [matDatepicker]="dob" formControlName="dateOfBirth">
    <mat-datepicker-toggle matSuffix [for]="dob"></mat-datepicker-toggle>
    <mat-datepicker #dob></mat-datepicker>
  </mat-form-field>
  <br/>
  <mat-form-field>
    <mat-label>Date of Admission</mat-label>
    <input matInput [matDatepicker]="admDate" formControlName="admissionDate">
    <mat-datepicker-toggle matSuffix [for]="admDate"></mat-datepicker-toggle>
    <mat-datepicker #admDate></mat-datepicker>
  </mat-form-field>
  <br/><br/>
  <button mat-raised-button>Submit</button>
</form>
import { Component, OnInit } from '@angular/core';
import { FormBuilder, FormControl } from '@angular/forms';
import { StudentService } from './student.service';

@Component({
  selector: 'app-student',
  templateUrl: './student.component.html'
})
export class StudentComponent implements OnInit {
  constructor(private formBuilder: FormBuilder, private studentService: StudentService) { }
  ngOnInit() {
  }
  studentForm = this.formBuilder.group({
    name: '',
    dateOfBirth: '',
    admissionDate: ''
  });
  onFormSubmit() {
    this.studentService.saveStudent(this.studentForm.value);
    this.studentForm.reset();
  }
}
export interface Student {
  name: string;
  dateOfBirth: string;
  admissionDate: string;
}
import { Injectable } from '@angular/core';

@Injectable({
  providedIn: 'root'
})
export class StudentService {
  saveStudent(student) {
    console.log(JSON.stringify(student));
  }
}
import { Component } from '@angular/core';

@Component({
  selector: 'app-root',
  template: `
      <app-student></app-student>
  `
})
export class AppComponent {
}
import { BrowserModule } from '@angular/platform-browser';
import { NgModule } from '@angular/core';
import { FormsModule, ReactiveFormsModule }    from '@angular/forms';
import { MatInputModule } from '@angular/material/input';
import { BrowserAnimationsModule } from '@angular/platform-browser/animations';
import { MatDatepickerModule } from '@angular/material/datepicker';
import { MatNativeDateModule } from '@angular/material/core';

import { AppComponent } from './app.component';
import { StudentComponent } from './student.component';

@NgModule({
  declarations: [
    AppComponent,
    StudentComponent
  ],
  imports: [
    BrowserModule,
    FormsModule,
    ReactiveFormsModule,
    BrowserAnimationsModule,
    MatInputModule,
    MatDatepickerModule,
    MatNativeDateModule,
  ],
  providers: [],
  bootstrap: [ AppComponent ]
})
export class AppModule { }
Run Application
To run the application, find the steps.1. Install Angular CLI using link.
2. Install Angular Material using link.
3. Download source code using download link given below on this page.
4. Use downloaded src in your Angular CLI application.
5. Run ng serve using command prompt.
6. Access the URL http://localhost:4200
Find the print screen of the output.


