Angular Material Custom ErrorStateMatcher
October 23, 2022
On this page we will learn to create custom ErrorStateMatcher and use it in our Angular Material application.
1. The
ErrorStateMatcher is a provider that defines how form controls behave with regards to displaying error messages.
2. The
ErrorStateMatcher contains a method isErrorState() that returns Boolean value. If return value is true, error message will be shown on UI otherwise no error message will be shown.
3. Find the declaration of
ErrorStateMatcher.isErrorState() method from Angular doc.
isErrorState(control: AbstractControl | null, form: FormGroupDirective | NgForm | null): boolean;
ErrorStateMatcher, create a class implementing ErrorStateMatcher and defining its isErrorState() method.
5. We can use our custom
ErrorStateMatcher either locally or globally. For local use, the <input> element provides errorStateMatcher attribute that is assigned with the instance of custom ErrorStateMatcher.
6. To configure
ErrorStateMatcher globally, use ErrorStateMatcher provider.
Technologies Used
Find the technologies being used in our example.1. Angular 13.1.0
2. Angular Material 13.3.9
3. Node.js 12.20.0
4. NPM 8.2.0
Creating Custom ErrorStateMatcher
1. By default the error messages are shown when the control is invalid and either the user has touched the element or the parent form has been submitted.2. We can change the default behavior by customizing the
ErrorStateMatcher.isErrorState() method definition. For this, we need to create a class implementing ErrorStateMatcher and customize isErrorState() method.
export class CustomErrorStateMatcher implements ErrorStateMatcher {
    isErrorState(control: FormControl | null, form: FormGroupDirective | NgForm | null) {
        return (control?.invalid && control.dirty) ?? false;
    }
}
3. To use custom
ErrorStateMatcher locally, create the instance of CustomErrorStateMatcher.
TypeScript code:
esMatcher = new CustomErrorStateMatcher();
Bind
esMatcher instance with errorStateMatcher attribute.
<input matInput
   formControlName="username"
   [errorStateMatcher]="esMatcher"
   placeholder="Username">
ErrorStateMatcher as following.
import { ErrorStateMatcher } from '@angular/material/core';
Using Custom ErrorStateMatcher Globally
We can use our customErrorStateMatcher globally by configuring it in application module.
providers: [
  { provide: ErrorStateMatcher, useClass: CustomErrorStateMatcher }
]
<input> element will use CustomErrorStateMatcher.
Complete Example
Find the customErrorStateMatcher.
custom-error-state-matcher.ts
import { ErrorStateMatcher } from '@angular/material/core';
import { FormControl, FormGroupDirective, NgForm } from '@angular/forms';

export class CustomErrorStateMatcher implements ErrorStateMatcher {
    isErrorState(control: FormControl | null, form: FormGroupDirective | NgForm | null) {
        return (control?.invalid && control.dirty) ?? false;
    }
}
<input> elements, one for username and second for password. The username field is using CustomErrorStateMatcher locally.
reactive-form.component.html
<form [formGroup]="personForm" (ngSubmit)="onFormSubmit()">
  <div>
    <mat-form-field>
      <input matInput formControlName="username" [errorStateMatcher]="esMatcher" placeholder="Username">
      <mat-error *ngIf="username?.hasError('required')">
        Username is required.
      </mat-error>
    </mat-form-field>
  </div>
  <div>
    <mat-form-field>
      <input matInput type="password" formControlName="password" placeholder="Password">
      <mat-error *ngIf="password?.hasError('required')">
        Password is required.
      </mat-error>
    </mat-form-field>
  </div>
  <div>
    <button mat-raised-button>Submit</button>
  </div>
</form>
import { Component } from '@angular/core';
import { Validators, FormBuilder } from '@angular/forms';
import { CustomErrorStateMatcher } from './custom-error-state-matcher';
import { PersonService } from './person.service';

@Component({
  selector: 'app-reactive',
  templateUrl: './reactive-form.component.html'
})
export class ReactiveFormComponent {
  esMatcher = new CustomErrorStateMatcher();
  constructor(private formBuilder: FormBuilder,
    private personService: PersonService) { }
  personForm = this.formBuilder.group({
    username: ['', Validators.required],
    password: ['', Validators.required],
  });
  onFormSubmit() {
    this.personService.savePerson(this.personForm.value);
  }
  get username() {
    return this.personForm.get('username');
  }
  get password() {
    return this.personForm.get('password');
  }
}
export interface Person {
  username: string;
  password: string;
}
import { Injectable } from '@angular/core';
import { Person } from './person';

@Injectable({
  providedIn: 'root'
})
export class PersonService {
  savePerson(person: Person) {
    console.log(person);
  }
}
import { Component } from '@angular/core';

@Component({
  selector: 'app-root',
  template: `
    <app-reactive></app-reactive>
  `
})
export class AppComponent {
}
import { BrowserModule } from '@angular/platform-browser';
import { BrowserAnimationsModule } from '@angular/platform-browser/animations';
import { NgModule } from '@angular/core';
import { ReactiveFormsModule } from '@angular/forms';
import { MatFormFieldModule } from '@angular/material/form-field';
import { MatInputModule } from '@angular/material/input';
import { MatButtonModule } from '@angular/material/button';
import { ErrorStateMatcher } from '@angular/material/core';
import { CustomErrorStateMatcher } from './custom-error-state-matcher';
import { AppComponent } from './app.component';
import { ReactiveFormComponent } from './reactive-form.component';

@NgModule({
  declarations: [
    AppComponent,
    ReactiveFormComponent
  ],
  imports: [
    BrowserModule,
    BrowserAnimationsModule,
    ReactiveFormsModule,
    MatFormFieldModule,
    MatInputModule,
    MatButtonModule
  ],
  providers: [
    //For Global configuration
    //{ provide: ErrorStateMatcher, useClass: CustomErrorStateMatcher }
  ],
  bootstrap: [AppComponent]
})
export class AppModule { }
Run Application
To run the application, find the steps.1. Install Angular CLI using link.
2. Install Angular Material using link.
3. Download source code using download link given below on this page.
4. Use downloaded src in your Angular CLI application.
5. Run ng serve using command prompt.
6. Access the URL http://localhost:4200
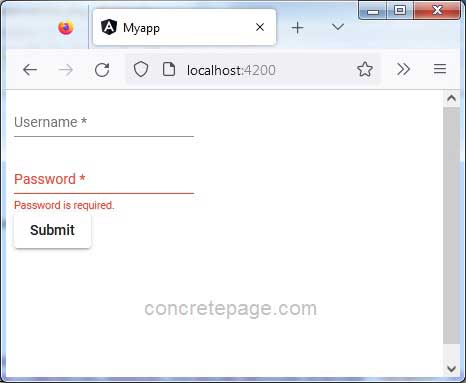
Find the print screen of the output.


