Angular ng-template Example
February 12, 2024
This page will walk through Angular <ng-template> example. The <ng-template> is an Angular element for rendering HTML. It is not displayed directly, it can be displayed using structural directive, ViewContainerRef etc. Suppose we have following code in our HTML template.
<ng-template>
  <p>Hello World!</p>
</ng-template>
<ng-template> will not be displayed but there will be a comment.
<!---->
<ng-template> with a comment. <ng-template> can be used with structural directive, ViewContainerRef etc. In our example we will discuss how to use <ng-template> with ngFor, ngIf and ngSwitch. We will also create custom structural directive and we will use that with <ng-template>. Using TemplateRef and ViewContainerRef we can reuse the code of <ng-template> in our HTML template. The <ng-template> example with ngFor is as follows.
<ng-template ngFor let-person [ngForOf]= "allPersons" let-i="index">
  <p>{{i + 1}}. {{person.name}} : {{person.age}} </p>
</ng-template>
Contents
1. <ng-template> with ngFor
Find the example to use<ng-template> with ngFor.
ng-template-ngfor.component.ts
import { Component } from '@angular/core';

@Component({
   selector: 'app-ngfor',
   templateUrl: './ng-template-ngfor.component.html'
})
export class NgTemplateNgForComponent {
   allPersons = [
     {name: 'Mahesh', age: '25'},
     {name: 'Shakti', age: '23'},
     {name: 'Krishna', age: '23'},
     {name: 'Radha', age: '21'},
   ];
}
<h3>ng-template with ngFor</h3>
<ng-template ngFor let-person [ngForOf]= "allPersons" let-i="index">
  <p>{{i + 1}}. {{person.name}} : {{person.age}} </p>
</ng-template>
let declares template input variable. The properties of NgFor such as index, first, last, even, odd can be assigned to a variable using let within the <ng-template>. Find the sample code.
<ng-template ngFor let-item [ngForOf]="items" let-i="index" let-o="odd" let-e="even" let-f="first" let-l="last" [ngForTrackBy]="trackByFn" >
 ---
</ng-template>
2. <ng-template> with ngIf
Here we will provide example to use<ng-template> with ngIf, ngIf-else and ngIf-then-else.
ng-template-ngif.component.ts
import { Component } from '@angular/core';

@Component({
   selector: 'app-ngif',
   templateUrl: './ng-template-ngif.component.html'
})
export class NgTemplateNgIfComponent {
  toggleFlag1= true;
  toggleFlag2= true;
  toggleFlag3= true;

  onToggle1() {
	  this.toggleFlag1 = (this.toggleFlag1 === true)? false : true;
  }
  onToggle2() {
	  this.toggleFlag2 = (this.toggleFlag2 === true)? false : true;
  }
  onToggle3() {
	  this.toggleFlag3 = (this.toggleFlag3 === true)? false : true;
  }
}
<h3>ng-template with ngIf</h3>
<button type="button" (click)="onToggle1()">Toggle</button>

<ng-template [ngIf]= "toggleFlag1" >
   <div>Hello World!</div>
</ng-template>

<h3>ng-template with ngIf-else</h3>

<button type="button" (click)="onToggle2()">Toggle</button>

<div *ngIf="toggleFlag2; else msgElseBlock" >
   <div>Hello World!</div>
</div>

<ng-template #msgElseBlock>
   <div>Else Block: Hello World! </div>
</ng-template>

<h3>ng-template with ngIf-then-else</h3>

<button type="button" (click)="onToggle3()">Toggle</button>

<div *ngIf="toggleFlag3; then thenBlock else elseBlock">

</div>
<ng-template #thenBlock>
    <div>Then Block: Hello World!</div>
</ng-template>
<ng-template #elseBlock>
    <div>Else Block: Hello World!</div>
</ng-template>
then and else, we need to assign a local template reference variable to our <ng-template> element and then conditionally ngIf will display it.
3. <ng-template> with ngSwitch
Find the example to use<ng-template> with ngSwitch.
ng-template-ngswitch.component.ts
import { Component } from '@angular/core';

@Component({
   selector: 'app-ngswitch',
   templateUrl: './ng-template-ngswitch.component.html'
})
export class NgTemplateNgSwitchComponent {
   myDir= '';
}
<h3>ng-template with ngSwitch</h3>
<input type="radio" name="direction" (click)="myDir='east'">East
<input type="radio" name="direction" (click)="myDir='west'">West
<input type="radio" name="direction" (click)="myDir='north'">North
<input type="radio" name="direction" (click)="myDir='south'">South
<br/><br/>
<div [ngSwitch]="myDir">
  <ng-template [ngSwitchCase]= "'east'"> Go to <b>East</b> Direction </ng-template>
  <ng-template [ngSwitchCase]= "'west'"> Go to <b>West</b> Direction </ng-template>
  <ng-template [ngSwitchCase]= "'north'"> Go to <b>North</b> Direction </ng-template>
  <ng-template [ngSwitchCase]= "'south'">Go to <b>South</b> Direction </ng-template>
  <ng-template ngSwitchDefault> No Direction </ng-template>
</div>
4. <ng-template> with TemplateRef and ViewContainerRef
Here we will use<ng-template> with TemplateRef and ViewContainerRef. First we will assign a template reference variable to <ng-template> and then we will access its reference as TemplateRef using @ViewChild(). Now we will fetch the view container reference using a directive. We will fetch all view container references provided by directive using @ViewChildren() and QueryList. Then we will embed template reference to all view container references obtained by directive. Find the example.
message.directive.ts
import { Directive, ViewContainerRef } from '@angular/core';

@Directive({
   selector: '[cpMsg]'
})
export class MessageDirective {
   constructor(public viewContainerRef: ViewContainerRef) { }
}
import { Component, ViewChild, ViewChildren, AfterViewInit, TemplateRef, ViewContainerRef, QueryList } from '@angular/core';
import { MessageDirective } from './message.directive';

@Component({
   selector: 'app-msg',
   templateUrl: './cp-msg.component.html'
})
export class CpMsgComponent implements  AfterViewInit {
    @ViewChild('msg')
    private msgTempRef = {} as TemplateRef<any>;

    @ViewChildren(MessageDirective)
    private queryList = {} as QueryList<MessageDirective>;

    ngAfterViewInit() {
		this.queryList.map(messageDirective =>
		     messageDirective.viewContainerRef.createEmbeddedView(this.msgTempRef));
    }
}
<h3>ng-template with TemplateRef and ViewContainerRef</h3>

<ng-template #msg>
   Welcome to you.<br/>
   Happy learning!
</ng-template>

<h3>Message </h3>

<div cpMsg> </div>

<h3>Message </h3>

<div cpMsg> </div>
<ng-template> will be embedded wherever we have used our cpMsg directive in our HTML template.
5. <ng-template> with Custom Structural Directive
Here we will provide example of<ng-template> with custom structural directive.
cp-if.directive.ts
import { Directive, TemplateRef, ViewContainerRef, Input } from '@angular/core';

@Directive({
     selector: '[cpIf]'
})
export class CpIfDirective {
	constructor( private templateRef: TemplateRef<any>,
	             private viewContainer: ViewContainerRef) { }
	@Input() set cpIf(condition: boolean) {
	   if (condition) {
		  this.viewContainer.createEmbeddedView(this.templateRef);
	   } else {
		  this.viewContainer.clear();
	  }
	}
}
import { Component } from '@angular/core';

@Component({
   selector: 'app-cpif',
   templateUrl: './cp-if-demo.component.html'
})
export class CpIfDemoComponent {
   showCpIf = '';
}
<h3>ng-template with Custom Structural Directive</h3>
<div>
  Show Message:
  <input type="radio" name="rad" (click)= "showCpIf= 'yes'"> Yse
  <input type="radio" name="rad" (click)= "showCpIf= 'no'"> No
</div>
<br/>
<div *cpIf="showCpIf === 'yes'">
  Hello cpIf Directive.
</div>
<ng-template [cpIf]="showCpIf === 'no'">
   <div>
      Message not Available.
  </div>
</ng-template>
6. Output
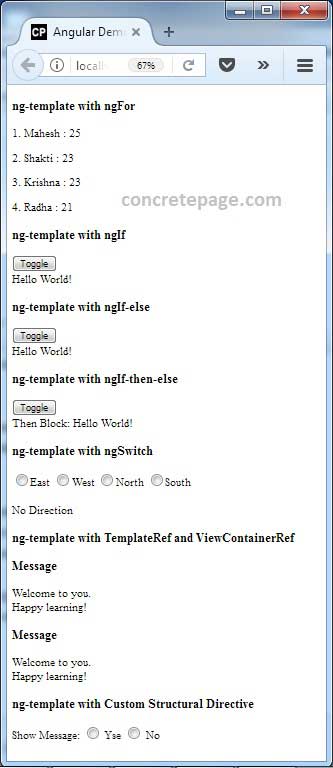
Find the print-screen of the outpu.


