Android Explicit Intent Example
June 23, 2023
Android Intent supports communication between application components. An Intent can start an activity, service and can deliver a broadcast. There are two types of Intent: Explicit and Implicit. On this page we will learn to use Explicit Intent in our android application.
Explicit Intent communicates an activity referring by fully qualified class name. Generally we use Explicit Intent to call an activity because we know the class name of activity which we are calling.
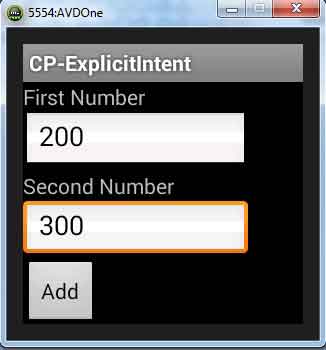
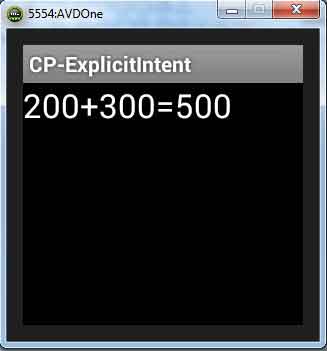
To run the Explicit Intent Demo, we are creating an app to add two numbers. There will be two UI, one to get input from user and second to display result.
Create Layout
We are creating two screen. First screen will take two number inputs from user. After click on Add button, second screen will open. For the first screen we are creating linear layout usingTextView, EditText and Button tags.
1.
TextView defines text message.
2.
EditText creates the text field.
3.
Button creates a button to listen click event.
Now find the first layout which is creating two text field and a button.
pageone.xml
<?xml version="1.0" encoding="utf-8"?>
<LinearLayout xmlns:android="http://schemas.android.com/apk/res/android"
    android:layout_width="fill_parent"
    android:layout_height="fill_parent"
    android:orientation="vertical" >
    <TextView
        android:id="@+id/firstNumText"
        android:layout_width="match_parent"
        android:layout_height="wrap_content"
        android:text="First Number"
        android:textAppearance="?android:attr/textAppearanceLarge" />
    <EditText
        android:id="@+id/firstNum"
        android:layout_width="250dp"
        android:layout_height="80dp"
        android:hint="Enter First Number"
        android:inputType="number">
    </EditText>
    <TextView
        android:id="@+id/secondNumText"
        android:layout_width="match_parent"
        android:layout_height="wrap_content"
        android:text="Second Number"
        android:textAppearance="?android:attr/textAppearanceLarge" />
    <EditText
        android:id="@+id/secondNum"
        android:layout_width="250dp"
        android:layout_height="80dp"
        android:hint="Enter Second Number"
        android:inputType="number"/>
    <Button
        android:id="@+id/addButton"
        android:layout_width="60dp"
        android:layout_height="55dp"
        android:text="Add" />
</LinearLayout>

result.xml
<?xml version="1.0" encoding="utf-8"?>
<LinearLayout xmlns:android="http://schemas.android.com/apk/res/android"
    android:layout_width="match_parent"
    android:layout_height="match_parent"
    android:orientation="vertical" >
    <TextView
        android:id="@+id/resultView"
        android:layout_width="match_parent"
        android:layout_height="wrap_content"
        android:textAppearance="?android:attr/textAppearanceLarge" android:text="TEXT" />
</LinearLayout>

Create Activity with Intent
InAndroidManifest.xml, we are defining two Activity class. First one is ExplicitIntentActivity and second one is ResultActivity. Both Activity class will extend android.app.Activity. Inside onCreate method, we have created Intent object. Find the first activity class ExplicitIntentActivity. This will derive OnClickListener to listen Add button. Explicit Intent will be declared as below.
Intent explicitIntent = new Intent(ExplicitIntentActivity.this,	ResultActivity.class);
explicitIntent.putExtra(key, value);
startActivity(explicitIntent);
ExplicitIntentActivity.java
package com.cp.android;
import android.app.Activity;
import android.content.Intent;
import android.os.Bundle;
import android.view.View;
import android.view.View.OnClickListener;
import android.widget.Button;
import android.widget.EditText;
public class ExplicitIntentActivity extends Activity {
	EditText firstNum;
	EditText secondNum;
	Button add;
	int sum;
	@Override
	public void onCreate(Bundle savedInstanceState) {
		super.onCreate(savedInstanceState);
		setContentView(R.layout.pageone);
		firstNum = (EditText) findViewById(R.id.firstNum);
		secondNum = (EditText) findViewById(R.id.secondNum);
		add = (Button) findViewById(R.id.addButton);
		add.setOnClickListener(new AddButtonClickHandler());
	}
	public class AddButtonClickHandler implements OnClickListener {
		public void onClick(View view) {
			int num1 = Integer.parseInt(firstNum.getText().toString());
			int num2 = Integer.parseInt(secondNum.getText().toString());
			Intent explicitIntent = new Intent(ExplicitIntentActivity.this,
					ResultActivity.class);
			explicitIntent.putExtra("SUM", num1 + "+" + num2 + "=" + (num1 + num2));
			startActivity(explicitIntent);
		}
	}
}
Intent intent = getIntent();
String sum = (String) intent.getSerializableExtra("SUM");
result.setText(sum);
ResultActivity.java
package com.cp.android;
import android.app.Activity;
import android.content.Intent;
import android.os.Bundle;
import android.widget.TextView;
public class ResultActivity extends Activity {
	@Override
	public void onCreate(Bundle savedInstanceState) {
		TextView result;
		super.onCreate(savedInstanceState);
		setContentView(R.layout.result);
		result = (TextView) findViewById(R.id.resultView);
		Intent intent = getIntent();
		String sum = (String) intent.getSerializableExtra("SUM");
		result.setText(sum);
	}
}
Configure AndroidManifest.xml
Find theAndroidManifest.xml which configures both Activity class.
AndroidManifest.xml
<?xml version="1.0" encoding="utf-8"?>
<manifest xmlns:android="http://schemas.android.com/apk/res/android"
    xmlns:tools="http://schemas.android.com/tools">
    <application
        android:allowBackup="true"
        android:dataExtractionRules="@xml/data_extraction_rules"
        android:fullBackupContent="@xml/backup_rules"
        android:icon="@mipmap/ic_launcher"
        android:label="@string/app_name"
        android:roundIcon="@mipmap/ic_launcher_round"
        android:supportsRtl="true"
        android:theme="@style/Theme.MyApplication"
        tools:targetApi="31">
    <activity
        android:name="com.cp.android.ExplicitIntentActivity"
        android:label="@string/app_name"
        android:exported="true">
        <intent-filter>
            <action android:name="android.intent.action.MAIN" />
            <category android:name="android.intent.category.LAUNCHER" />
        </intent-filter>
    </activity>
    <activity
        android:name="com.cp.android.ResultActivity"
        android:label="@string/app_name" >
    </activity>
    </application>
</manifest>


