Android + Eclipse Simple Example Step by Step
August 03, 2014
In this page we will quick start an android application using eclipse. To run the application, eclipse can be integrated with Android Virtual Device that will behave as Android Emulator. Application can be deployed as Android Application Package (apk) file. Application LOG can be seen in console and Android Virtual Device LOG will be available in LogCat. Here we will discuss step by step the creation of simple application of android using eclipse.
We will focus on below points.
1. Perquisites to Run the Application
2. Create Android Simple Application
3. Create Android Virtual Device to Run the Application
4. Check Log in Console and LogCat
5. Install Android Application (APK file) in Android Mobile Phone
Perquisites to Run the Application
Before starting the demo you should be ready with development environment. Find the perquisites to run the application.1. There should be JDK 6 or above version in your system.
2. Your favorite up-to-date Eclipse Version
3. Go through the link to setup Android in Eclipse before starting the demo.
How to Install Android SDK and ADT Plugin in Eclipse Kepler
Create Android Simple Application
We will create a simple android application starting from wizard. For fast learning you can download the project given on bottom and import it as Android Project from Existing Code and run as Android application. Ensure that you have created Android Virtual Device already.Go to File->New->Other and search for Android Application Project.
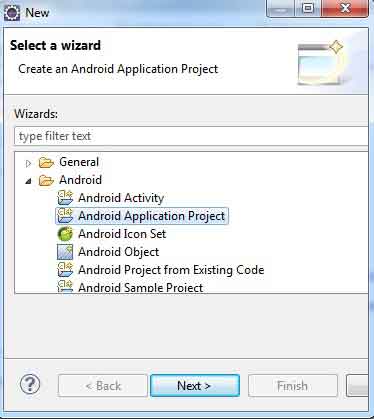
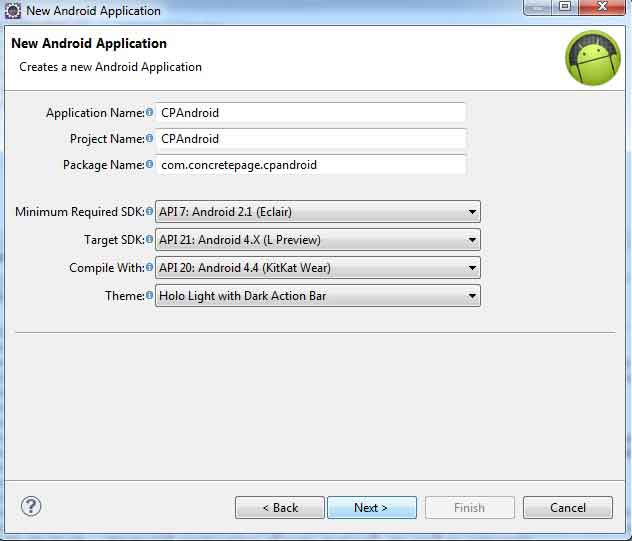
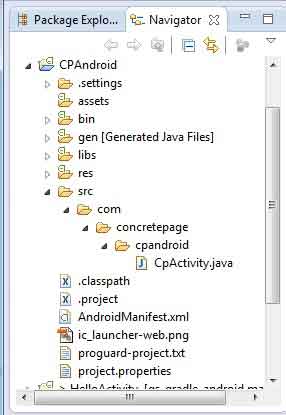
CpActivity.java
package com.concretepage.cpandroid;
import android.app.Activity;
import android.os.Bundle;
import android.widget.TextView;
public class CpActivity extends Activity {
	public void onCreate(Bundle savedInstanceState) {
        super.onCreate(savedInstanceState);
        TextView text = new TextView(this);
        text.setText("Concretepage.com: This is First Android App. ");
        setContentView(text);
    }
}
Now replace AndroidManifest.xml by below code. This xml keeps all the information related our application.
AndroidManifest.xml
<?xml version="1.0" encoding="utf-8"?>
<manifest xmlns:android="http://schemas.android.com/apk/res/android"
    package="com.concretepage.cpandroid"
    android:versionCode="1"
    android:versionName="1.0" >

    <uses-sdk android:minSdkVersion="7" />
    <application
        android:allowBackup="true"
        android:icon="@drawable/ic_launcher"
        android:label="@string/app_name"
        android:theme="@style/AppTheme" >
        <activity
            android:name=".CpActivity"
            android:label="@string/app_name" >
            <intent-filter>
                <action android:name="android.intent.action.MAIN" />
                <category android:name="android.intent.category.LAUNCHER" />
            </intent-filter>
        </activity>
    </application>
</manifest>
Create Android Virtual Device to Run the Application
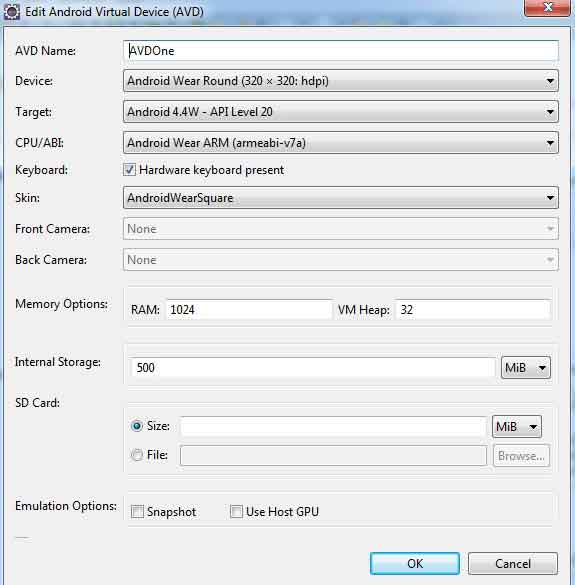
Eclipse has Android Virtual Device that works like an emulator to run and test the android application. Find the steps to create the Android Virtual Device.Click on the Window->Android Virtual Device . You will be able to see below scree.
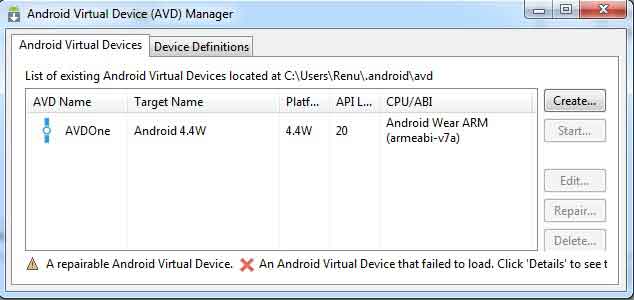
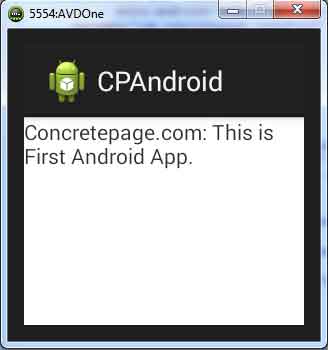
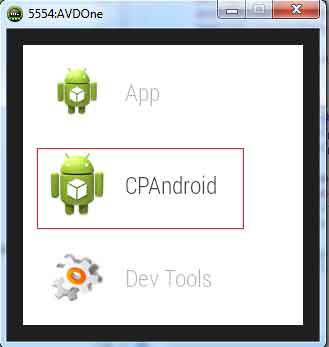
Run As->Android Application You will be able to see below screen.
Check Log in Console and LogCat
There will be two log. One is eclipse console log that will provide start+ deployment + stop of the application. LogCat is detail log of the Android Virtual Device, which will display all the action being performed in the device in detail. The console log will look like below.Console.log
[2014-08-03 19:11:16 - CPAndroid] Android Launch!
[2014-08-03 19:11:16 - CPAndroid] adb is running normally.
[2014-08-03 19:11:16 - CPAndroid] Performing com.concretepage.cpandroid.CpActivity activity launch
[2014-08-03 19:11:16 - CPAndroid] Automatic Target Mode: using existing emulator 'emulator-5554' running compatible AVD 'AVDOne'
[2014-08-03 19:11:19 - CPAndroid] Application already deployed. No need to reinstall.
[2014-08-03 19:11:19 - CPAndroid] Starting activity com.concretepage.cpandroid.CpActivity on device emulator-5554
[2014-08-03 19:11:22 - CPAndroid] ActivityManager: Starting: Intent { act=android.intent.action.MAIN cat=[android.intent.category.LAUNCHER] cmp=com.concretepage.cpandroid/.CpActivity }
LogCat.log
08-03 12:38:25.590: E/AndroidRuntime(823): 	at android.app.ActivityThread.performLaunchActivity(ActivityThread.java:2161)
08-03 12:38:25.590: E/AndroidRuntime(823): 	... 11 more
08-03 12:38:28.860: I/Process(823): Sending signal. PID: 823 SIG: 9
08-03 12:41:10.450: D/gralloc_goldfish(868): Emulator without GPU emulation detected.
08-03 12:47:52.230: I/Choreographer(868): Skipped 107 frames!  The application may be doing too much work on its main thread.
Install Android Application (APK file) in Android Mobile Phone
You can also install your android application to any android mobile phone. Find the below steps.1. Find the .apk file. In our demo, go to bin directory and you will get CPAndroid.apk file .
2. Transfer this apk file from your PC to mobile.
3. Click to install and it will be installed as a normal android application.
4. Go to mobile phone menu. You will be able to see the icon of your app. Our demo apk file will create the icon with the name CPAndroid .
5. Click CPAndroid icon to run the demo android app.
To build android project using maven, find the another post. Build Android Project with Maven


