Spring 4 MVC Example Using Maven and Eclipse
July 16, 2014
On this example, we will go step by step to run Spring 4 MVC example. We will use WebApplicationInitializer in place of web.xml to initialize DispatcherServlet. Use @EnableWebMvc annotation to support Spring MVC. In the controller, we are using @RequestParam to get input from request. For fast learning, it is recommended that download the source code, run pom.xml and deploy in tomcat to test it.
Software Used
In this example, we are using below software and tools.1. JDK 7
2. Tomcat 7
3. Eclipse
4. Maven
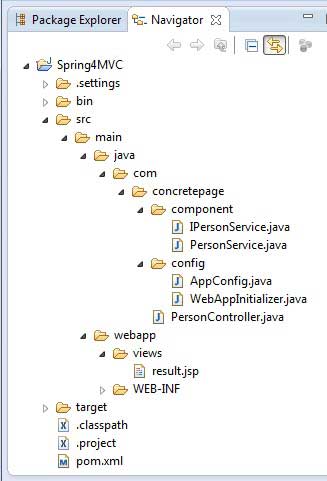
Eclipse Screen shot for Files
Before starting code walk through, it is better to understand how to keep files in eclipse. It is very helpful for startup. You can find source code download link at bottom of this page.
Use @EnableWebMvc in Config Class
To configure bean, you can use class files instead of XML. To enable MVC, use @EnableWebMvc in the config class as below.AppConfig.java
package com.concretepage.config;
import org.springframework.context.annotation.Bean;
import org.springframework.context.annotation.ComponentScan;
import org.springframework.context.annotation.Configuration;
import org.springframework.web.servlet.config.annotation.EnableWebMvc;
import org.springframework.web.servlet.view.JstlView;
import org.springframework.web.servlet.view.UrlBasedViewResolver;
import com.concretepage.component.IPersonService;
import com.concretepage.component.PersonService;
@Configuration
@ComponentScan("com.concretepage")
@EnableWebMvc
public class AppConfig {
    @Bean
    public UrlBasedViewResolver setupViewResolver() {
        UrlBasedViewResolver resolver = new UrlBasedViewResolver();
        resolver.setPrefix("/views/");
        resolver.setSuffix(".jsp");
        resolver.setViewClass(JstlView.class);
        return resolver;
    }
    @Bean
    public IPersonService personService() {
        return new PersonService();
    }
}
WebAppInitializer.java
package com.concretepage.config;
import javax.servlet.ServletContext;
import javax.servlet.ServletException;
import javax.servlet.ServletRegistration.Dynamic;
import org.springframework.web.WebApplicationInitializer;
import org.springframework.web.context.support.AnnotationConfigWebApplicationContext;
import org.springframework.web.servlet.DispatcherServlet;
public class WebAppInitializer implements WebApplicationInitializer {
	public void onStartup(ServletContext servletContext) throws ServletException {
        AnnotationConfigWebApplicationContext ctx = new AnnotationConfigWebApplicationContext();
        ctx.register(AppConfig.class);
        ctx.setServletContext(servletContext);
        Dynamic dynamic = servletContext.addServlet("dispatcher", new DispatcherServlet(ctx));
        dynamic.addMapping("/");
        dynamic.setLoadOnStartup(1);
   }
}
IPersonService.java
package com.concretepage.component;
public interface IPersonService {
  public String getPersonName();
}
PersonService.java
package com.concretepage.component;
public class PersonService implements IPersonService {
	@Override
	public String getPersonName(){
		return "Ram";
	}
}
Create Controller Using @RequestParam
Find the controller for Spring 4 MVC. Annotate the class by @Controller. Use @RequestParam, to get input from request. Use Model to set values for view.PersonController.java
package com.concretepage;
import org.springframework.beans.factory.annotation.Autowired;
import org.springframework.stereotype.Controller;
import org.springframework.ui.Model;
import org.springframework.web.bind.annotation.RequestMapping;
import org.springframework.web.bind.annotation.RequestParam;
import com.concretepage.component.IPersonService;
@Controller
@RequestMapping("/page")
public class PersonController {
	@Autowired
	private IPersonService personService;
	@RequestMapping("/login")
        public String hello(@RequestParam(value="userId", required=false) String userId,
    		@RequestParam(value="location", required=false) String location,
    		Model model) {

	        model.addAttribute("msg", "Hello "+personService.getPersonName() );
	        model.addAttribute("userId", userId);
	        model.addAttribute("location", location);
                return "result";
	}
}
result.jsp
<html>
<head>
<title>Spring 4 MVC</title>
</head>
<body>
<h1>${msg}</h1>
<h2>User Id: ${userId}</h2>
<h2>Location : ${location}</h2>
</body>
</html>
Maven Dependency
Find Maven dependency to compile and run the example.pom.xml
   <parent>
    <groupId>org.springframework.boot</groupId>
        <artifactId>spring-boot-starter-parent</artifactId>
        <version>1.1.1.RELEASE</version>
    </parent>

    <dependencies>
        <dependency>
            <groupId>org.springframework.boot</groupId>
            <artifactId>spring-boot-starter-web</artifactId>
        </dependency>
        <dependency>
            <groupId>com.fasterxml.jackson.core</groupId>
            <artifactId>jackson-databind</artifactId>
        </dependency>
        <dependency>
	      <groupId>jstl</groupId>
	      <artifactId>jstl</artifactId>
	      <version>1.2</version>
        </dependency>
    </dependencies>
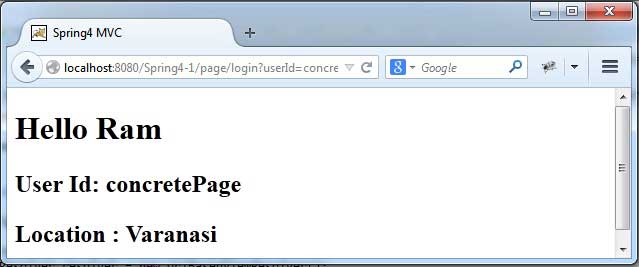
Output Screen
To run the example, download source code, run pom.xml and deploy the war file in Tomcat and run the below URL.http://localhost:8080/Spring4-1/page/login?userId=concretePage&location=Varanasi


