Angular @ViewChild() Example
February 11, 2024
This page will walk through Angular @ViewChild() example. The @ViewChild() decorator configures a view query. The @ViewChild() decorator can be used to get the first element or the directive matching the selector from the view DOM. The @ViewChild() provides the instance of another component or directive in a parent component and then parent component can access the methods and properties of that component or directive. In this way using @ViewChild() a component can communicate with a component or directive. In a parent component we can use @ViewChild() for components, directives. The @ViewChild() can be also be used for template reference variable with ElementRef or TemplateRef. To use @ViewChild() we need to pass child component name or directive name or template variable as an argument.
1. Suppose we have a component named as
StopwatchComponent then within a parent component, we use it as follows.
@ViewChild(StopwatchComponent)
private stopwatchComponent: StopwatchComponent;
StopwatchComponent will be used in parent component HTML template.
2. Now suppose we have a directive
CpColorDirective, then we use it as follows.
@ViewChild(CpColorDirective)
private cpColorDirective: CpColorDirective;
CpColorDirective will be used in host element of DOM layout in parent component HTML template.
3. Now if we have a template reference variable defined in parent component as given below.
<input type="text" #title>
title template variable with @ViewChild() as given below.
@ViewChild('title')
private elTitle : ElementRef;
TemplateRef with template reference variable. On this page we will provide @ViewChild() complete example with component, directive and template variable.
Contents
@ViewChild() using Component
@ViewChild() can be used for component communication. A component will get instance of another component inside it using @ViewChild(). In this way parent component will be able to access the properties and methods of child component. The child component selector will be used in parent component HTML template. Now let us discuss example.
1. Number example
In this example we will increase and decrease the counter using two buttons. The counter will be from a child component. Increase and decrease button will be inside parent component. We will communicate parent and child components using
@ViewChild() decorator.
First of all we will create a component where we will write methods to increase and decrease counter.
number.component.ts
import { Component } from '@angular/core';

@Component({
  selector: 'app-number',
  template: '<b>{{message}}</b>'
})
export class NumberComponent {
	message:string ='';
	count:number = 0;
	increaseByOne() {
	   this.count = this.count + 1;
	   this.message = "Counter: " + this.count;
	}
	decreaseByOne() {
	   this.count = this.count - 1;
	   this.message = "Counter: " + this.count;
	}
}
NumberComponent in our parent component using @ViewChild().
number-parent.component.ts
import { Component, ViewChild } from '@angular/core';
import { NumberComponent } from './number.component';

@Component({
       selector: 'app-number-parent',
       templateUrl: './number-parent.component.html'
})
export class NumberParentComponent {
       @ViewChild(NumberComponent)
       private numberComponent = {} as NumberComponent;
       increase() {
              this.numberComponent.increaseByOne();
       }
       decrease() {
              this.numberComponent.decreaseByOne();
       }
}
NumberComponent in NumberParentComponent. We will use selector of NumberComponent in HTML template of NumberParentComponent.
number-parent.component.html
<;h3>@ViewChild using Component</h3>;
Number Example:
<button type="button" (click)="increase()">Increase</button>
<button type="button" (click)="decrease()">Decrease</button>
<br/><br/>
<app-number></app-number>
NumberComponent and NumberParentComponent need to be configured in @NgModule in application module.
Find the print screen.

2. Stopwatch example
In this example we will create a simple stopwatch. We will create two components, one of which will contain the functionality of stopwatch and second component will instantiate first component using
@ViewChild() decorator. Find the component that will contain the functionality of simple stopwatch.
stopwatch.component.ts
import { Component } from '@angular/core';

@Component({
  selector: 'app-stopwatch',
  template: '<h2>{{counter}}</h2>'
})
export class StopwatchComponent {
	shouldRun:boolean = false;
	counter:number = 0;
	start() {
	      this.shouldRun = true;
	      let interval = setInterval(() =>
  	        {
		    if(this.shouldRun === false){
			   clearInterval(interval);
		    }
		    this.counter = this.counter + 1;
	        }, 1000);
	}
	stop() {
	      this.shouldRun = false;
	}
}
@ViewChild() in the following component.
stopwatch-parent.component.ts
import { Component, ViewChild } from '@angular/core';
import { StopwatchComponent } from './stopwatch.component';

@Component({
       selector: 'app-stopwatch-parent',
       templateUrl: './stopwatch-parent.component.html'
})
export class StopwatchParentComponent {
       @ViewChild(StopwatchComponent)
       private stopwatchComponent = {} as StopwatchComponent;
       startStopwatch() {
              this.stopwatchComponent.start();
       }
       stopStopwatch() {
              this.stopwatchComponent.stop();
       }
}
StopwatchComponent in StopwatchParentComponent. Now use the selector of StopwatchComponent in the HTML template of StopwatchParentComponent.
stopwatch-parent.component.html
<;h3>@ViewChild using Component</h3>;
Stopwatch Example:
<button type="button" (click)="startStopwatch()">Start</button>
<button type="button" (click)="stopStopwatch()">Stop</button>
<br/>
<app-stopwatch></app-stopwatch>

@ViewChild() using Directive
@ViewChild() can instantiate a directive within a component and in this way the component will be able to access the directive methods. Here we will create a directive that will contain the methods to change the text color of the host element of DOM layout. Find the directive.
cpcolor.directive.ts
import { Directive, ElementRef, AfterViewInit } from '@angular/core';

@Directive({
     selector: '[cpColor]'
})
export class CpColorDirective implements AfterViewInit{
    constructor(private elRef: ElementRef) {
    }
    ngAfterViewInit() {
	   this.elRef.nativeElement.style.color = 'red';
    }
    change(changedColor: String) {
	   this.elRef.nativeElement.style.color = changedColor;
    }
}
AfterViewInit: It is the lifecycle hook that is called after a component view has been fully initialized. To use AfterViewInit, our class will implement it and override its method ngAfterViewInit().
Now create the component, that will instantiate
CpColorDirective and access its methods.
cpcolor-parent.component.ts
import { Component, ViewChild } from '@angular/core';
import { CpColorDirective } from './cpcolor.directive';

@Component({
    selector: 'app-cpcolor-parent',
    templateUrl: './cpcolor-parent.component.html'
})
export class CpColorParentComponent {
    @ViewChild(CpColorDirective)
    private cpColorDirective = {} as CpColorDirective;
    changeColor(color: string) {
        this.cpColorDirective.change(color);
    }
}
cpcolor-parent.component.html
<;h3>@ViewChild using Directive</h3>;
Color Example:
<p cpColor>Change my Color </p>
<div>
  Change Color:
  <input type="radio" name="rad" (click)= "changeColor('green')"> Green
  <input type="radio" name="rad" (click)= "changeColor('cyan')"> Cyan
  <input type="radio" name="rad" (click)= "changeColor('blue')"> Blue
</div>
@NgModule in application module.
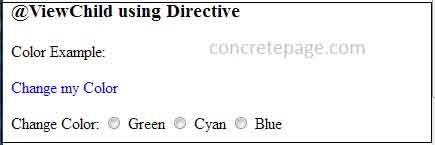
Find the print screen.

@ViewChild() with Template Variable using ElementRef
Here we will use@ViewChild() with Template Variable and ElementRef to access native element. @ViewChild() can instantiate ElementRef corresponding to a given template reference variable. The template variable name will be passed in @ViewChild() as an argument. In this way component will be able to change the appearance and behavior of element of given template variable. Find the HTML template.
cptheme.component.html
<;h3>@ViewChild with Template Variable using ElementRef to access Native Element </h3>;
<div>
   Name: <input type="text" #name> <br/>
   City: <input type="text" #city>
</div>
#name and #city. We will instantiate corresponding ElementRef using @ViewChild() as given below in the component.
cptheme.component.ts
import { Component, ViewChild, ElementRef, AfterViewInit } from '@angular/core';

@Component({
	selector: 'app-cptheme',
	templateUrl: './cptheme.component.html'
})
export class CpThemeComponent implements AfterViewInit {
	@ViewChild('name')
	private elName = {} as ElementRef;
	@ViewChild('city')
	private elCity = {} as ElementRef;

	ngAfterViewInit() {
		this.elName.nativeElement.style.backgroundColor = 'cyan';
		this.elName.nativeElement.style.color = 'red';
		this.elCity.nativeElement.style.backgroundColor = 'cyan';
		this.elCity.nativeElement.style.color = 'red';
	}
}

Using Multiple @ViewChild()
A component can use multiple@ViewChild() decorator. We have already seen in the previous example of @ViewChild() with template variable where we are using multiple @ViewChild() decorator. Here we will combine all our above components and directive and template variable for multiple @ViewChild() decorator demo in a parent component.
ui-element.component.ts
import { Component, ViewChild, ElementRef, AfterViewInit } from '@angular/core';
import { NumberComponent } from './number.component';
import { StopwatchComponent } from './stopwatch.component';
import { CpColorDirective } from './cpcolor.directive';

@Component({
	selector: 'app-ui-element',
	templateUrl: './ui-element.component.html'
})
export class UIElementComponent implements AfterViewInit {
	@ViewChild(NumberComponent)
	private numberComponent = {} as NumberComponent;
	@ViewChild(StopwatchComponent)
	private stopwatchComponent = {} as StopwatchComponent;
	@ViewChild(CpColorDirective)
	private cpColorDirective = {} as CpColorDirective;
	@ViewChild('title')
	private elTitle = {} as ElementRef;

	ngAfterViewInit() {
		this.elTitle.nativeElement.style.backgroundColor = 'cyan';
		this.elTitle.nativeElement.style.color = 'red';
	}
	increase() {
		this.numberComponent.increaseByOne();
	}
	decrease() {
		this.numberComponent.decreaseByOne();
	}
	startStopwatch() {
		this.stopwatchComponent.start();
	}
	stopStopwatch() {
		this.stopwatchComponent.stop();
	}
	changeColor(color: string) {
		this.cpColorDirective.change(color);
	}
}
ui-element.component.html
<h2> Using Multiple @ViewChild </h2>;
<b>1. Number Example<br/>
<button type="button" (click)="increase()">Increase</button>
<button type="button" (click)="decrease()">Decrease</button>
<br/><br/>
<app-number></app-number>

<br/><b>2. Stopwatch Example </b><br/>
<button type="button" (click)="startStopwatch()">Start</button>
<button type="button" (click)="stopStopwatch()">Stop</button>
<br/>
<app-stopwatch></app-stopwatch>

<b>3. Color Example </b><br/>
<p cpColor>Change my Color </p>
<div>
  Change Color:
  <input type="radio" name="rad" (click)= "changeColor('green')"> Green
  <input type="radio" name="rad" (click)= "changeColor('cyan')"> Cyan
  <input type="radio" name="rad" (click)= "changeColor('blue')"> Blue
</div>
<br/><b>4. Title: <input type="text" #title>
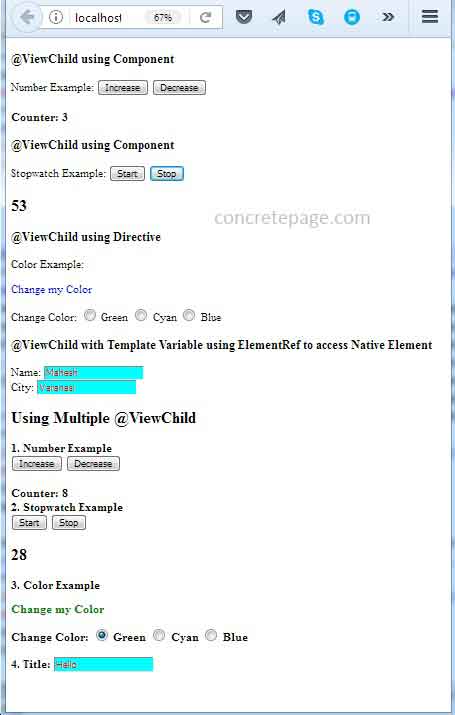
Output
Find the print-screen of the output.


