Angular Route Guards: canActivate and canActivateChild Example
February 27, 2024
This page will walk through Angular canActivate and canActivateChild route guards example. The role of Angular route guard comes into the picture when authentication and authorization is required to navigate a route. Angular provides CanActivateFn and CanActivateChildFn function signatures to create canActivate and canActivateChild route guards respectively. The canActivate is a property of Route interface and is used for authentication. The canActivateChild is also a property of Route interface and is used for authorization. To use route guards in our application, we need to create an injectable service and create canActivate and canActivateChild functions.
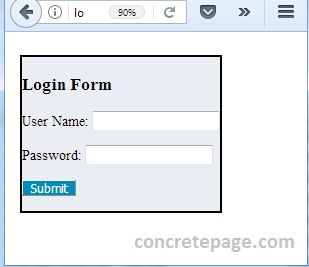
In our demo application, user is authenticated by entering username/password using login page. User has two roles ADMIN and USER. We have a dashboard layout route and its children routes and they are protected by
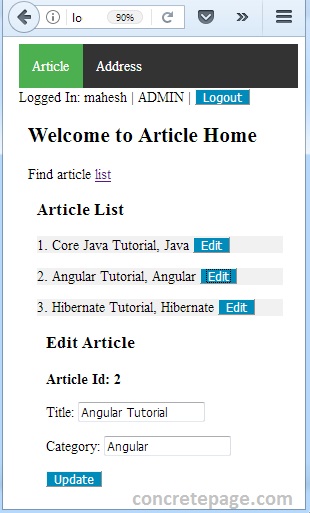
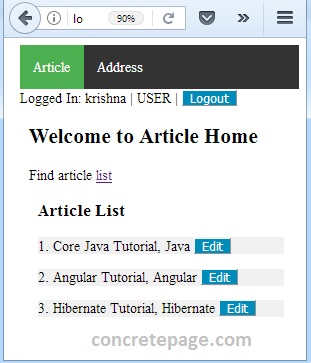
canActivate and canActivateChild route guards. When we try to access any protected route, the current routes will be saved for future use to redirect here and we will be redirected to login page. Once the user is logged-in, user will be redirected to already saved route. In our application we have some routes that are only accessible to the user with ADMIN role and not for other roles. Now find the complete example to create our route guards application step-by-step.
Contents
- Route Guards
- Component-Less Route
- Complete Example
- Step-1: Create Login Service
- Step-2: Create Service with canActivate() and canActivateChild() Functions
- Step-3: Create Route with canActivate Property
- Step-4: Create Route with canActivateChild Property
- Step-5: Create Login/Logout Component and Module
- Step-6: Other Components used in Demo
- Run Application
- References
- Download Source Code
Route Guards
Guarding routes means whether we can visit the route or not. For example, in login authentication based application, a user has to login first to enter into the application. If there is no route guard then anyone can access any link but using route guard we restrict the access of links. To achieve route guards, Angular provides following interfaces that are contained in@angular/router package.
1. CanActivateFn
2. CanActivateChildFn
3. CanDeactivateFn
4. ResolveFn
In this article we will discuss
CanActivateFn and CanActivateChildFn. The CanActivateFn decides whether we can navigate to a route or not. It is used to redirect to login page to require authentication. CanActivateChildFn decides whether we can navigate to child routes or not. It is used to decide link access on the basis of authorization. It is possible that those links accessible to ADMIN role, will be not be allowed to USER role. Let us understand how to use CanActivateFn and CanActivateChildFn route guards.
A. Using
CanActivateFn1.
CanActivateFn is a signature of function. It can be used to force user to login into application before navigating to the route. Find the declaration of CanActivateFn from Angular doc.
type CanActivateFn = (route: ActivatedRouteSnapshot, state: RouterStateSnapshot) =>
    Observable<boolean | UrlTree> | Promise<boolean | UrlTree> | boolean | UrlTree;
canActivate() which can have following arguments.
ActivatedRouteSnapshot: Contains the information about a route associated with component loaded in outlet in particular time. It can traverse router state tree.
RouterStateSnapshot: It is a tree of activated route snapshots. It has
url property that gives the URL from which this snapshot was created.
canActivate() method of our class returns boolean value or Observable or Promise of boolean value.
2. We need to create a service with
canActivate method.
@Injectable()
export class AuthGuardService {
  canActivate(route: ActivatedRouteSnapshot, state: RouterStateSnapshot): boolean {
    return true;
  }
}
canActivate property of Route interface to guard the route and assign array of CanActivateFn instances.
Now find the
canActivate property used in route declarations.
{
   path: 'home',
   component: DashboardLayoutComponent,
   canActivate: [
	(route: ActivatedRouteSnapshot, state: RouterStateSnapshot) =>
			inject(AuthGuardService).canActivate(route, state),
   ]
}
canActivate() method from AuthGuardService returns true, only when route can be navigated. In case of false value, navigation can be redirected to login page.
B. Using
CanActivateChildFn1.
CanActivateChildFn is a signature of a function to guard child routes. Suppose a user has been authenticated but not authorized to visit the child routes, so child routes can be guarded using CanActivateChildFn. Find its declaration from the Angular doc.
 type CanActivateChildFn = (childRoute: ActivatedRouteSnapshot, state: RouterStateSnapshot) =>
    Observable<boolean | UrlTree> | Promise<boolean | UrlTree> | boolean | UrlTree;
canActivateChildFn is the same as canActivateFn.
2. We need to create an injectable service with
canActivateChild() method.
@Injectable()
export class AuthGuardService {
  canActivate(route: ActivatedRouteSnapshot, state: RouterStateSnapshot): boolean {
    return true;

  }
  canActivateChild(route: ActivatedRouteSnapshot, state: RouterStateSnapshot): boolean {
    return true;
  }
}
canActivateChild property of Route interface to guard the route that will accept an array of CanActivateChildFn instances.
path: 'list',
component: ArticleListComponent,
canActivateChild: [
	(route: ActivatedRouteSnapshot, state: RouterStateSnapshot) =>
		inject(AuthGuardService).canActivateChild(route, state),
],
children: [
  {
     path: ':id',
     component: ArticleEditComponent
  }
]
canActivateChild() method of AuthGuardService returns true.
Component-Less Route
We can create a path without component. It is useful to guard child routes. Find the code snippet which is usingcanActivateChild route guard that has no component.
const countryRoutes: Routes = [
  {
    path: 'country',
    component: CountryComponent,
    canActivate: [
    	(route: ActivatedRouteSnapshot, state: RouterStateSnapshot) =>
		inject(AuthGuardService).canActivate(route, state),
    ],
    children: [
      {
        path: '',
        canActivateChild: [
           (route: ActivatedRouteSnapshot, state: RouterStateSnapshot) =>
		       inject(AuthGuardService).canActivateChild(route, state),
        ],
        children: [
          { path: 'view', component: CountryDetailComponent },
          { path: 'add', component: AddCountryComponent }
        ]
      }
    ]
  }
];
Complete Example
Here I will provide a complete example to guard routes withcanActivate and canActivateChild properties of Route interface. I will create a login application for authentication. When a user tries to navigate any route and if user has not logged in then user will be redirected to login page. After logged-in, user can navigate protected routes. In our application there are two types of role, ADMIN and USER role. We will allow user to access some routes on the basis of authorization. We will restrict some routes for user with USER role and will be accessible only for ADMIN. Authentication will be done using canActivate and authorization will be done using canActivateChild property.
Step-1: Create Login Service
First of all we will create a service that will authenticate a user. We will also create a method to check if user is logged in, setter and getter method for redirect URL, method to get login URL, method to get logged in user and method to logout user.user.ts
export class User {
  constructor(public userId:number, public username:string, public password:string, public role:string) {
  }
}
import { Injectable } from '@angular/core';
import { Observable, of } from 'rxjs';
import { map } from 'rxjs/operators';

import { User } from './user';

const USERS = [
	new User(1, 'mahesh', 'm123', 'ADMIN'),
	new User(2, 'krishna', 'k123', 'USER')
];
let usersObservable = of(USERS);

@Injectable()
export class AuthService {
	private redirectUrl: string = '/';
	private loginUrl: string = '/login';
	private isloggedIn: boolean = false;
	private loggedInUser = {} as User;
	getAllUsers(): Observable<User[]> {
		return usersObservable;
	}
	isUserAuthenticated(username: string, password: string): Observable<boolean> {
		return this.getAllUsers().pipe(
			map(users => {
				let user = users.find(user => (user.username === username) && (user.password === password));
				if (user) {
					this.isloggedIn = true;
					this.loggedInUser = user;
				} else {
					this.isloggedIn = false;
				}
				return this.isloggedIn;
			}));
	}
	isUserLoggedIn(): boolean {
		return this.isloggedIn;
	}
	getRedirectUrl(): string {
		return this.redirectUrl;
	}
	setRedirectUrl(url: string): void {
		this.redirectUrl = url;
	}
	getLoginUrl(): string {
		return this.loginUrl;
	}
	getLoggedInUser(): User {
		return this.loggedInUser;
	}
	logoutUser(): void {
		this.isloggedIn = false;
	}
}
Step-2: Create Service with canActivate() and canActivateChild() Functions
Find the service that is definingcanActivate and canActivateChild functions.
auth-guard.service.ts
import { Injectable } from '@angular/core';
import { Router, ActivatedRouteSnapshot, RouterStateSnapshot } from '@angular/router';
import { AuthService } from './auth.service';

@Injectable()
export class AuthGuardService {

	constructor(private authService: AuthService, private router: Router) {
	}
	canActivate(route: ActivatedRouteSnapshot, state: RouterStateSnapshot): boolean {
		const url: string = state.url;
		console.log('Url:' + url);
		if (this.authService.isUserLoggedIn()) {
			return true;
		}
		this.authService.setRedirectUrl(url);
		this.router.navigate([this.authService.getLoginUrl()]);
		return false;
	}
	canActivateChild(route: ActivatedRouteSnapshot, state: RouterStateSnapshot): boolean {
		const loggedInUser = this.authService.getLoggedInUser();
		if (loggedInUser.role === 'ADMIN') {
			return true;
		} else {
			console.log('Unauthorized to open link: ' + state.url);
			return false;
		}
	}
}
canActivate() will return true if user is already logged-in. If user is not logged-in already then the current route will be saved and user will be redirected to login page. In login component, once the user successfully logged-in, user will be redirected to its saved URL.
canActivateChild() will return true, if user role is ADMIN. This is used with child routes when we want to restrict unauthorized access. In our application we have routes that will be accessed only by ADMIN role and not by USER role.
Step-3: Create Route with canActivate Property
Find the routes guarded bycanActivate property.
app-routing.module.ts
import { NgModule, inject } from '@angular/core';
import { ActivatedRouteSnapshot, RouterModule, RouterStateSnapshot, Routes } from '@angular/router';
import { AuthGuardService } from './authentication/services/auth-guard.service';
import { DashboardLayoutComponent } from './layout/dashboard.layout.component';
import { AddressComponent } from './address/address.component';

const routes: Routes = [
	{
		path: '',
		redirectTo: '/article',
		pathMatch: 'full'
	},
	{
		path: '',
		component: DashboardLayoutComponent,
		canActivate: [
			(route: ActivatedRouteSnapshot, state: RouterStateSnapshot) =>
				inject(AuthGuardService).canActivate(route, state),
		],
		children: [
			{
				path: 'article',
				loadChildren: () => import('./article/article.module').then(m => m.ArticleModule)
			},
			{
				path: 'address',
				component: AddressComponent
			}
		]
	},
	{
		path: 'login',
		loadChildren: () => import('./authentication/auth.module').then(m => m.AuthModule)
	}
];

@NgModule({
	imports: [
		RouterModule.forRoot(routes)
	],
	exports: [
		RouterModule
	]
})
export class AppRoutingModule { }
canActivate property at layout entry point. When we try to navigate routes of layout or its children, the routes will be guarded by canActivate. In the service AuthGuardService, the method canActivate() decides whether we can navigate to protected URL or not. Once the user has logged-in, canActivate() will return true and user can navigate to protected URL.
Find the application module used in our example.
app.module.ts
import { NgModule }   from '@angular/core';
import { BrowserModule } from '@angular/platform-browser';

import { AppComponent }  from './app.component';
import { AppRoutingModule }  from './app-routing.module';
import { DashboardLayoutComponent }  from './layout/dashboard.layout.component';
import { AddressComponent }  from './address/address.component';
import { LogoutComponent } from './authentication/logout.component';
import { AuthGuardService } from './authentication/services/auth-guard.service';
import { AuthService } from './authentication/services/auth.service';

@NgModule({
  imports: [
        BrowserModule,
	AppRoutingModule,
  ],
  declarations: [
        DashboardLayoutComponent,
	AddressComponent,
	LogoutComponent,
        AppComponent
  ],
  providers: [
        AuthService,
        AuthGuardService
  ],
  bootstrap: [ AppComponent ]
})
export class AppModule { }
Step-4: Create Route with canActivateChild Property
Find the routes guarded bycanActivateChild property.
article-routing.module.ts
import { NgModule, inject } from '@angular/core';
import { ActivatedRouteSnapshot, RouterModule, RouterStateSnapshot, Routes } from '@angular/router';
import { ArticleComponent } from './article.component';
import { ArticleListComponent } from './article-list/article.list.component';
import { ArticleEditComponent } from './article-list/edit/article.edit.component';
import { AuthGuardService } from '../authentication/services/auth-guard.service';

const articleRoutes: Routes = [
	{
		path: '',
		component: ArticleComponent,
		children: [
			{
				path: 'list',
				component: ArticleListComponent,
				canActivateChild: [
					(route: ActivatedRouteSnapshot, state: RouterStateSnapshot) =>
						inject(AuthGuardService).canActivateChild(route, state),
				],
				children: [
					{
						path: ':id',
						component: ArticleEditComponent
					}
				]
			}
		]
	}
];

@NgModule({
	imports: [RouterModule.forChild(articleRoutes)],
	exports: [RouterModule]
})
export class ArticleRoutingModule { }
CanActivateChildFn guards the child routes of a route that is using canActivateChild property. It works in the same way as canActivate. In the service AuthGuardService, the method canActivateChild() returns true if the user role is ADMIN. When the canActivateChild() returns true, the protected children routes can be navigated otherwise cannot be navigated.
Find the article module used in the example.
article.module.ts
import { NgModule }   from '@angular/core';
import { CommonModule }   from '@angular/common';
import { ReactiveFormsModule }    from '@angular/forms';

import { ArticleComponent }  from './article.component';
import { ArticleListComponent }  from './article-list/article.list.component';
import { ArticleEditComponent }  from './article-list/edit/article.edit.component';
import { ArticleService } from './services/article.service';
import { ArticleRoutingModule } from './article-routing.module';

@NgModule({
  imports: [
        CommonModule,
	ReactiveFormsModule,
	ArticleRoutingModule
  ],
  declarations: [
	ArticleComponent,
	ArticleListComponent,
	ArticleEditComponent
  ],
  providers: [ ArticleService ]
})
export class ArticleModule { }
Step-5: Create Login/Logout Component and Module
We will create a login application here. If user is not authenticated, and user tries to access the dashboard layout route or its children route then it will redirect to login route saving the current route in login service. Once the user is logged-in, the login component will redirect the user to route saved in login service. Login service code has been given on the start of article. Now find the other files of our login application.login.component.html
<h3>Login Form</h3>
<div *ngIf="invalidCredentialMsg" ngClass="error">{{invalidCredentialMsg}}</div>
<div>
	<form [formGroup]="loginForm" (ngSubmit)="onFormSubmit()">
	  <p>User Name: <input formControlName="username"></p>
	  <p>Password: <input type="password" formControlName="password"></p>
	  <p><button type="submit">Submit</button></p>
	</form>
</div>
import { Component } from '@angular/core';
import { FormControl, FormGroup } from '@angular/forms';
import { Router } from '@angular/router';
import { AuthService } from './services/auth.service';

@Component({
	templateUrl: './login.component.html',
	styleUrls: ['./login.component.css']
})
export class LoginComponent {
	invalidCredentialMsg = '';
	constructor(private authService: AuthService, private router: Router) {
	}
	loginForm = new FormGroup({
		username: new FormControl(),
		password: new FormControl()
	});
	onFormSubmit() {
		let uname = this.loginForm.get('username')?.value;
		let pwd = this.loginForm.get('password')?.value;
		this.authService.isUserAuthenticated(uname, pwd).subscribe(
			authenticated => {
				if (authenticated) {
					let url = this.authService.getRedirectUrl();
					console.log('Redirect Url:' + url);
					this.router.navigate([url]);
				} else {
					this.invalidCredentialMsg = 'Invalid Credentials. Try again.';
				}
			}
		);
	}
}
:host {
   position: absolute;
   background-color: #eaedf2;
   top: 10%;
   left: 5%;
   border: 3px solid black;
}
import { Component, OnInit } from '@angular/core';
import { FormControl, FormGroup } from '@angular/forms';
import { Router } from '@angular/router';
import { AuthService } from './services/auth.service';
import { User } from './services/user';

@Component({
    selector: 'logout',
    template: `Logged In: {{loggedInUser.username}} | {{loggedInUser.role}} |
           <button input='input' (click)="logout()">Logout</button>
	`
})
export class LogoutComponent {
    loggedInUser = {} as User;
    constructor(private authService: AuthService, private router: Router) {
    }
    ngOnInit() {
        this.loggedInUser = this.authService.getLoggedInUser();
    }
    logout() {
        this.authService.logoutUser();
        this.router.navigate([this.authService.getLoginUrl()]);
    }
}
import { NgModule } from '@angular/core';
import { RouterModule, Routes } from '@angular/router';

import { LoginComponent }  from './login.component';

const authRoutes: Routes = [
	{
	  path: '',
	  component: LoginComponent
	}
];

@NgModule({
  imports: [ RouterModule.forChild(authRoutes) ],
  exports: [ RouterModule ]
})
export class AuthRoutingModule{ }
import { NgModule }   from '@angular/core';
import { CommonModule }   from '@angular/common';
import { ReactiveFormsModule }    from '@angular/forms';

import { LoginComponent }  from './login.component';
import { AuthRoutingModule }  from './auth-routing.module';

@NgModule({
  imports: [
        CommonModule,
	ReactiveFormsModule,
	AuthRoutingModule
  ],
  declarations: [
        LoginComponent
  ]
})
export class AuthModule { }
Step-6: Other Components used in Demo
For the route guard demo, we have created an article application. A user can visit the article and edit the article. There is also an address component used in our demo. Now find the rest of the components used in our example.app.component.ts
import { Component } from '@angular/core';

@Component({
  selector: 'app-root',
  template: `
	<div [ngClass] = "'parent-container'">
	  <router-outlet></router-outlet>
	</div>
  `
})
export class AppComponent {
}
import { Component } from '@angular/core';
@Component({
  template: `
	<nav [ngClass] = "'parent-menu'">
	  <ul>
		 <li><a routerLink="/article" routerLinkActive="active" >Article</a></li>
		 <li><a routerLink="/address" routerLinkActive="active">Address</a></li>
	  </ul>
	</nav>
	<logout></logout>
	<div [ngClass] = "'parent-container'">
	  <router-outlet></router-outlet>
	</div>
  `
})
export class DashboardLayoutComponent {
}
<h3>Edit Article</h3>
<p *ngIf="article"><b>Article Id: {{article.articleId }} </b></p>
<form [formGroup]="articleForm" (ngSubmit)="onFormSubmit()">
   <p> Title: <input formControlName="title"> </p>
   <p> Category: <input formControlName="category"> </p>
   <p> <button>Update</button> </p>
</form>
import { Component, OnInit } from '@angular/core';
import { ActivatedRoute, Router, Params } from '@angular/router';
import { FormControl, FormGroup } from '@angular/forms';
import { switchMap } from 'rxjs/operators';

import { ArticleService } from '../../services/article.service';
import { Article } from '../../services/article';

@Component({
	templateUrl: './article.edit.component.html'
})
export class ArticleEditComponent implements OnInit {
	article = {} as Article;
	constructor(
		private articleService: ArticleService,
		private route: ActivatedRoute,
		private router: Router) { }

	ngOnInit() {
		this.route.params.pipe(
			switchMap((params: Params) => this.articleService.getArticle(+params['id']))
		).subscribe(article => {
			this.article = article ?? {} as Article;
			this.setFormValues();
		});
	}
	articleForm = new FormGroup({
		title: new FormControl(),
		category: new FormControl()
	});
	setFormValues() {
		this.articleForm.setValue({ title: this.article?.title, category: this.article?.category });
	}
	onFormSubmit() {
		this.article.title = this.articleForm.get('title')?.value;
		this.article.category = this.articleForm.get('category')?.value;
		this.articleService.updateArticle(this.article)
			.subscribe(() =>
				this.router.navigate(['../'], { relativeTo: this.route })
			);
	}
}
<h3>Article List</h3>
<div *ngFor="let article of articles | async" [ngClass]= "'sub-child-menu'">
  <p>{{article.articleId}}. {{article.title}}, {{article.category}}
     <button type="button" (click)="goToEdit(article)">Edit</button>
  </p>
</div>
<div [ngClass]= "'sub-child-container'">
	<router-outlet></router-outlet>
</div>
import { Component, OnInit } from '@angular/core';
import { ActivatedRoute, Router } from '@angular/router';
import { Observable } from 'rxjs';

import { ArticleService } from '../services/article.service';
import { Article } from '../services/article';

@Component({
  templateUrl: './article.list.component.html'
})
export class ArticleListComponent implements OnInit {
  articles: Observable<Article[]>;
  constructor(
        private articleService: ArticleService,
        private route: ActivatedRoute,
        private router: Router) {
          this.articles = this.articleService.getArticles();
        }
  ngOnInit() {
  }
  goToEdit(article: Article) {
      this.router.navigate([ article.articleId ], { relativeTo: this.route });
  }
}
export class Article {
	constructor(public articleId:number, public title:string, public category:string) {
	}
}
import { Injectable } from '@angular/core';
import { of } from 'rxjs';
import { map } from 'rxjs/operators';

import { Article } from './article';

const ARTICLES = [
	new Article(1, 'Core Java Tutorial', 'Java'),
	new Article(2, 'Angular Tutorial', 'Angular'),
	new Article(3, 'Hibernate Tutorial', 'Hibernate')
];
let articlesObservable = of(ARTICLES);

@Injectable()
export class ArticleService {
	getArticles() {
		return articlesObservable;
	}
	getArticle(id: number) {
		return this.getArticles().pipe(
			map(articles => articles.find(article => article.articleId === id))
		);
	}
	updateArticle(article: Article) {
		return this.getArticles().pipe(
			map(articles => {
				let articleObj = articles.find(ob => ob.articleId === article.articleId);
				articleObj = article;
				return articleObj;
			}));
	}
}
import { Component } from '@angular/core';

@Component({
  template: `<h2>Welcome to Article Home</h2>
        <p>Find article <a routerLink="list" routerLinkActive="active">list</a></p>
	<div [ngClass] = "'child-container'">
	  <router-outlet></router-outlet>
	</div>
  `
})
export class ArticleComponent {
}
import { Component } from '@angular/core';
@Component({
  template: `
          <h3>ADDRESS</h3>
          <p><b> Article: Child routing & Relative navigation </b></p>
	  <p><b> Category: Angular </b></p>
	  <p><b> Website: CONCRETEPAGE.COM </b></p>
  `
})
export class AddressComponent {
}
.parent-menu ul {
    list-style-type: none;
    margin: 0;
    padding: 0;
    overflow: hidden;
    background-color: #333;
}
.parent-menu li {
    float: left;
}
.parent-menu li a {
    display: block;
    color: white;
    text-align: center;
    padding: 15px 15px;
    text-decoration: none;
}
.parent-menu li a:hover:not(.active) {
    background-color: #111;
}
.parent-menu .active{
    background-color: #4CAF50;
}
.parent-container {
    padding-left: 10px;
}
.child-container {
    padding-left: 10px;
}
.sub-child-container {
    padding-left: 10px;
}
.child-menu  {
    padding-left: 25px;
}
.child-menu .active{
    color: #4CAF50;
}
.sub-child-menu {
    background-color: #f1f1f1;
    width: 275px;
    list-style-type: none;
    margin: 0;
    padding: 0;
}
.sub-child-menu .active{
    color: #4CAF50;
}
.error {
    color: red;
    font-size: 20px;
}
button {
    background-color: #008CBA;
    color: white;
}
Run Application
Download source code using download link given below on this page and run the application.Login with ADMIN role user mahesh/m123.


