Build Android Project with Maven
November 01, 2014
This page will explain how to build android project using maven. We will provide a demo step by step and create apk file by running the pom.xml.
Software Required
1. JDK 72. Maven 3.1
3. Android SDK
4. Eclipse
Create a Project Structure in Eclipse
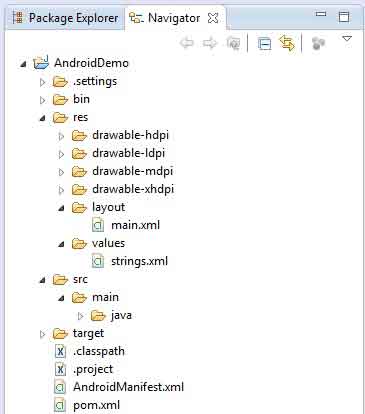
For the android project we need to create below structure.
res\values : Create strings.xml file to configure variable.
res\layout : We will keep here XML files layout.
Create drawable directory to keep ic_launcher.png
pom.xml file to Build Android Project
Find the pom.xml. Configured here the entire JAR dependency required to run the android project.pom.xml
<?xml version="1.0" encoding="UTF-8"?>
<project xmlns="http://maven.apache.org/POM/4.0.0" xmlns:xsi="http://www.w3.org/2001/XMLSchema-instance"
    xsi:schemaLocation="http://maven.apache.org/POM/4.0.0 http://maven.apache.org/maven-v4_0_0.xsd">
    <modelVersion>4.0.0</modelVersion>
    <groupId>com.concretepage</groupId>
    <artifactId>android</artifactId>
    <version>1</version>
    <packaging>apk</packaging>
    <properties>
        <project.build.sourceEncoding>UTF-8</project.build.sourceEncoding>
        <project.reporting.outputEncoding>UTF-8</project.reporting.outputEncoding>
    </properties>
    <dependencies>
        <dependency>
            <groupId>com.google.android</groupId>
            <artifactId>android</artifactId>
            <version>4.1.1.4</version>
            <scope>provided</scope>
        </dependency>
    </dependencies>
    <build>
        <plugins>
            <plugin>
                <groupId>com.jayway.maven.plugins.android.generation2</groupId>
                <artifactId>android-maven-plugin</artifactId>
                <version>3.9.0-rc.1</version>
                <configuration>
                    <sdk>
                        <platform>20</platform>
                    </sdk>
                    <deleteConflictingFiles>true</deleteConflictingFiles>
                    <undeployBeforeDeploy>true</undeployBeforeDeploy>
                </configuration>
                <extensions>true</extensions>
            </plugin>
            <plugin>
                <artifactId>maven-compiler-plugin</artifactId>
                <version>3.1</version>
                <configuration>
                    <source>1.7</source>
                    <target>1.7</target>
                </configuration>
            </plugin>
        </plugins>
    </build>
</project>
android-maven-plugin: We need to configure android-maven-plugin with the version.
settings.xml to Set Android SDK Path
While building android project with maven, it searches for Android SDK path. We can configure it as below. 1. Create settings.xml as below.settings.xml
<settings>
  <profiles>
    <profile>
        <id>android-settings</id>
        <properties>
            <android.sdk.path>user-home\android-sdks</android.sdk.path>
        </properties>
    </profile>
  </profiles>
  <activeProfiles>
        <activeProfile>android-settings</activeProfile>
  </activeProfiles>
</settings>
Write Code for Android Project
Now we will create a sample android project. Find the activity class.TimeDemoActivity.java
package com.concretepage.android;
import java.util.Calendar;
import android.os.Bundle;
import android.widget.TextView;
import android.app.Activity;
public class TimeDemoActivity extends Activity {
    @Override
    public void onCreate(Bundle savedInstanceState) {
        super.onCreate(savedInstanceState);
        setContentView(R.layout.main);
    }
    @Override
    public void onStart() {
        super.onStart();
        TextView textView = (TextView) findViewById(R.id.text_view);
        Calendar  calender = Calendar.getInstance();
        textView.setText(calender.getTime().toString());
    }
}
AndroidManifest.xml
<?xml version="1.0" encoding="utf-8"?>
<manifest xmlns:android="http://schemas.android.com/apk/res/android"
    package="com.concretepage.android"
    android:versionCode="1"
    android:versionName="1.0" >
    <uses-sdk android:minSdkVersion="11" android:targetSdkVersion="11" />
    <application
        android:allowBackup ="false"
        android:icon="@drawable/ic_launcher"
        android:label="@string/app_name" >
        <activity
            android:name=".TimeDemoActivity"
            android:label="@string/app_name" >
            <intent-filter>
                <action android:name="android.intent.action.MAIN" />
                <category android:name="android.intent.category.LAUNCHER" />
            </intent-filter>
        </activity>
    </application>
</manifest>
main.xml
<?xml version="1.0" encoding="utf-8"?>
<LinearLayout xmlns:android="http://schemas.android.com/apk/res/android"
    android:orientation="vertical"
    android:layout_width="fill_parent"
    android:layout_height="fill_parent"
    >
<TextView
    android:id="@+id/text_view"
    android:layout_height="fill_parent"
    android:layout_width="fill_parent"
    />
</LinearLayout>
strings.xml
<?xml version="1.0" encoding="utf-8"?>
<resources>
    <string name="app_name">Android-Maven</string>
</resources>
Maven Command to Build Android Project
To build the project, open the command prompt and navigate to project root directory. Run the below command.1. mvn eclipse:eclipse : configure .classpath for eclipse.
2. mvn clean package : cleans the old apk file and generates new one. Apk file is created inside target directory.


